# ElementUI 以函数的方式打开 Dialog
ElementUI (opens new window) 有一个 MessageBox (opens new window) 的组件,提供了全局方法 (opens new window)打开消息弹框,但是 Dialog (opens new window) 却没有提供这样的方法,这篇文章我们来研究一下怎样以函数的方式打开对话框。
Vue 2.6.14 + ElementUI 2.15.14
# 现状
一般我们都是这样使用 dialog:首先新建一个文件,自定义 dialog,然后在页面代码里引入这个自定义 dialog,通过 visible 属性控制打开或者关闭 dialog,最后处理 confirm 或者 cancel 的事件。
# 自定义 dialog
<!-- CustomDialog.vue -->
<template>
  <el-dialog title="提示" :visible.sync="dialogVisible" width="30%">
    <span>这是一段信息</span>
    <span slot="footer" class="dialog-footer">
      <el-button @click="cancel">取 消</el-button>
      <el-button type="primary" @click="confirm">确 定</el-button>
    </span>
  </el-dialog>
</template>

<script>
export default {
  props: {
    visible: {
      type: Boolean,
      default: false,
    },
  },
  computed: {
    dialogVisible: {
      get() {
        return this.visible;
      },
      set(newVal) {
        this.$emit("update:visible", newVal);
      },
    },
  },
  methods: {
    cancel() {
      this.$emit("cancel");
    },
    confirm() {
      this.$emit("confirm");
    },
  },
};
</script>
2
3
4
5
6
7
8
9
10
11
12
13
14
15
16
17
18
19
20
21
22
23
24
25
26
27
28
29
30
31
32
33
34
35
36
37
38
39
# 使用 dialog
<template>
  <div class="Dialog">
    <el-button type="primary" size="default" @click="openDialog">Open Dialog</el-button>
    <CustomDialog
      :visible.sync="visible"
      @confirm="handleConfirm"
      @cancel="handleCancel"></CustomDialog>
  </div>
</template>

<script>
import CustomDialog from "@/components/CustomDialog.vue";
export default {
  components: {
    CustomDialog,
  },
  data() {
    return {
      visible: false,
    };
  },
  methods: {
    openDialog() {
      this.visible = true;
    },
    handleConfirm() {
      // 处理确认事件
      this.visible = false;
    },
    handleCancel() {
      // 处理取消事件
      this.visible = false;
    },
  },
};
</script>
2
3
4
5
6
7
8
9
10
11
12
13
14
15
16
17
18
19
20
21
22
23
24
25
26
27
28
29
30
31
32
33
34
35
36
从上面的代码我们可以看到,一个 dialog,相应地有一个 visible 属性和 handleConfirm、handleCancel 两个方法,随着 dialog 越来越多,这个页面的代码就越来越不好阅读希望像 this.$confirm 一样以函数的方式打开 dialog,以 Promise 的方式来处理 confirm/cancel,像下面这样:
this.$showDialog(options).then().catch()
这样展示 dialog 和处理 dialog 的逻辑在同一个地方,业务逻辑比较清晰,且无需额外定义控制属性和处理方法。
# 组件
平常我们都是通过 Vue 模板创建组件的,其实 Vue 还提供了很多种方式来创建组件,下面我们来看看
# Vue 模板
这个是我们常用创建组件的方式
<template>
  <div>
    <div>Vue 模板组件</div>
    <el-button type="primary" @click="increase"> You clicked me {{ count }} times. </el-button>
  </div>
</template>

<script>
export default {
  name: "FileCounter",
  data() {
    return {
      count: 0,
    };
  },
  methods: {
    increase() {
      this.count += 1;
    },
  },
};
</script>
2
3
4
5
6
7
8
9
10
11
12
13
14
15
16
17
18
19
20
21
22
# Template 字符串
通过 Template 字符串也可以创建组件,Vue 官网上大部分例子都是通过 Template 字符串来创建组件的
export default {
  data() {
    return {
      count: 0,
    };
  },
  methods: {
    increase() {
      this.count += 1;
    },
  },
  template:
    '<div><div>Template字符串组件</div><el-button type="primary" @click="increase">You clicked me {{ count }} times.</el-button></div>',
};
2
3
4
5
6
7
8
9
10
11
12
13
14
也可以使用 ID 选择器来指向一个元素,例如:
template: '#my-template-element'
# render 函数
在实际应用中基本上不会使用 Template 字符串来创建组件,因为代码不好阅读、不好调试、不好维护,除了 Vue 模板创建组件外,另一种常用的方式就是使用 render 函数,让你拥有 JavaScript 的完全编程的能力。
render 函数通过 createElement 来创建 VNode,其实不管是 Vue 模版还是 Template 字符串最终都会被编译为 createElement,最后创建 VNode
export default {
  data() {
    return {
      count: 0,
    };
  },
  methods: {
    increase() {
      this.count += 1;
    },
  },
  render(createElement) {
    return createElement("div", [
      createElement("div", "Render函数组件"),
      createElement(
        "el-button",
        {
          props: {
            type: "primary",
          },
          on: {
            click: this.increase,
          },
        },
        `You clicked me ${this.count} times.`,
      ),
    ]);
  },
};
2
3
4
5
6
7
8
9
10
11
12
13
14
15
16
17
18
19
20
21
22
23
24
25
26
27
28
29
# JSX
从上面的例子中,我们看到 createElement API 比较繁琐,如果你既想拥有 JavaScript 的完全编程的能力,又想代码简洁,可以使用 JSX,类似于 React。Vue-CLI (opens new window) 提供了开箱即用的 JSX 支持,如果你使用的是别的工具,比如 Webpack,则需要安装一个 Babel 插件 (opens new window)。
export default {
  data() {
    return {
      count: 0,
    };
  },
  methods: {
    increase() {
      this.count += 1;
    },
  },
  render() {
    return (
      <div>
        <div>JSX组件</div>
        <el-button type="primary" onClick={this.increase}>
          You clicked me {this.count} times.
        </el-button>
      </div>
    );
  },
};
2
3
4
5
6
7
8
9
10
11
12
13
14
15
16
17
18
19
20
21
22
可以看出代码如 Vue 模板一样简洁,有点类似 React Class 组件
# 手动创建组件实例
以函数的方式打开对话框需要手动创建组件实例,有两种方式:
new Vue()
const instance = new Vue({
  render: h => h(Component),
})
2
3
Vue.extend()
const CustomDialogConstructor = Vue.extend(CustomDialog);
const instance = new CustomDialogConstructor();
2
因为第二种方式更加简洁,所以这里使用第二种方式
# 实现
首先我们定义个通用的 dialog,可以自定义标题、内容、底部按钮
<!-- CommonDialog.vue -->
<template>
  <el-dialog :title="title" :visible.sync="dialogVisible" width="30%" destroy-on-close>
    <slot></slot>
    <span slot="footer" class="dialog-footer">
      <el-button
        v-for="button in buttons"
        :key="button.action"
        :type="button.type"
        @click="click(button)">
        {{ button.text }}
      </el-button>
    </span>
  </el-dialog>
</template>

<script>
export default {
  props: {
    visible: {
      type: Boolean,
      default: false,
    },
    // 标题
    title: {
      type: String,
      default: "",
    },
    // 是否自动关闭
    autoClose: {
      type: Boolean,
      default: true,
    },
    // 点击按钮的回调
    callback: {
      type: Function,
    },
    // 底部按钮数组
    buttons: {
      type: Array,
      default() {
        return [
          {
            action: "cancel",
            text: "取消",
            type: "default",
          },
          {
            action: "confirm",
            text: "确定",
            type: "primary",
          },
        ];
      },
    },
  },
  computed: {
    dialogVisible: {
      get() {
        return this.visible;
      },
      set(newVal) {
        this.$emit("update:visible", newVal);
      },
    },
  },
  methods: {
    click(button) {
      if (this.autoClose) {
        this.close();
      }
      this.callback?.({
        action: button.action,
      });
    },
    close() {
      this.dialogVisible = false;
    },
  },
};
</script>
2
3
4
5
6
7
8
9
10
11
12
13
14
15
16
17
18
19
20
21
22
23
24
25
26
27
28
29
30
31
32
33
34
35
36
37
38
39
40
41
42
43
44
45
46
47
48
49
50
51
52
53
54
55
56
57
58
59
60
61
62
63
64
65
66
67
68
69
70
71
72
73
74
75
76
77
78
79
80
81
然后定义函数来打开 dialog
import CommonDialog from "@/components/CommonDialog";
import Vue from "vue";

export const showDialog = (options, vnode) => {
  const CommonDialogConstructor = Vue.extend(CommonDialog);
  let instance = new CommonDialogConstructor();
  for (const prop in options) {
    if (Object.hasOwn(options, prop)) {
      instance.prop = options[prop];
    }
  }
  if (vnode) {
    instance.$slots.default = [vnode];
  }
  instance.$mount();
  document.body.appendChild(instance.$el);
  instance.$once("update:visible", newVal => {
    if (!newVal) {
      instance.$destroy();
      document.body.removeChild(instance.$el);
      instance = null;
    }
  });
  Vue.nextTick(() => {
    instance.visible = true;
  });
  return new Promise((resolve, reject) => {
    instance.callback = res => {
      if (res.action !== "cancel") {
        resolve({
          ...res,
          instance,
        });
      } else {
        reject({
          ...res,
          instance,
        });
      }
    };
  });
};
2
3
4
5
6
7
8
9
10
11
12
13
14
15
16
17
18
19
20
21
22
23
24
25
26
27
28
29
30
31
32
33
34
35
36
37
38
39
40
41
42
添加为全局方法
import { showDialog } from "@/utils";
Vue.prototype.$showDialog = showDialog;
2
最后我来看看使用效果
async openDialog() {
  try {
    const h = this.$createElement;
    const res = await this.$showDialog({ autoClose: true }, [
      h("span", "This is "),
      h("i", { style: "color: teal" }, "VNode"),
    ]);
    console.log(res.action);
  } catch (res) {
    console.log(res.action);
  }
}
2
3
4
5
6
7
8
9
10
11
12
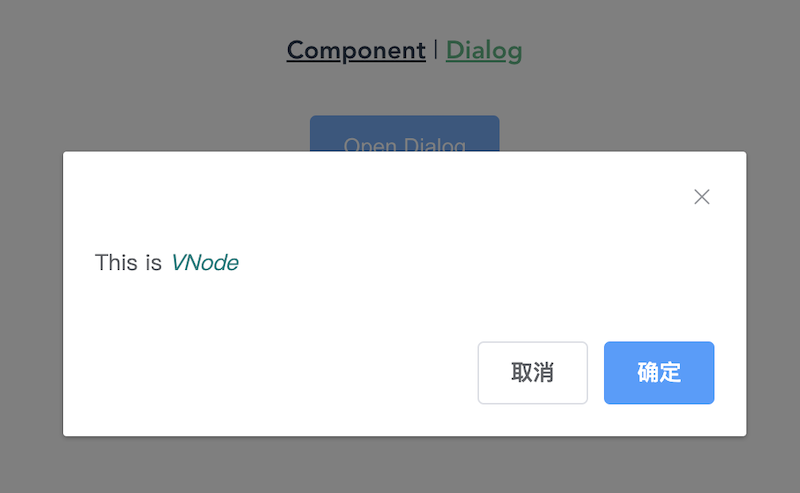
# Demo
elementui-dialog-demo (opens new window)