# Learn Express
上一篇文章 创建 Node.js 后台服务,我们使用 Express 创建了一个用户管理系统的后台服务,并用 React + Ant Design 创建了一个 Web 前端系统来使用和验证创建的后台服务。其实正如 Express 官网 (opens new window)说的,Express 是 Node.js 的一个快速的,独立的,极简的 web 框架("Fast, unopinionated, minimalist web framework for Node.js"),非常适用于创建 web 服务。这篇文章我们将使用 Express 创建 web 服务。
因为篇幅原因,我们将分成两部分,这部分主要介绍 Express 框架。
Express 框架主要由 3 大核心组成:路由、中间件以及错误处理,下面我们将一一介绍。
# 安装
$ npm init --yes
$ npm install express
2
express 当前版本是 5.x,要求 node 18+
# 从 Hello World 开始
使用 express 创建一个 web 服务,创建 app.js
// app.js
import express from "express"
const app = express()
const port = 3000

app.get('/', (req, res) => {
  res.send('Hello World!')
})

app.listen(port, () => {
  console.log(`Example app listening on port ${port}`)
})
2
3
4
5
6
7
8
9
10
11
12
开启服务
$ node app.js
在浏览器地址栏里输入 http://localhost:3000/ ,就能看到浏览器上显示 "Hello World!"
# 生成器
Express 提供了一个快速创建 Express 应用的工具 express-generator (opens new window)
express-generator最新版本 4.16.1 发布于 6 年前,里面用到的一些技术已经过时了,比如hogan.js、compass
# 安装
$ npm install -g express-generator
# CLI
express -h

  Usage: express [options] [dir]

    Options:

          --version        output the version number
      -e, --ejs            add ejs engine support
          --pug            add pug engine support
          --hbs            add handlebars engine support
      -H, --hogan          add hogan.js engine support
      -v, --view <engine>  add view <engine> support (dust|ejs|hbs|hjs|jade|pug|twig|vash) (defaults to jade)
          --no-view        use static html instead of view engine
      -c, --css <engine>   add stylesheet <engine> support (less|stylus|compass|sass) (defaults to plain css)
          --git            add .gitignore
      -f, --force          force on non-empty directory
      -h, --help           output usage information
2
3
4
5
6
7
8
9
10
11
12
13
14
15
16
17
express CLI 有三个有意思的选项,engine、view <engine> 和 css <engine>
# engine
模版引擎,之前支持 ejs、pug、hbs、hogan,从代码分析,现在推荐使用选项 view <engine>
if (options.view === true) {
  if (options.ejs) {
    options.view = 'ejs'
    warning("option `--ejs' has been renamed to `--view=ejs'")
  }

  if (options.hbs) {
    options.view = 'hbs'
    warning("option `--hbs' has been renamed to `--view=hbs'")
  }

  if (options.hogan) {
    options.view = 'hjs'
    warning("option `--hogan' has been renamed to `--view=hjs'")
  }

  if (options.pug) {
    options.view = 'pug'
    warning("option `--pug' has been renamed to `--view=pug'")
  }
}
2
3
4
5
6
7
8
9
10
11
12
13
14
15
16
17
18
19
20
21
# view <engine>
模版引擎,取代之前分散的 ejs、pug、hbs、hogan 4 个选项,支持 8 个模版引擎库 jade、dust、ejs、hbs、hjs、pug、twig (opens new window)、vash,默认是 jade。但是因为 express-generator 最新版本 4.16.1 发布于 6 年前,jade、dust、hjs、vash 以及用于 handlebars.js (opens new window) 的 hbs 都很久没有更新了。推荐使用 pugjs/pug (opens new window)、mde/ejs (opens new window)、handlebars-lang/handlebars.js (opens new window)。另外还有 marko-js/marko (opens new window)、mozilla/nunjucks (opens new window) 以及 janl/mustache.js (opens new window)。在下篇文章 使用 Express 创建 Web 服务 中将详细介绍模版引擎。
# css <engine>
默认是 css,支持 less、styleus、sass 和 compass(已过时)
# 创建应用
下面使用 pug 模版引擎创建 myapp 应用
express --view=pug myapp
将在当前目录下创建 myapp 应用,该应用的目录结构如下:
├── app.js
├── bin
|  └── www
├── package.json
├── public
|  ├── images
|  ├── javascripts
|  └── stylesheets
|     └── style.css
├── routes
|  ├── index.js
|  └── users.js
└── views
   ├── error.pug
   ├── index.pug
   └── layout.pug

directory: 7 file: 9
2
3
4
5
6
7
8
9
10
11
12
13
14
15
16
17
18
# 路由
路由是 Express 框架的核心组成部分,它表示服务器如何响应客户端的请求。其结构如下:
app.METHOD(PATH, HANDLER)
app,Express 应用实例METHOD,表示 HTTP 请求方法 (opens new window),以小写字母表示,比如get、post等PATH,路径,可以是字符串、字符串路径模式、正则表达式或者数组HANDLER,处理函数,可以有多个。每个处理函数都有三个参数,分别是请求(request),响应(response)以及链式控制函数(next)
比如之前 Hello World 的例子:
app.get('/', (req, res) => {
  res.send('Hello World!')
})
2
3
当外界发起一个根路径("/")的 get 请求时,响应其 "Hello World!"
# HTTP 请求方法
Express 支持大部分 HTTP 请求方法,比如 get、post、delete 等,完整列表请查看 app.METHOD (opens new window)。
app.get('/user', (req, res) => {
  res.send('cp3hnu')
})
2
3
如果服务器的响应与 HTTP 请求方法无关,也可以使用 app.all() (opens new window),这适用于统一处理各种请求方法。
app.all('/secret', (req, res, next) => {
  console.log('Accessing the secret section ...')
  next() // pass control to the next handler
})
2
3
4
app.route() (opens new window) 可以为路由路径创建可链接的路由处理函数,避免路径冗余和拼写错误。
app.route()(opens new window) 其实返回一个 Express 的Router实例 (opens new window),后面会讲到
app.route('/book')
  .get((req, res) => {
    res.send('Get a random book')
  })
  .post((req, res) => {
    res.send('Add a book')
  })
  .put((req, res) => {
    res.send('Update the book')
  })
2
3
4
5
6
7
8
9
10
# 路径
路由路径支持字符串、正则表达式以及两者的组合数组
Express 使用
path-to-regexp(opens new window) 匹配路由路径,以前 Vue-Router 也是使用这个库匹配路由路径,直到 Vue-Router 4.x 实现了自己的路由路径解析系统。Express Playground Router (opens new window) 是一个测试 Express 怎么匹配路由路径的工具。
// 字符串,/about
app.get('/about', (req, res) => {
  res.send('about')
})

// 正则表达式,匹配 /butterfly、/dragonfly 等
app.get(/.*fly$/, (req, res) => {
  res.send('/.*fly$/')
})

// 组合数组,匹配 /abcd、/xyza、/lmn 和 /pqr
app.use(['/abcd', '/xyza', /\/lmn|\/pqr/], (req, res, next) => {
  next()
})
2
3
4
5
6
7
8
9
10
11
12
13
14
Express 5.x 不再支持字符串路径模式
- 特殊符号
+、?不再支持,使用时报错。
// TypeError: Unexpected + at 3, expected END: https://git.new/pathToRegexpError
app.get('/ab+cd', (req, res) => {
  res.send('ab+cd')
})

// TypeError: Unexpected + at 3, expected END: https://git.new/pathToRegexpError
app.get('/ab?cd', (req, res) => {
  res.send('ab?cd')
})
2
3
4
5
6
7
8
9
?可以使用{}代替
app.get('/a{b}cd', (req, res) => {
  res.send('ab?cd')
})
2
3
- 特殊符号
*后面必须有一个名称,比如/*name,其作用等同于/:name
// 等同于 /^(?:\/api\/([\s\S]+))(?:\/$)?$/i
app.get('/api/*name', (req, res) => {
  res.send(req.params)
})

// 对于地址 http://localhost:3000/api/cp3hnu
// 输出:
// { "name": "cp3hnu" }
2
3
4
5
6
7
8
更多详情请参考 Migration Guide (opens new window)
# 参数
Express 和 Vue-Router 一样也支持路径参数,路径参数名只支持 [A-Za-z0-9_]
app.get('/users/:userId/books/:bookId', (req, res) => {
  res.send(res.params)
})

// 对于地址 http://localhost:3000/users/34/books/8989
// 输出:
// { "userId": "34", "bookId": "8989" }
2
3
4
5
6
7
连字符(-)和点(.)是按字面意思解释的,因此它们可以与路由参数一起使用
app.get('/flights/:from-:to', (req, res) => {
  res.send(res.params)
})

// 对于地址 http://localhost:3000/plantae/:genus.:species
// 输出:
// { "from": "LAX", "to": "SFO" }

app.get('/plantae/:genus.:species', (req, res) => {
  res.send(res.params)
})

// 对于地址 http://localhost:3000/plantae/:genus.:species
// 输出:
// { "genus": "Prunus", "species": "persica" }
2
3
4
5
6
7
8
9
10
11
12
13
14
15
Express 4.x 限制变量的方式,比如 /:id(\\\d+),可以用正则表达式代替
// 索引
app.get(/\/users\/([0-9]+)/, (req, res, next) => {
  res.send(req.params.0);
})

// 对于地址 http://localhost:3000/users/34
// 输出:
// { "0": "34" }

// 更好的方法是使用命名捕获组
app.get(/\/users\/(?<id>[0-9]+)/, (req, res, next) => {
  res.send(req.params.id);
})

// 对于地址 http://localhost:3000/users/34
// 输出:
// { "id": "34" }
2
3
4
5
6
7
8
9
10
11
12
13
14
15
16
17
# 处理函数
一个路由地址可以提供单个处理函数、多个处理函数和处理函数数组以及前面三者的组合。
当提供多个处理函数或者数组时,必须手动调用 next() 函数,才会执行下一个处理函数。
注意,这个时候调用
next()函数不能带有任何参数
// 单个
app.get('/example/a', (req, res) => {
  res.send('Hello from A!')
})

// 多个
app.get('/example/b', (req, res, next) => {
  console.log('the response will be sent by the next function ...')
  next()  // 必须手动调用 next() 函数
}, (req, res) => {
  res.send('Hello from B!')
})

// 数组
const cb0 = function (req, res, next) {
  console.log('CB0')
  next() // 必须手动调用 next() 函数
}

const cb1 = function (req, res, next) {
  console.log('CB1')
  next() // 必须手动调用 next() 函数
}

const cb2 = function (req, res) {
  res.send('Hello from C!')
}

app.get('/example/c', [cb0, cb1, cb2])

// 组合
app.get('/example/d', [cb0, cb1], (req, res, next) => {
  console.log('the response will be sent by the next function ...')
  next() // 必须手动调用 next() 函数
}, (req, res) => {
  res.send('Hello from D!')
})
2
3
4
5
6
7
8
9
10
11
12
13
14
15
16
17
18
19
20
21
22
23
24
25
26
27
28
29
30
31
32
33
34
35
36
37
如果要跳过后续的处理函数,可以调用 next("route")。
next("route") 只能跳过同一个方法里添加的处理函数,两个 app.METHOD 之间没有影响,即使它们的 path 相同,比如两个 get("/api"),它们的处理函数不会相互影响。
同一个 app.METHOD() 添加的处理函数,Express 称为 sub-stack。
如果当前处理函数响应了请求,比如调用
res.send(),请求也就结束了,即使没有调用next("route")后续的处理函数也不会调用了。
app.get('/api', (req, res, next) => {
  console.log("1");
 	next("route")
})

app.get('/api', (req, res) => {
  console.log("2");
  res.send("Hello World!")
})

// 输出:
// 1
// 2
2
3
4
5
6
7
8
9
10
11
12
13
# 路由模块
express.Router() (opens new window) 可以创建模块化的路由,它返回一个 Router (opens new window) 对象,是一个完整的中间件(下面会讲到)和路由系统,因此被称为 "mini-app"。
比如,我们创建一个用户的子系统
// users.js
import express from "express"
const router = express.Router()

router.get('/list', (req, res) => {
  res.send('User list')
})

router.get('/id', (req, res) => {
  res.send('An user ')
})

router.get('/about', (req, res) => {
  res.send('About users')
})

export default router
2
3
4
5
6
7
8
9
10
11
12
13
14
15
16
17
然后加载这个模块
import users from './users'
app.use("/users", users)
2
现在这个服务能处理 /users/list、/users/123、/users/about 的请求。
通过 express.Router() (opens new window),简化了路由路径,同时对子系统进行了封装,便于移植。
Router (opens new window) 使用路由的方式和 Express 应用一致,除了处理函数可以使用 next("router") 跳过这个 Router 路由
router.get('/list', (req, res, next) => {
  // 如果身份不是管理员,跳过这个 users 路由
  // 如果 app 没有定义 /users/list 的路由, 则报错,错误码 404
  if (!isAdmin()) {
     next("router")
  } else {
    next()
  }
})
2
3
4
5
6
7
8
9
app.router() (opens new window) 返回 Express 应用程序内建的 Router 实例。猜测 app.get() 其实就是内建的 app.router().get()
# 中间件
中间件是 Express 框架的核心中的核心。
那什么是 Express 的中间件呢?中间件就是可以访问请求对象(Request (opens new window))、响应对象(Response (opens new window))以及 next() 的函数。
从这个定义可以看出,上文提到的处理函数其实就是一个中间件,称为路由中间件。
Express 中间件主要的工作:
- 完成某些功能
- 修改
Request和Response对象 - 完成请求-响应
- 调用下一个中间件
比如下面定义一个 requestTime 的中间件:给每一个请求添加一个 requestTime 属性
const requestTime = function (req, res, next) {
  req.requestTime = Date.now()
  next()
}
2
3
4
Express 使用 app.use() (opens new window) 或者上文介绍的 app.METHOD() (opens new window) 加载中间件。
与 app.METHOD() 不同的是 app.use() 路由路径可以为空,当路由路径为空时,中间件应用于所有的请求,比如下面这个 requestTime 中间件作用于所有的请求。
app.use(requestTime)

app.get('/', (req, res) => {
  let responseText = 'Hello World!<br>'
  responseText += `<small>Requested at: ${req.requestTime}</small>`
  res.send(responseText)
})

app.listen(3000)
2
3
4
5
6
7
8
9
但是需要主要的是,中间件的加载顺序很重要,首先加载的中间件也会首先执行。如果上面的例子调换顺序,则请求 http://localhost:3000/ 时无法访问 requestTime 属性
app.get('/', (req, res) => {
  let responseText = 'Hello World!<br>'
  responseText += `<small>Requested at: ${req.requestTime}</small>` // 无法访问 requestTime
  res.send(responseText)
})

app.use(requestTime)

app.listen(3000)
2
3
4
5
6
7
8
9
带有路径时,app.use() 也和 app.METHOD() 有所不同,app.use() 匹配子路径
// 匹配 /api 和 /api 下的子路径,比如 /api/abc, /api/abc/abc 等等
app.use('/api', (req, res) => {
  res.send("Hello World!")
})

// 只匹配 /api,不匹配 /api 下的子路径
app.get('/api', (req, res) => {
  res.send("Hello World!")
})
2
3
4
5
6
7
8
9
所以一般使用 app.use() 执行功能操作,而 app.METHOD() 响应请求。
app.use() 与 app.METHOD() 的第三个不同之处是,app.use() 加载的中间件,不能通过调用 next("route") 跳过后续的中间件。
同一个 app.use() 和 app.METHOD() 加载的中间件,Express 称为中间件 sub-stack.
中间件也支持异步函数
async function validateCookies (req, res, next) {
  await cookieValidator(req.cookies)
  next()
}

app.use(validateCookies)
2
3
4
5
6
当中间件返回一个 reject 的 promise 或者抛异常(throw)时,将主动调用 next(err),这将执行 Express 错误处理中间件,这个后面会讲到。
# Router 中间件
正如上文说的,Router 是一个完整的中间件和路由系统,因此 Router 也可以加载中间件,称之为 Router 中间件。上面 app.use() 加载的中间件称为应用中间件。
// users.js
const express = require('express')
const router = express.Router()

router.use((req, res, next) => {
  console.log('Time:', Date.now())
  next()
})

export default router
2
3
4
5
6
7
8
9
10
Router 加载中间件的方式和 Express 应用一致,除了可以使用 next("router") 跳过这个 Router 路由。
# 内置中间件
Express 提供了三个内置中间件:
express.json([options])express.urlencoded([options])express.static(root, [options])
# express.json()
express.json() (opens new window) 基于 body-parser (opens new window) 中间件解析请求中的 JSON 负载。解析后 request 对象有一个 body 属性,包含解析后的 JSON 对象。
在上一篇文章 创建 Node.js 后台服务 中我们是这么处理带 JSON 负载的 POST 请求的:通过 request 对象的 data 事件收集数据,end 事件解析收集到的数据。
const postUsers = (response, request) => {
  // 设置接收数据的编码格式为 UTF-8
  request.setEncoding('utf8');
  let body = '';
  // data 事件,接收请求数据
  request.on('data', (data) => {
    body += data;
  });
  // end 事件,表示数据传递完成
  request.on('end', () => {
    const newUser = JSON.parse(body);
    newUser.id = findMaxId(users) + 1;
    users.push(newUser);
    response.statusCode = 201;
    response.setHeader('Content-Type', 'application/json');
    response.end(JSON.stringify(newUser));
  });
}
2
3
4
5
6
7
8
9
10
11
12
13
14
15
16
17
18
使用 express.json() 中间件,将大大简化上面的代码
const postUsers = (response, request) => {
  const newUser = request.body;
  newUser.id = findMaxId(users) + 1;
  users.push(newUser);
  response.sendStatus(201);
  response.set('Content-Type', 'application/json');
  response.end(JSON.stringify(newUser));
}

app.use(express.json("application/json"))
app.post('/users', postUsers)
2
3
4
5
6
7
8
9
10
11
# express.urlencoded()
express.urlencoded() (opens new window) 与 express.json() 类似,也是基于 body-parser (opens new window) 中间件,但是是解析 URL 编码负载,即 application/x-www-form-urlencoded 编码。
# express.static()
express.static(root, [options]) (opens new window) 基于 serve-static (opens new window),服务于静态资源,比如图片、字体、JS、CSS 等文件。参数 root 指定静态资源的所在的目录。比如下面是加载 public 目录下的所有静态资源。
import path from 'node:path'

// get the resolved path to the file
const __filename = fileURLToPath(import.meta.url);
const __dirname = path.dirname(__filename);

app.use(express.static(path.join(__dirname, 'public')))
2
3
4
5
6
7
然后就可以加载 public 目录下的资源了
http://localhost:3000/images/bg.png
可以给静态资源指定一个路由前缀
app.use("/static", express.static(path.join(__dirname, 'public')))
还可以加载多个目录下的静态资源,调用多次
app.use(express.static(path.join(__dirname, 'public')))
app.use(express.static(path.join(__dirname, 'files')))
2
# 第三方中间件
使用第三方中间件很简单,安装相应的 npm 包,加载中间件就 ok 了。比如下面使用 cookie-parser (opens new window) 中间件
$ npm install cookie-parser
import express from 'express'
import cookieParser from 'cookie-parser'
const app = express()

// 加载中间件
app.use(cookieParser())
2
3
4
5
6
查看有哪些第三中间件,请查看 Third-party middleware (opens new window)
# 错误处理
Express 的错误处理机制帮助我们捕获和处理错误。
Express 提供了默认的错误处理程序,当中间件抛出异常或者调用 next(error) 表明出错时,Express 捕获错误并且处理错误
app.get('/', (req, res) => {
  throw new Error('BROKEN')
})

app.use((req, res, next) => {
  const error = new Error('BROKEN')
  error.status = 503
  error.headers = {
    custom: "BROKEN"
  }
  next(error)
})
2
3
4
5
6
7
8
9
10
11
12
默认的错误处理程序主要完成:
- 根据
error.status或者error.statusCode设置响应的statusCode,如果值不在4xx ~ 5xx区间,或者没有设置,则设置为500 - 根据响应的
statusCode,设置响应的statusMessage - 设置响应 body,在开发环境下是
error.stack,在生产环境下是statusMessage组成的 HTML - 根据
error.headers设置响应header
上面第二个例子,设置了错误对象的 status 和 headers,其响应如下:
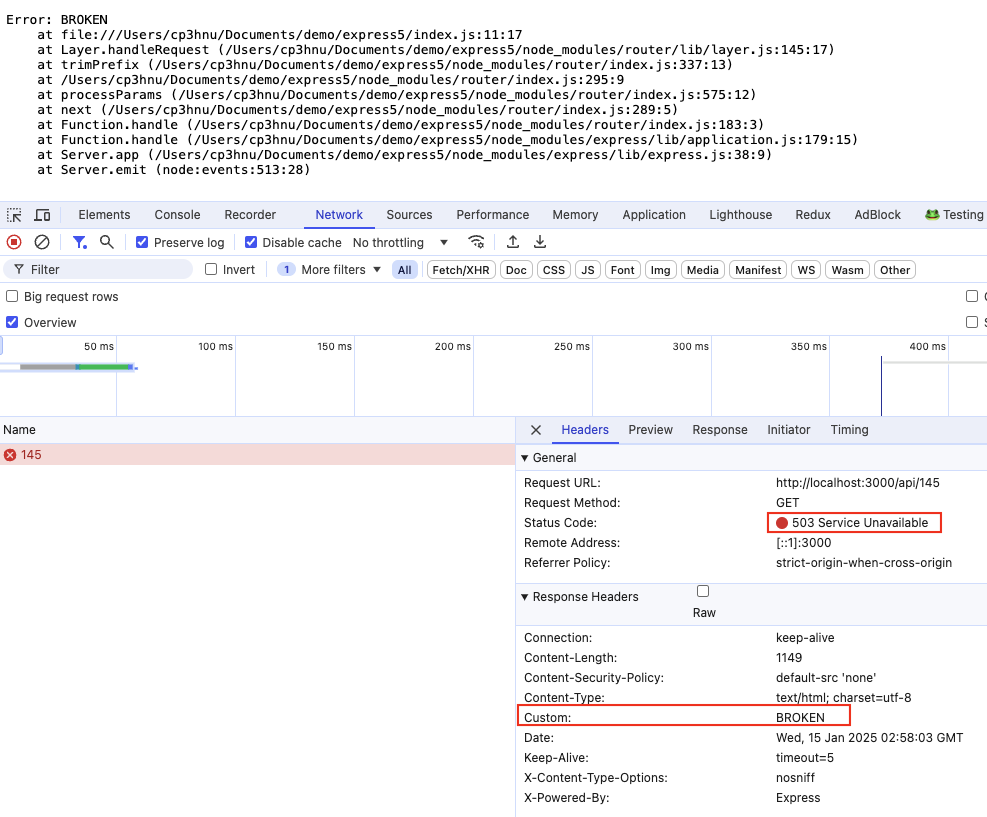
如果中间件调用了异步函数,为了捕获异步函数的错误,需要手动调用 next() 函数,例如
const { readFile } = require('node:fs');
app.get('/', (req, res, next) => {
  fs.readFile('/file-does-not-exist', (err, data) => {
    if (err) {
      next(err) // Pass errors to Express.
    } else {
      res.send(data)
    }
  })
})
2
3
4
5
6
7
8
9
10
因为从 Express 5.x 开始,如果中间件返回 promise,当 promise 被 reject 时,会自动调用 next(error),所以最好的方式是使用异步函数
const { readFile } = require('node:fs/promises');

app.get('/', async (req, res, next) => {
  const contents = await fs.readFile('/file-does-not-exist')
})
2
3
4
5
# 自定义错误处理程序
错误处理程序也是一个中间件,但是与上文介绍的中间件不同,它有四个参数,第一个参数是错误对象。错误处理程序必须带有 4 个参数,否则 Express 不认为它是一个错误处理程序。
app.use((err, req, res, next) => {
  console.error(err.stack)
  res.status(500).send('Something broke!')
})
2
3
4
错误处理程序必须定义在其它中间件后面。Express 服务可以定义多个错误处理程序,如果当前处理程序不出来该类型的错误,可以通过 next(error) 将错误往后传递,最后是 Express 的默认错误处理程序。
// 打印错误信息
function logErrors (err, req, res, next) {
  console.error(err.stack)
  next(err)
}

// 除了 XHR 错误
function clientErrorHandler (err, req, res, next) {
  if (req.xhr) {
    res.status(500).send({ error: 'Something failed!' })
  } else {
    next(err)
  }
}

// 处理所有错误
function errorHandler (err, req, res, next) {
  res.status(500)
  res.render('error', { error: err })
}

// 其它中间件
app.use(logErrors)
app.use(clientErrorHandler)
app.use(errorHandler)
2
3
4
5
6
7
8
9
10
11
12
13
14
15
16
17
18
19
20
21
22
23
24
25
当自定义错误处理程序时,如果 header 已经发送到客户端,您必须将错误传递给默认的错误处理程序
这一点还不是很明白
function errorHandler (err, req, res, next) {
  if (res.headersSent) {
    return next(err)
  }
  res.status(500)
  res.render('error', { error: err })
}
2
3
4
5
6
7
Router 也可以自定义错误处理程序,除了自定义路由模块的错误。
# next() 总结
中间件调用 next() 有四种方式:
- 无参数
- 带有
"route"参数 - 带有
"router"参数 - 其它参数
而根据上文介绍,有四个 API 加载中间件
app.METHOD()app.use()router.METHOD()router.use()
我们现在来总结一下。首先我们假设一个前提,中间件没有结束请求-响应周期。
next() | 无参数 | "route" 参数 | "router" 参数 | 其它参数 |
|---|---|---|---|---|
app.METHOD() | 必须调用,否则请求一直是 pending 状态 | 跳过同一个 app.METHOD() 加载的中间件,其它的不受影响 | 报错,错误码是 404 | 报错,错误码默认是 500 |
app.use() | 必须调用,否则请求一直是 pending 状态 | 没有作用 | 报错,错误码是 404 | 报错,错误码默认是 500 |
router.METHOD() | 必须调用,否则请求一直是 pending 状态 | 跳过同一个 router.METHOD() 加载的中间件,其它的不受影响 | 跳过整个 router,如果 app 没有这个地址的其它路由,则报错,错误码是 404 | 报错,错误码默认是 500 |
router.use() | 必须调用,否则请求一直是 pending 状态 | 没有作用 | 跳过整个 router,如果 app 没有这个地址的其它路由,则报错,错误码是 404 | 报错,错误码默认是 500 |
# 调试
要查看 Express 使用的所有内部日志,在启动时将 DEBUG 环境变量设置为 express:*。
DEBUG=express:* node index.js
控制台将输出:
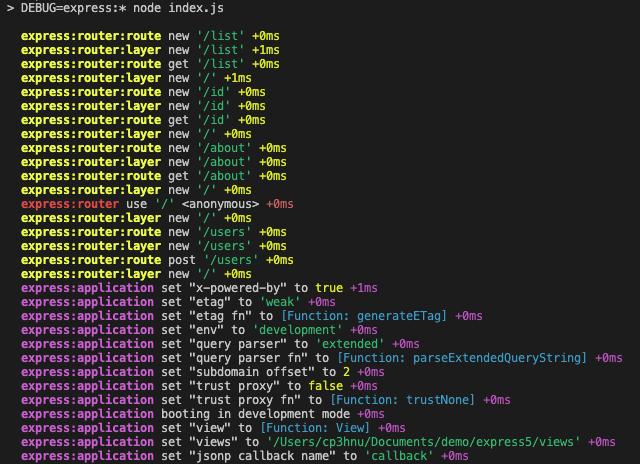
当应用程序发出请求时,输出:

但是很遗憾,在 Express 5.x 这个方法不管用,因此我提了一个 issue (opens new window),期待他们的回答。
从他们的回答中,我们得知 Express 5.x 内部移除了调试库
debug-js/debug(opens new window)
从 express-generator (opens new window) 的生成的代码中,我们找到有两个解决办法:
安装 morgan
$ npm i morgan
在应用程序入口文件使用 morgan
// index.js
import logger from 'morgan';
app.use(logger('dev'));
2
3
它将打印每一个请求
GET /users 200 32.586 ms - 171
- 使用
debug-js/debug(opens new window) 手动输出。
Express 4.x 内部就是使用的这个库实现调试功能,也因为 Express 5.x 将这个库移除了,所以 Express 5.x 目前无法实现自动调试。
$ npm install debug
debug 导出的是一个函数,需要指定一个调试命名空间(namespace)。然后通过设置 DEBUG=namespace 运行应用,就可以打印 debug 的输出了。
import debugModule from "debug"
const debug = debugModule('express:server')

app.use((req, res, next) => {
  debug(`express:server ${req.method} ${req.url}`);
  next();
})
2
3
4
5
6
7
$ DEBUG=express:server node index.js
期待 Express 5.x 重新添加调试功能。
# 最后
这篇文章我们详细介绍了 Express 框架以及 Express 框架三大核心技术。下篇文章 使用 Express 创建 Web 服务 我们将使用 Express 框架来创建 Web 服务。
# References
- Express (opens new window)
- Express API (opens new window)
- Express middleware (opens new window)
- Express examples (opens new window)
- Database integration (opens new window)
- Express Playground Router (opens new window)
- HTTP response status codes (opens new window)
expressjs/express(opens new window)expressjs/express-generator(opens new window)pillarjs/path-to-regexp(opens new window)pugjs/pug(opens new window)mde/ejs(opens new window)handlebars-lang/handlebars.js(opens new window)marko-js/marko(opens new window)mozilla/nunjucks(opens new window)janl/mustache.js(opens new window)@ladjs/consolidate(opens new window)expressjs/morgan(opens new window)debug-js/debug(opens new window)