# Next.js 项目代码格式化配置指南
这篇文章将详细介绍 Next.js 项目的代码格式化配置,需要使用 ESLint (opens new window)、Prettier (opens new window)、Husky (opens new window)、lint-staged (opens new window) 等工具。
Next.js 当前版本 v15.x
# 创建 Next.js 项目
首先我们使用 create-next-app 工具创建的 Next.js 项目,并且在询问是否使用 ESLint 时,选择 YES
Would you like to use ESLint? No / Yes
create-next-app 帮我们安装了 @eslint/eslintrc (opens new window)、eslint (opens new window) 和 eslint-config-next 三个 ESLint 相关的库
{
  "devDependencies": {
    "@eslint/eslintrc": "^3",
    "eslint": "^9",
    "eslint-config-next": "15.3.2",
  },
}
2
3
4
5
6
7
和生成一个配置文件 eslint.config.mjs
import { dirname } from "path";
import { fileURLToPath } from "url";
import { FlatCompat } from "@eslint/eslintrc";

const __filename = fileURLToPath(import.meta.url);
const __dirname = dirname(__filename);

const compat = new FlatCompat({
  baseDirectory: __dirname,
});

const eslintConfig = [
  ...compat.extends("next/core-web-vitals", "next/typescript"),
];

export default eslintConfig;
2
3
4
5
6
7
8
9
10
11
12
13
14
15
16
# eslint-config-next
eslint-config-next 是 Next.js 使用 ESLint 的工具集,从 eslint-config-next 的 package.json 文件,可以看出它包含了各种插件和规则库,比如我们经常在 React 项目里使用的 eslint-plugin-react (opens new window)。
@typescript-eslint/parser和@typescript-eslint/eslint-plugin是 ESLint 解析 Typescript 的两个插件。eslint-config-next也自动帮我们设置好了
{
  "name": "eslint-config-next",
  "version": "15.3.2",
  "dependencies": {
    "@next/eslint-plugin-next": "15.3.2",
    "@rushstack/eslint-patch": "^1.10.3",
    "@typescript-eslint/eslint-plugin": "^5.4.2 || ^6.0.0 || ^7.0.0 || ^8.0.0",
    "@typescript-eslint/parser": "^5.4.2 || ^6.0.0 || ^7.0.0 || ^8.0.0",
    "eslint-import-resolver-node": "^0.3.6",
    "eslint-import-resolver-typescript": "^3.5.2",
    "eslint-plugin-import": "^2.31.0",
    "eslint-plugin-jsx-a11y": "^6.10.0",
    "eslint-plugin-react": "^7.37.0",
    "eslint-plugin-react-hooks": "^5.0.0"
  },
  "peerDependencies": {
    "eslint": "^7.23.0 || ^8.0.0 || ^9.0.0",
    "typescript": ">=3.3.1"
  },
  "peerDependenciesMeta": {
    "typescript": {
      "optional": true
    }
  }
}
2
3
4
5
6
7
8
9
10
11
12
13
14
15
16
17
18
19
20
21
22
23
24
25
# @eslint/eslintrc
@eslint/eslintrc (opens new window) 是 ESLint 用来将以前 ESLintRC 风格的配置文件(.eslintrc.js) 转换为扁平(Flat)配置文件(eslint.config.js)的工具。ESLint 9 之后,ESLint 要求使用扁平的配置文件,eslint.config.js/mjs/cjs。而 eslint-config-next 使用的还是以前的 ESLintRC 风格的 ESLint 配置文件,所以 Next.js 也使用这个库进行转换。用法见上面的 eslint.config.mjs 文件。
# ESLintRC Config vs Flat Config
ESLintRC 是基于“继承和字符串配置”的老式风格,Flat Config 是基于“模块导入和显式结构”的现代配置方式。
它们的区别如下:
| 特性 | ESLintRC Config(旧) | Flat Config(新,ESLint 9 默认) |
|---|---|---|
| 配置文件名 | .eslintrc.js/json/yml | eslint.config.js/mjs/cjs |
| 导出方式 | module.exports = {} | export default [ ... ] (数组) |
| 配置结构 | 嵌套对象(基于继承) | 扁平数组(逐层合并) |
| 插件机制 | 使用 plugins 和 extends 字符串 | 显式导入插件模块、函数 |
| 文件匹配 | 使用 overrides.files 等 glob 模式 | 使用 files: ["**/*.ts"] 字段直接匹配 |
| 支持范围限定(root) | 有 root: true 来终止查找 | 自动停止,无需设置 |
| 执行性能 | 配置动态解析,有一定开销 | 编译期结构明确,更快 |
示例对比如下:
ESLintRC Config 示例
// .eslintrc.js
module.exports = {
  root: true,
  parser: "@typescript-eslint/parser",
  plugins: ["@typescript-eslint"],
  extends: [
    "eslint:recommended",
    "plugin:@typescript-eslint/recommended",
  ],
  rules: {
    semi: ["error", "always"],
  },
  overrides: [
    {
      files: ["*.ts", "*.tsx"],
      rules: {
        "@typescript-eslint/no-unused-vars": "error",
      },
    },
  ],
};
2
3
4
5
6
7
8
9
10
11
12
13
14
15
16
17
18
19
20
21
Flat Config 示例
// eslint.config.mjs
import js from "@eslint/js";
import tseslint from "typescript-eslint";

export default [
  js.configs.recommended,
  ...tseslint.configs.recommended,
  {
    files: ["**/*.ts", "**/*.tsx"],
    rules: {
      semi: ["error", "always"],
      "@typescript-eslint/no-unused-vars": "error",
    },
  },
];
2
3
4
5
6
7
8
9
10
11
12
13
14
15
# 安装 Prettier
接下来我们需要安装 Prettier (opens new window) 及相关库
$ npm install -D prettier eslint-config-prettier eslint-plugin-prettier prettier-plugin-tailwindcss
eslint-config-prettier (opens new window)
关闭 ESLint 中与 Prettier 冲突的规则。配置如下:
// eslint.config.mjs
import eslintConfigPrettier from "eslint-config-prettier/flat";

export default [
  // others
  eslintConfigPrettier,
];
2
3
4
5
6
7
eslint-plugin-prettier (opens new window)
让 ESLint 运行 Prettier 并将其作为 ESLint 规则(用于 eslint --fix)。配置如下:
// eslint.config.mjs
import eslintPluginPrettierRecommended from 'eslint-plugin-prettier/recommended';

export default [
  // others
  eslintPluginPrettierRecommended,
];
2
3
4
5
6
7
# 添加 Prettier 配置
根据自己的喜好,配置 Prettier (opens new window)
// prettier.config.mjs
const config = {
  singleQuote: false,
  tabWidth: 2,
  trailingComma: "all",
  printWidth: 120,
  semi: true,
  arrowParens: "avoid",
  bracketSameLine: true,
  plugins: ["prettier-plugin-tailwindcss"],
};

export default config;
2
3
4
5
6
7
8
9
10
11
12
13
# 修改 ESLint 的配置
修改 ESLint 的配置文件 eslint.config.mjs,添加 Prettier 相关的规则
import { dirname } from "path";
import { fileURLToPath } from "url";
import { FlatCompat } from "@eslint/eslintrc";
import eslintConfigPrettier from "eslint-config-prettier/flat";
import eslintPluginPrettierRecommended from "eslint-plugin-prettier/recommended";

const __filename = fileURLToPath(import.meta.url);
const __dirname = dirname(__filename);

const compat = new FlatCompat({
  baseDirectory: __dirname,
});

const eslintConfig = [
  ...compat.extends("next/core-web-vitals", "next/typescript"),
  eslintConfigPrettier,
  eslintPluginPrettierRecommended,
];

export default eslintConfig;
2
3
4
5
6
7
8
9
10
11
12
13
14
15
16
17
18
19
20
# VSCode 设置
# 安装 VSCode 插件
为了能在 VSCode 保存代码时,自动使用 ESLint + Prettier 格式化代码,需要安装 VSCode 三个插件
- VSCode Plugin: Prettier - Code formatter (opens new window)
- VSCode Plugin: ESLint (opens new window)
- VSCode Plugin: Prettier ESLint (opens new window)
# 配置 VSCode
安装上面的插件后,我们还需要设置 VSCode
// .vscode/settings.json
{
  "editor.defaultFormatter": "esbenp.prettier-vscode",
  "[javascript]": {
    "editor.defaultFormatter": "rvest.vs-code-prettier-eslint"
  },
  "[typescript]": {
    "editor.defaultFormatter": "rvest.vs-code-prettier-eslint"
  },
  "[javascriptreact]": {
    "editor.defaultFormatter": "rvest.vs-code-prettier-eslint"
  },
  "[typescriptreact]": {
    "editor.defaultFormatter": "rvest.vs-code-prettier-eslint"
  },
  "editor.formatOnSave": true,
  "eslint.validate": ["javascript", "typescript", "javascriptreact", "typescriptreact"],
  "files.associations": {
    "*.css": "tailwindcss"
  }
}
2
3
4
5
6
7
8
9
10
11
12
13
14
15
16
17
18
19
20
21
完成上面的配置后,我们保存代码时,VSCode 就会自动校验代码并格式化代码。
# 安装 Lint-Staged 和 Husky
但是这只能保证我自己写的代码没有格式化问题,但是对于团队的其他人,并不能保证他们提交的代码没有格式化问题。因此我们还需要设置在他们提交代码的时候校验代码并格式化代码。这就需要使用 lint-staged (opens new window) 和 Husky (opens new window)。
lint-staged
只对 git staged 的文件进行一些操作,比如校验代码、格式化代码等。使用 lint-staged 可以避免对项目的所有代码进行代码校验与格式化。
Husky
可以让我们在提交代码(commit/push)时进行一些操作,比如运行 lint-staged
# 安装
$ npm i -D husky lint-staged
# lint-staged 配置
lint-staged 配置有多种方式 (opens new window),为了保持项目风格的统一,我们使用 lint-staged.config.mjs 配置文件
// lint-staged.config.mjs
const lintStagedConfig = {
  "*.{js,jsx,ts,tsx}": ["npm run lint-fix"],
  "*.{json,css,md}": ["npm run format-fix"],
};

export default lintStagedConfig;
2
3
4
5
6
7
# Husky 配置
配置 Husky 很简单,安装 Husky 之后,运行
$ npx husky init
他将创建 .husky/pre-commit 文件并且在 package.json 里添加 "prepare": "husky" NPM Scripts。
我们只要修改 pre-commit 文件,让他运行 lint-staged 命令
#!/usr/bin/env sh
npx lint-staged
2
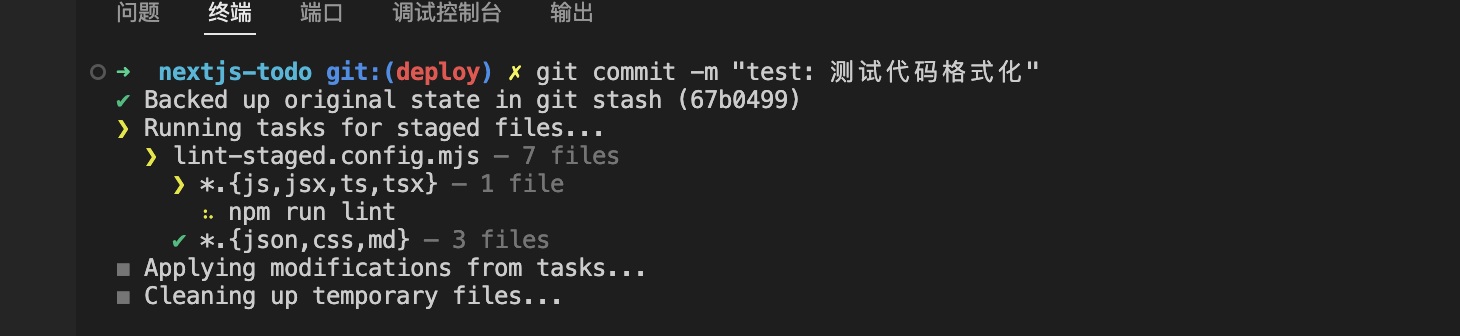
当我们提交代码时, Lint-Staged 和 Husky 将帮助我们进行代码校验与格式化,保障提交的代码没有格式问题。
# package.json
在 package.json 添加 NPM Scripts
// package.json
{
  "name": "nextjs-todo",
  "version": "0.1.0",
  "private": true,
  "type": "module",
  "scripts": {
    "dev": "next dev --turbopack",
    "build": "next build",
    "start": "next start",
    "lint": "next lint --ext .js,.ts,.jsx,.tsx",
    "lint-fix": "next lint --fix --ext .js,.ts,.jsx,.tsx",
    "format": "prettier --check .",
    "format-fix": "prettier --write .",
    "prepare": "husky"
  },
}
2
3
4
5
6
7
8
9
10
11
12
13
14
15
16
17
# 其他
至此,我们完成了 Next.js 项目代码格式化配置。
但是我们还可以根据自己的需求,添加更多的代码校验与格式化的功能。比如 import 语句排序
# eslint-plugin-simple-import-sort
# 安装
$ npm i -D eslint-plugin-simple-import-sort
# 配置
import simpleImportSort from "eslint-plugin-simple-import-sort";

export default [
  {
    name: "import-sort",
    plugins: {
      "simple-import-sort": simpleImportSort,
    },
    rules: {
      "simple-import-sort/imports": "error",  // 对 import 进行排序
      "simple-import-sort/exports": "error"   // 对 export 进行排序(可选)
    }
  }
];
2
3
4
5
6
7
8
9
10
11
12
13
14
# 结果示例
它会把如下 import 语句
import z from './z';
import fs from 'fs';
import a from './a';
import react from 'react';
2
3
4
变成
import fs from 'fs';
import react from 'react';

import a from './a';
import z from './z';
2
3
4
5
它的规则是,先分组,再以字母顺序排列。
默认的分组如下:
[
  // Side effect imports.
  // 例如:import "./setup"
  ["^\\u0000"],
  // Node.js builtins prefixed with `node:`.
  // 例如:import * as fs from "node:fs"
  ["^node:"],
  // Packages.
  // Things that start with a letter (or digit or underscore), or `@` followed by a letter.
  // 例如: import react from "react"
  ["^@?\\w"],
  // Absolute imports and other imports such as Vue-style `@/foo`.
  // Anything not matched in another group.
  // 例如 import foo from "/foo",或者 import foo from "@/foo
  ["^"],
  // Relative imports.
  // Anything that starts with a dot.
  // 例如 import a from "./a"
  ["^\\."],
];
2
3
4
5
6
7
8
9
10
11
12
13
14
15
16
17
18
19
20
每个分组之间会有一个空行,例如上面的第 2 行与第 4 行之间有个空行,如果不想要这个空行,可以修改 group 的配置,将他们放在同一个数组里。
rules: {
  "simple-import-sort/imports": [
    "error",
    {
      groups: [["^\\u0000", "^node:", "^@?\\w", "^", "^\\."]],
    },
  ]
}
2
3
4
5
6
7
8
更多详情,请参考 How to remove newline between import groups? (opens new window)
# References
- ESLint (opens new window)
- Prettier (opens new window)
- Husky (opens new window)
lint-staged(opens new window)- Stylelint (opens new window)
@eslint/eslintrc(opens new window)eslint-config-prettier(opens new window)eslint-plugin-prettier(opens new window)prettier-eslint(opens new window)eslint-plugin-simple-import-sort(opens new window)eslint-plugin-import(opens new window)- VSCode Plugin: Prettier - Code formatter (opens new window)
- VSCode Plugin: ESLint (opens new window)
- VSCode Plugin: Prettier ESLint (opens new window)