# Jupyter Notebook React 实现
Jupyter 是一个大型项目,涵盖了众多不同的软件产品和工具,包括广受欢迎的 Jupyter Notebook (opens new window) 和 JupyterLab (opens new window)。Jupyter 项目及其子项目都是围绕计算笔记本(Computational Notebook)展开的 。
计算笔记本是一种可共享的文档,它结合了计算机代码、解释性文本、数据、丰富的可视化效果(例如 3D 模型、图表、图形与图像)以及交互式控件。笔记本与编辑器(例如 Jupyter Notebook、JupyterLab)配合使用,提供了一个快速的交互式环境,用于原型设计和解释代码、探索和可视化数据,以及与他人分享想法。
# 问题与目标
我们怎样在自己的系统里实现 Jupyter Notebook 功能呢?以前我们是直接在后台启动 Jupyter Notebook 或 JupyterLab 应用,然后通过 iframe 嵌入到我们系统 。但是这样存在一些问题:
- 不便于用户共享,用户启动的 Jupyter Notebook 或 JupyterLab 应用都是独立的,无法预览其他用户创建的 notebook。虽然 JupyterHub (opens new window) 可以实现多用户共享,但是它有一套自己的认证机制,它更适合一个团队的成员共享。
- 用户为了预览 notebook,也要启动 Jupyter Notebook 或 JupyterLab 应用,消耗资源。
- Jupyter Notebook 或 JupyterLab 应用的 UI 与系统风格不一致。
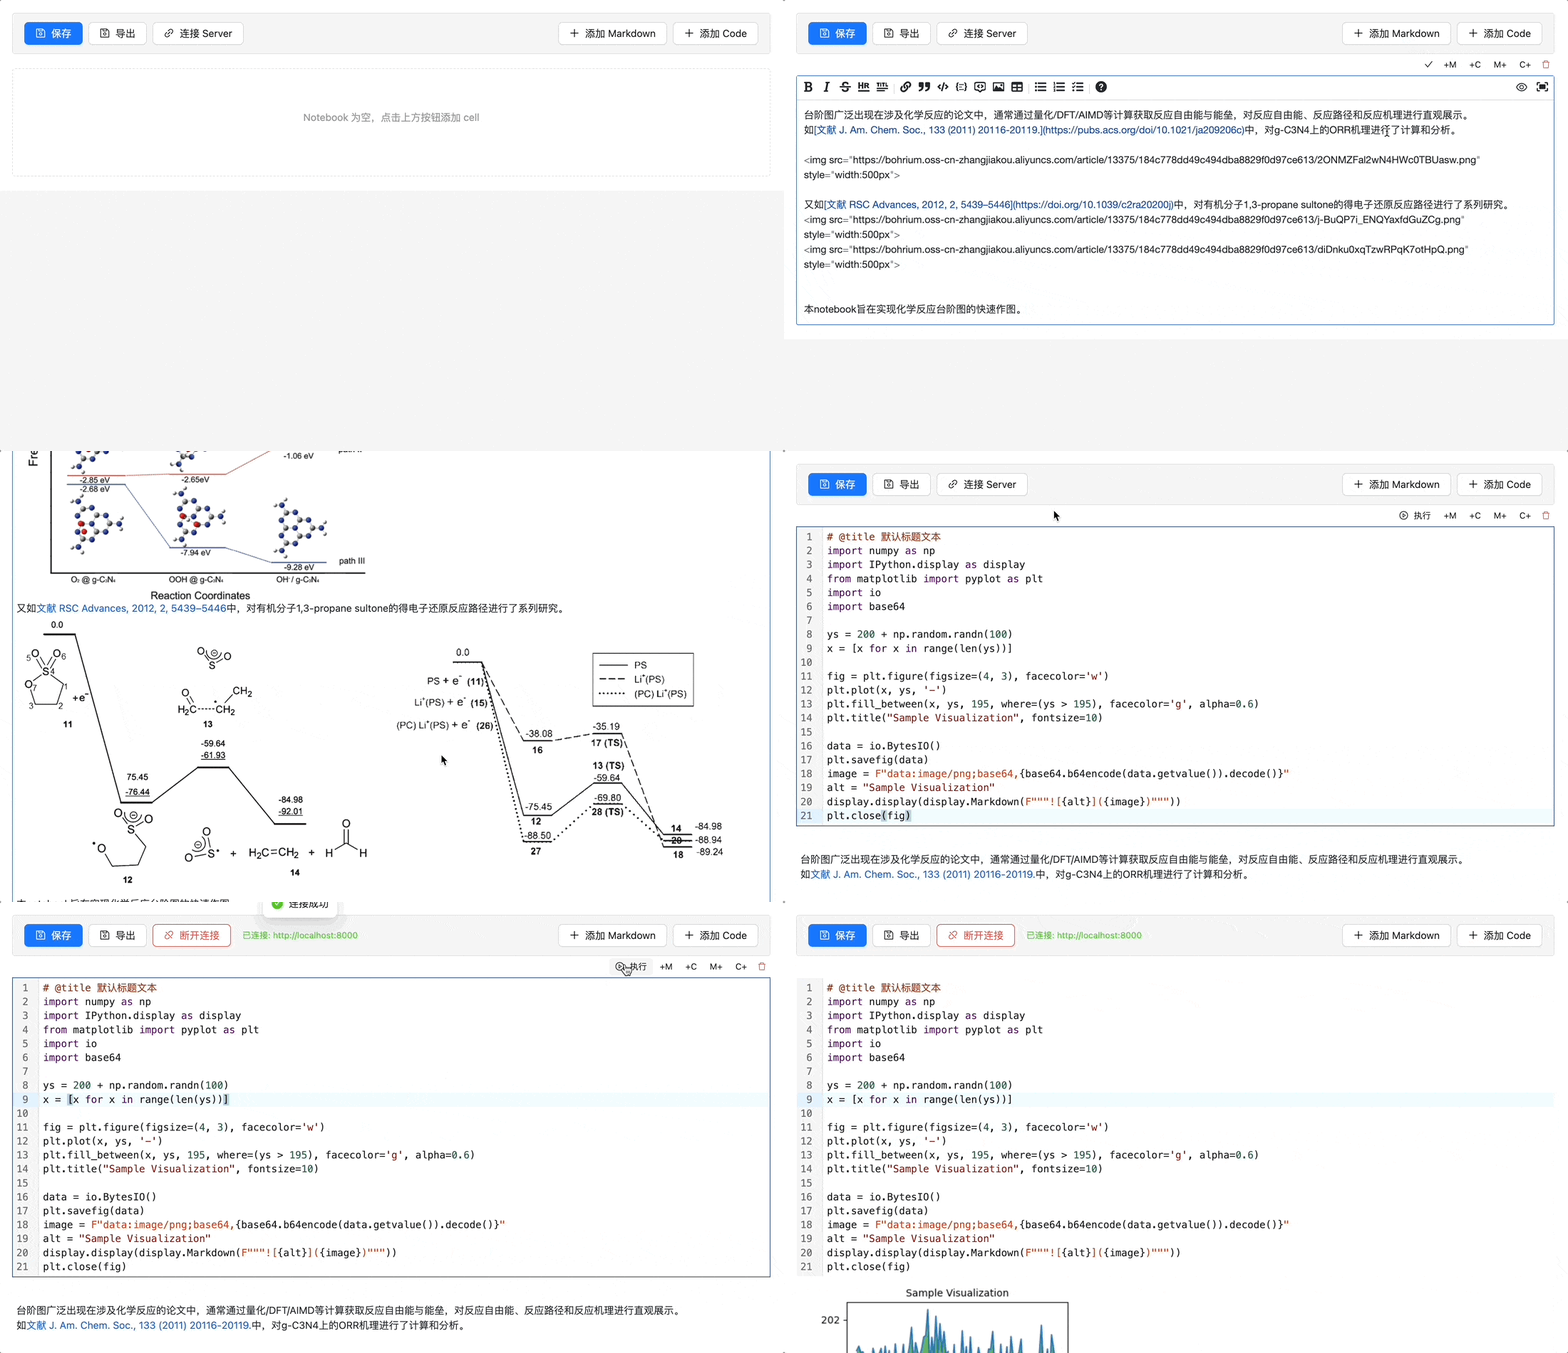
因此本文将使用 React 实现 Jupyter Notebook,做一个 Jupyter Notebook-Like 的功能,实现以下功能:
- 用户可以方便地创建 notebook,用户之间可以预览。
- 自定义 notebook UI ,以符合系统自身的风格。
- 在接入 Jupyter Server 后,能运行 notebook 里的代码。
- 可以编辑、保存和导出 notebook。
# 实现效果
# Jupyter 生态
在学习 Jupyter 时,经常看到 Jupyter Notebook 与 JupyterLab。Jupyter Notebook 和 JupyterLab 都是创建、渲染以及编辑 notebook 的 Web 应用。
它们都支持:
- 代码编辑,具备自动语法高亮、缩进和 Tab 键自动补全功能。
- 能够执行代码,并将计算结果附加到代码上。
- 使用富媒体(如 HTML、LaTeX、PNG、SVG 等)显示计算结果。
- 使用 Markdown 标记语言编辑富文本。
- 使用 LaTeX 在 Markdown 单元格中添加数学符号,并由 MathJax (opens new window) 进行原生渲染。
不同之处
Jupyter Notebook 是早期的经典应用,提供了一种简化的、轻量级的 notebook 创作体验。通常是一个页面只能打开一个 .ipynb 文件。
JupyterLab 是新一代的 Web 应用,提供功能丰富的标签式多 notebook 编辑环境、可以自定义界面布局,以及增加了系统控制台等附加工具。
主要功能对比
| 功能 | Notebook | JupyterLab |
|---|---|---|
| 多文件同时打开 | ❌ | ✅ |
| 多标签 | ❌ | ✅ |
| 拖拽分屏 | ❌ | ✅ |
| 文件管理 | 简单 | 强大 |
| 编辑 .py/.md/.txt | ❌ | ✅ |
| 终端 | ❌ | ✅ |
| 控制台(Console) | ❌ | ✅ |
简单说一句结论:JupyterLab 是新一代平台,Notebook 是老的经典应用。
所以 JupyterLab 是我们的研究对象。
# Jupyter Notebook
# 安装
安装 Jupyter Notebook 推荐使用 Anaconda (opens new window)。

Anaconda 适合初学者,因为已经内置了 Jupyter Notebook 和 JupyterLab。
还可以通过 pip (opens new window) 安装
$ pip3 install jupyter
# 运行
安装之后,运行 Jupyter Notebook 很简单
$ jupyter notebook
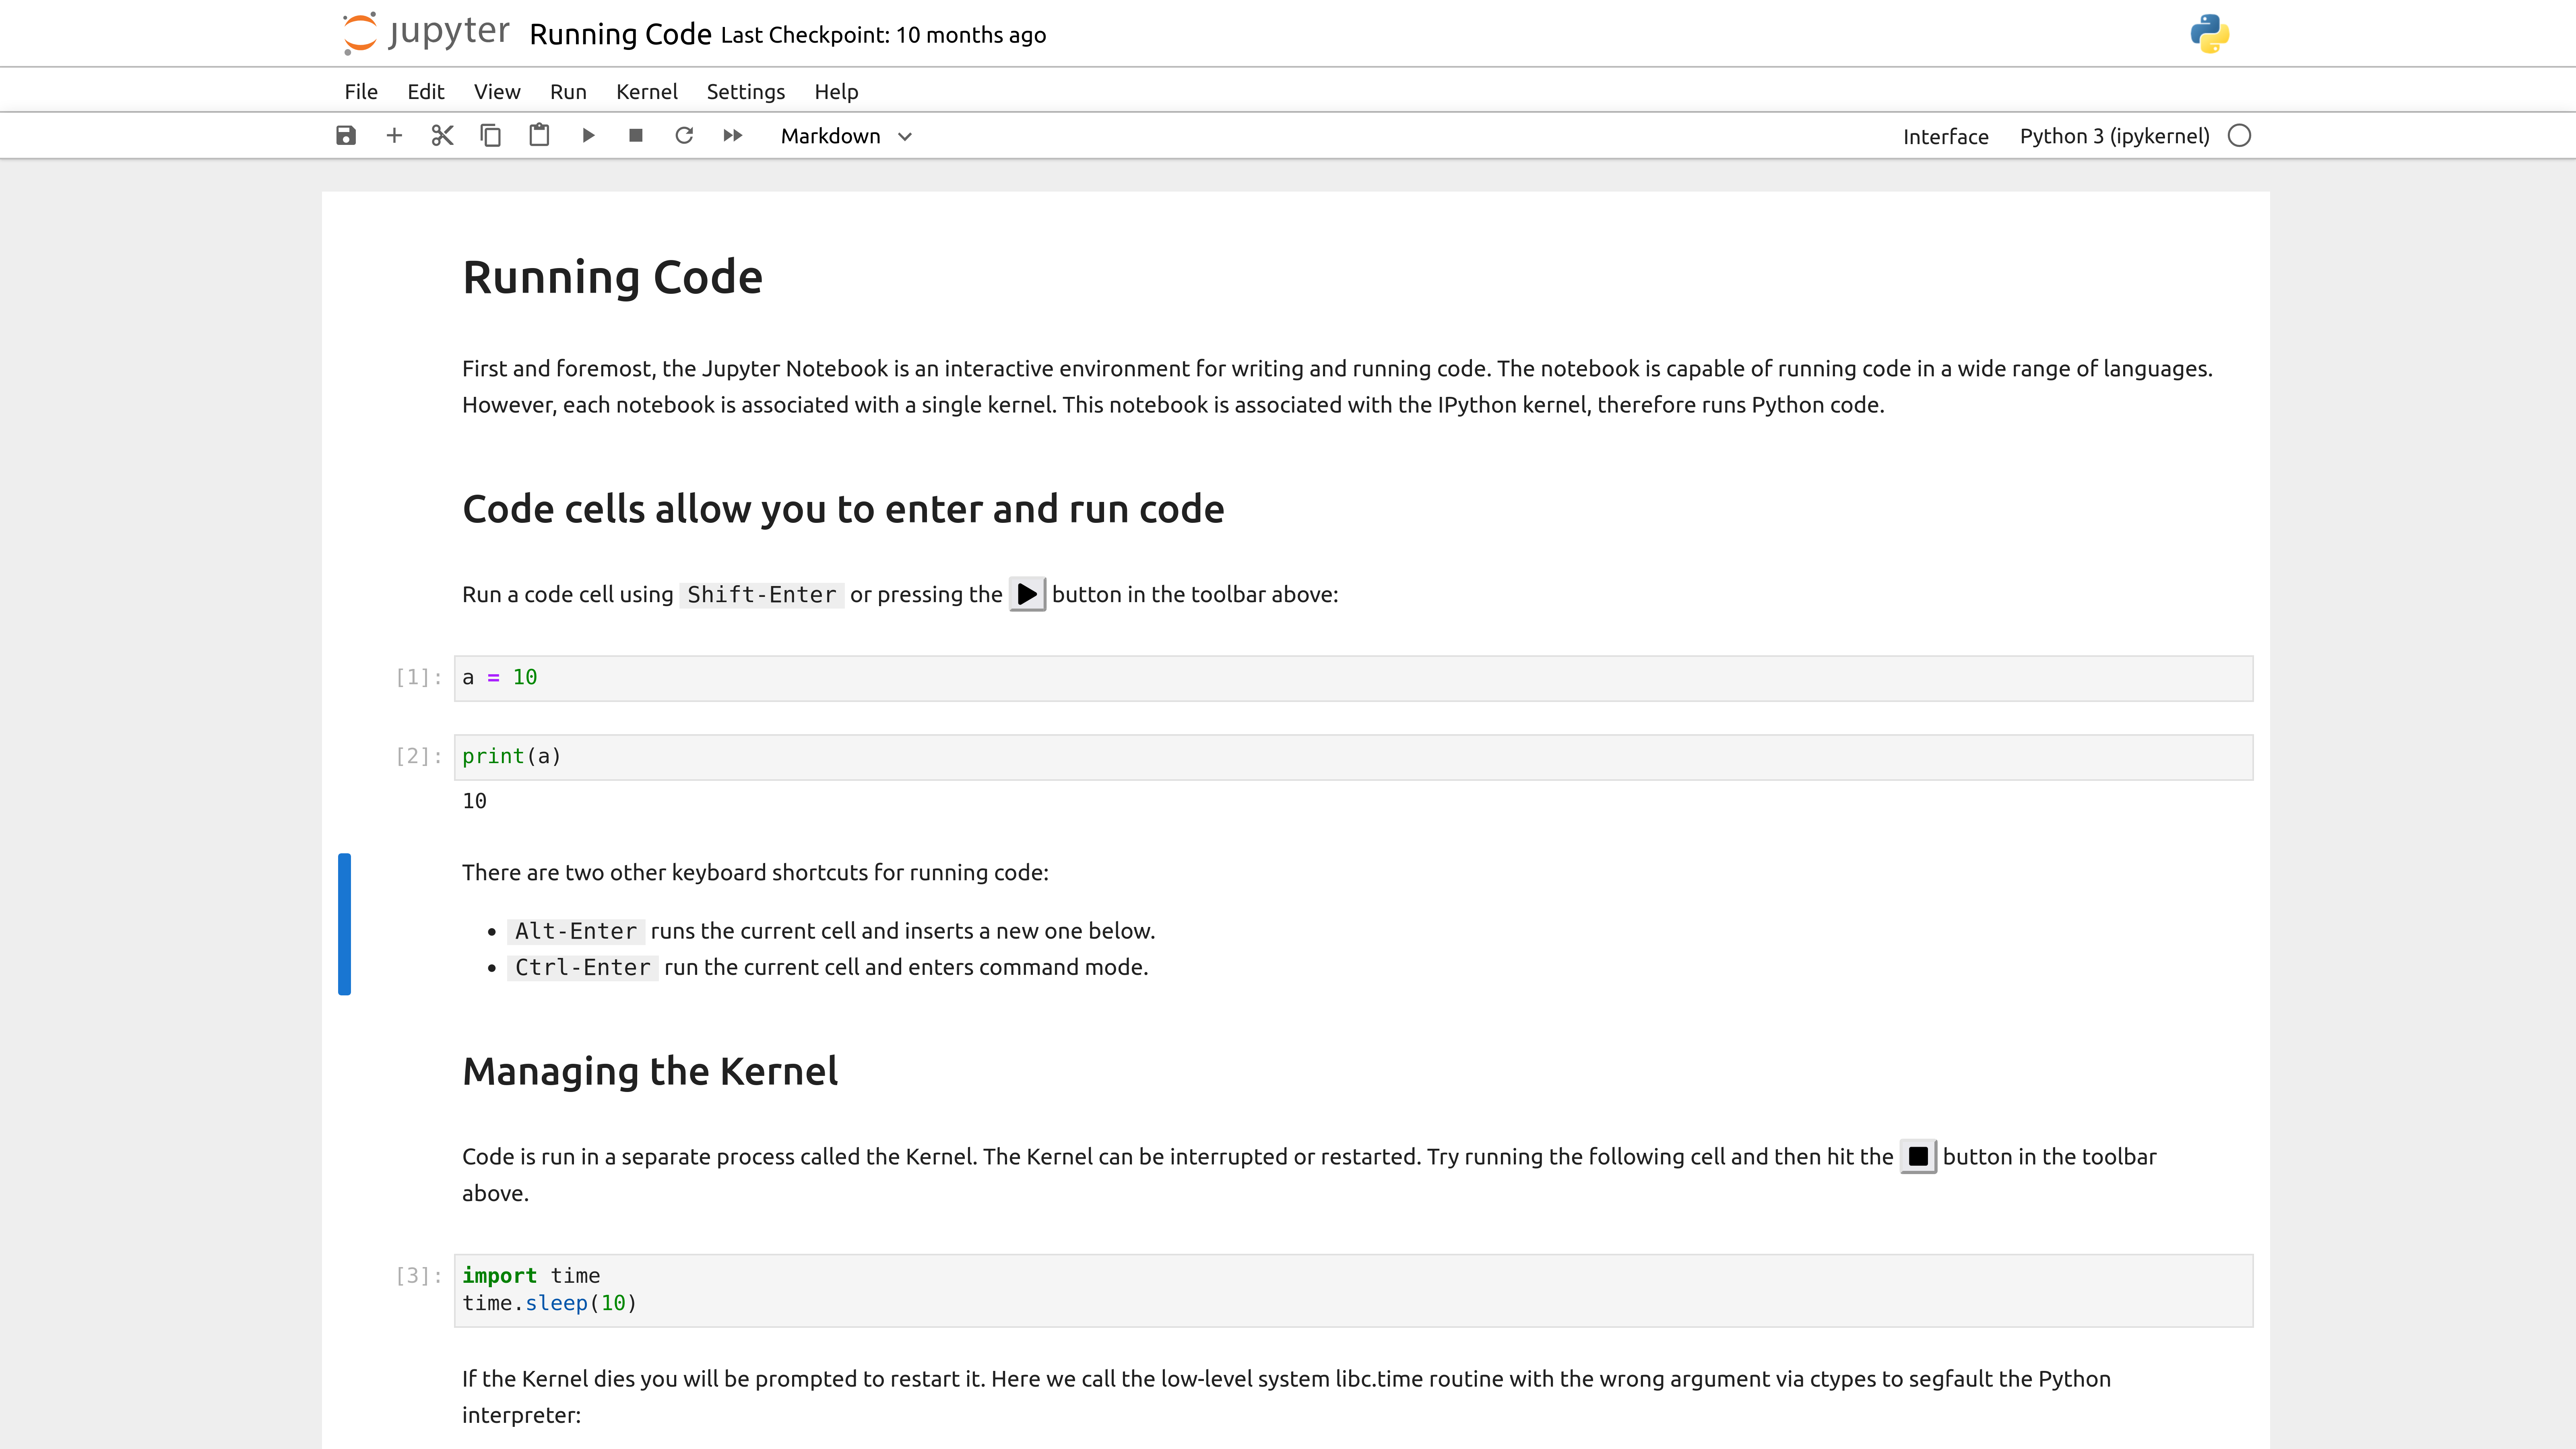
从上面这张图可以看出,Jupyter Notebook 是一个单页应用,不支持文件管理,多标签功能。
# JupyterLab
# 安装
同样推荐使用 Anaconda (opens new window) 安装 JupyterLab。
另外也可以使用 conda、mamba、pip、pipenv 以及 docker 安装 JupyterLab。
# conda
$ conda install -c conda-forge jupyterlab
# mamba
$ mamba install -c conda-forge jupyterlab
# pip
$ pip install jupyterlab
2
3
4
5
6
更多安装方式请参考 Jupyter - Installation (opens new window)。
# 运行
运行 JupyterLab 也很简单
$ jupyter lab
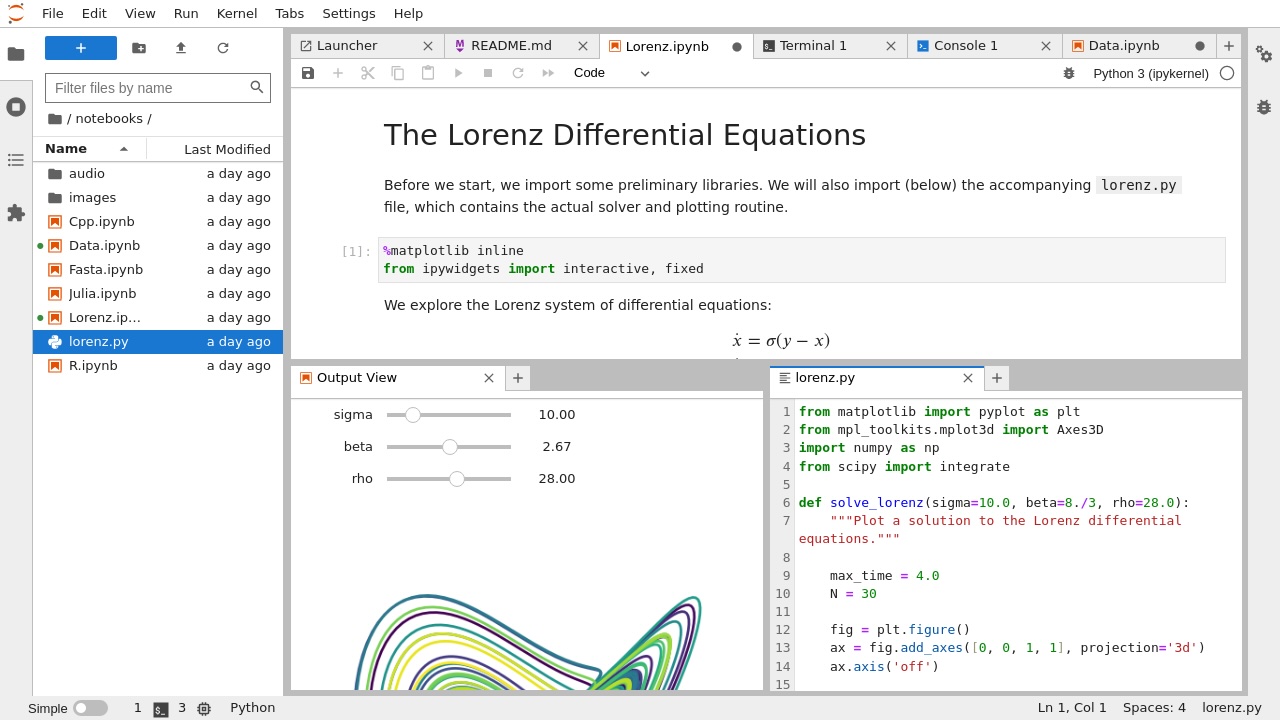
从上面这张图可以看出,JupyterLab 支持多文件管理,支持多标签等功能。
# 其它
# JupyterHub
JupyterHub (opens new window) 是一个多用户 Jupyter Notebook 服务平台,可用于学生班级、企业或科研团队。
# Jupyter Desktop
Jupyter Desktop (opens new window) 是一款基于 Electron 的桌面应用程序。
# Voilà
Voilà (opens new window) 将 Jupyter Notebook 转换为一个独立的静态 Web 应用程序。它删除了 notebook 中的代码,是一个不能编辑、执行的 Jupyter Notebook。
# JupyterLite
JupyterLite (opens new window) 是一种完全基于浏览器运行的 JupyterLab,它使用 WebAssembly (opens new window)(Wasm)运行 code,因此它不需要 Jupyter Server。
# Voici
Voici (opens new window) 是 Voilà (opens new window) 和 JupyterLite (opens new window) 的组合,它和 JupyterLite (opens new window) 一样使用 WebAssembly (opens new window)(Wasm)在浏览器中渲染 notebook。它可以作为 Voilà (opens new window) 的替代品。
# Notebook 文件格式
Jupyter notebook 文件(.ipynb)其实就是一个特殊的 JSON 文件 (opens new window)。下面是它的基本格式:
{
  "metadata": { // Notebook 级别的元数据
    "kernel_info": {
      # if kernel_info is defined, its name field is required.
      "name": "the name of the kernel"
    },
    "language_info": {
      # if language_info is defined, its name field is required.
      "name": "the programming language of the kernel",
      "version": "the version of the language",
      "codemirror_mode": "The name of the codemirror mode to use [optional]",
    },
  },
  "nbformat": 4, // 主版本
  "nbformat_minor": 5, // 小版本
  "cells": [
    # list of cell dictionaries, see below
  ],
}
2
3
4
5
6
7
8
9
10
11
12
13
14
15
16
17
18
19
其中最重要的是 cells,有三种类型:
markdowncoderaw
# Markdown Cell
Markdown Cell 主要用于解释性内容,支持 GitHub-flavored (opens new window) 风格,JuputerLab 使用 marked (opens new window) 进行渲染。其定义如下:
{
  "cell_type": "markdown",
  "metadata": {}, // Cell 级别的元数据
  "source": "[multi-line *markdown*]",
}
2
3
4
5
# 附件
Markdown Cell 和 Raw Cell 可以包含附件,通常是内联图片,这些图片可以在 Markdown 中被引用。
{
"cell_type": "markdown",
"metadata": {},
"source": ["Here is an *inline* image "],
"attachments": {"test.png": {"image/png": "base64-encoded-png-data"}},
}
2
3
4
5
6
# Code Cell
Code Cell 是 Jupyter notebook 的主要内容,包含代码、代码结果输出和执行次数。
{
  "cell_type": "code",
  "execution_count": 1,  # integer or null
  "metadata": {
    "collapsed": True,  # whether the output of the cell is collapsed
    "scrolled": False,  # any of true, false or "auto"
  },
  "source": "[some multi-line code]",
  "outputs": [
    {
      # list of output dicts (described below)
      "output_type": "stream",
      # ...
    }
  ],
}
2
3
4
5
6
7
8
9
10
11
12
13
14
15
16
Code Cell 的输出又有下面四种类型:
streamdisplay_dataexecute_resulterror
# Stream
stdout 或者 stderr 的输出
{
  "output_type": "stream",
  "name": "stdout",  # or stderr
  "text": "[multiline stream text]",
}
2
3
4
5
# display_data
富文本输出,支持各种 mime-type,比如 "text/plain"、"image/png" 等。
一个 output data 可以同时有多个 mime-type,前端会选择最合适的一个进行展示,JupyterLab 使用 Rendermime 处理这些 mime-type 输出的渲染。
{
  "output_type": "display_data",
  "data": {
    "text/plain": "[multiline text data]",
    "image/png": "[base64-encoded-multiline-png-data]",
    "application/json": {
      # JSON data is included as-is
      "key1": "data",
      "key2": ["some", "values"],
      "key3": {"more": "data"},
    },
    "application/vnd.exampleorg.type+json": {
      # JSON data, included as-is, when the mime-type key ends in +json
      "key1": "data",
      "key2": ["some", "values"],
      "key3": {"more": "data"},
    },
  },
  "metadata": { // Output 级别的元数据
    "image/png": {
      "width": 640,
      "height": 480,
    },
  },
}
2
3
4
5
6
7
8
9
10
11
12
13
14
15
16
17
18
19
20
21
22
23
24
25
# execute_result
执行 Code Cell 的结果,与 display_data 类型差不多,多了一个表示执行次数的 execution_count
{
  "output_type": "execute_result",
  "execution_count": 42,
  "data": {
    "text/plain": "[multiline text data]",
    "image/png": "[base64-encoded-multiline-png-data]",
    "application/json": {
      # JSON data is included as-is
      "json": "data",
    },
  },
  "metadata": {
    "image/png": {
      "width": 640,
      "height": 480,
    },
  },
}
2
3
4
5
6
7
8
9
10
11
12
13
14
15
16
17
18
# error
执行失败,显示一个错误信息
{
  'output_type': 'error',
  'ename' : str,   # Exception name, as a string
  'evalue' : str,  # Exception value, as a string

  # The traceback will contain a list of frames,
  # represented each as a string.
  'traceback' : list,
}
2
3
4
5
6
7
8
9
# Raw Cell
Raw Cell 表示在 nbconvert 输出中应保持不变的内容。Raw Cell 唯一有用的是 metadata 的 format 字段,它指定 nbconvert 使用什么格式转换 Raw Cell 的内容。
{
  "cell_type": "raw",
  "metadata": {
      # the mime-type of the target nbconvert format.
      # nbconvert to formats other than this will exclude this cell.
      "format": "mime/type"
  },
  "source": ["some nbformat output text"],
}
2
3
4
5
6
7
8
9
这种类型的 Cell 一般很少使用。
# JupyterLab 架构
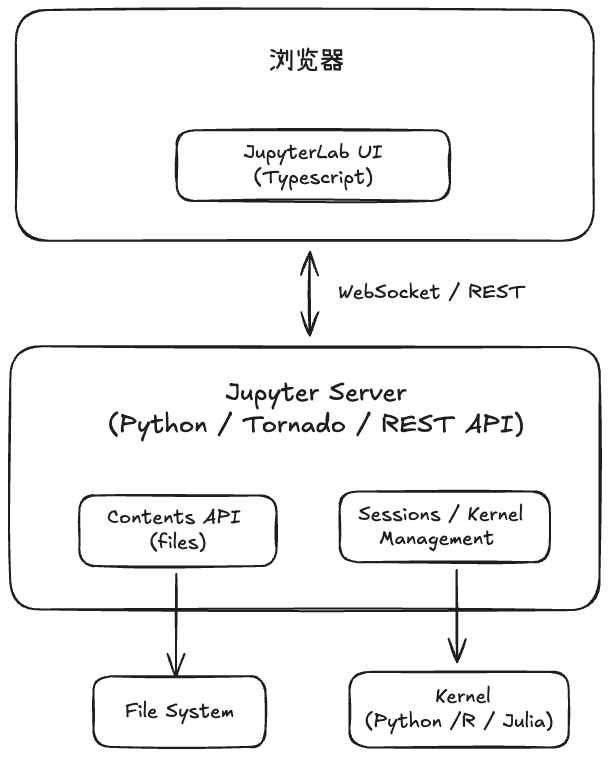
下面是 JupyterLab 整体架构,主要包括有两大部分组成:
- JupyterLab UI,渲染页面
- Jupyter Server,提供核心服务和 REST API (opens new window)。
# JupyterLab UI
JupyterLab 通过一个前端组件库 (opens new window)来实现 notebook 编辑器的界面。这些组件库都是用 Typescript 编写的,比如
@jupyterlab/cells(opens new window),渲染 Jupyter notebook 单元格。@jupyterlab/outputarea(opens new window),渲染代码的执行结果。@jupyterlab/rendermime(opens new window),MIME 渲染器,为多种格式(如 Markdown、HTML、Image 和 LaTeX)提供默认的渲染器。@jupyterlab/rendermime-interfaces(opens new window),为实现特殊的 MIME 渲染器提供接口。@jupyterlab/nbformat(opens new window),Typescript 类型定义。@jupyterlab/services(opens new window),与 Jupyter Server 进行交互,比如连接、执行代码需要靠它。
这些组件都不是 React 组件,它们依赖 jupyterlab/lumino (opens new window) 进行渲染。
# Lumino
Lumino (opens new window) 是 JupyterLab 前端渲染库,类似于 JQuery、React、Vue。
Lumino 提供了一套丰富的组件、布局、事件和数据结构工具包。我们可以使用这些工具包构建可扩展的、高性能的 Web 应用程序。
@lumino/
├─ application    应用
├─ widgets        UI / 布局 / 生命周期
├─ coreutils      工具箱(插件系统、UUID、JSON、Promise)
├─ commands       命令系统(菜单、快捷键、palette)
├─ messaging      Widget 消息系统(底层)
├─ signaling      状态变化、解耦通信
├─ disposable     资源释放、生命周期管理
├─ collections    数据结构(LinkedList、Heap)
├─ algorithm      算法工具(迭代器)
├─ polling        定时轮询
├─ dragdrop       拖拽系统
├─ keyboard       键盘映射
├─ datagrid       高性能表格
├─ domutils       DOM 工具栏(剪贴板、Selector、BoxSizing)
├─ properties     响应式属性(很少用)
└─ virtualdom     虚拟 DOM(⚠️ 基本弃用)
2
3
4
5
6
7
8
9
10
11
12
13
14
15
16
17
其中最重要的是@lumino/widgets 和 @lumino/coreutils 工具包。
# @lumino/widgets
这是 Lumino 最核心的包,负责:
- Widget,可以理解为一个组件
- DOM 生命周期
- 布局系统,比如
BoxLayout、AccordionLayout、PanelLayout等 - Attach / Detach、Resize 管理
Widget 的定义(简化版)
export class Widget implements IMessageHandler, IObservableDisposable {
  constructor(options: Widget.IOptions = {}) {
    this.node = Private.createNode(options);
    this.addClass('lm-Widget');
  }
}

namespace Private {
  export function createNode(options: Widget.IOptions): HTMLElement {
    return options.node || document.createElement(options.tag || 'div');
  }
}
2
3
4
5
6
7
8
9
10
11
12
怎么使用 Widget 创建一个 HTML 块呢?
<div>
  <h1>标题</h1>
  <p>这是段落</p>
  <span>这是正文</span>
  <img src="http://localhost:8000/image/example.jpg" />
<div>
2
3
4
5
6
- 首先创建一个 Widget
import { Widget } from '@lumino/widgets';

function createNode(): HTMLElement {
  const root = document.createElement('div');

  const h1 = document.createElement('h1');
  h1.textContent = '标题';

  const p = document.createElement('p');
  p.textContent = '这是段落';

  const span = document.createElement('span');
  span.textContent = '这是正文';

  const img = document.createElement('img');
  img.src = 'http://localhost:8000/image/example.jpg';

  root.append(h1, p, span, img);
  return root;
}

class ArticleWidget extends Widget {
  constructor() {
    super({ node: createNode() });
  }
}

export default ArticleWidget;
2
3
4
5
6
7
8
9
10
11
12
13
14
15
16
17
18
19
20
21
22
23
24
25
26
27
28
- 然后挂载到 Document
const widget = new ArticleWidget();
Widget.attach(widget, document.body);
2
attach 其实就是使用了 insertBefore (opens new window) 方法。
export function attach(
    widget: Widget,
    host: HTMLElement,
    ref: HTMLElement | null = null
  ): void {
    if (widget.parent) {
      throw new Error('Cannot attach a child widget.');
    }
    if (widget.isAttached || widget.node.isConnected) {
      throw new Error('Widget is already attached.');
    }
    if (!host.isConnected) {
      throw new Error('Host is not attached.');
    }
    MessageLoop.sendMessage(widget, Widget.Msg.BeforeAttach);
    host.insertBefore(widget.node, ref);
    MessageLoop.sendMessage(widget, Widget.Msg.AfterAttach);
  }
2
3
4
5
6
7
8
9
10
11
12
13
14
15
16
17
18
同理 detach 使用了 removeChild (opens new window) 方法。
  export function detach(widget: Widget): void {
    if (widget.parent) {
      throw new Error('Cannot detach a child widget.');
    }
    if (!widget.isAttached || !widget.node.isConnected) {
      throw new Error('Widget is not attached.');
    }
    MessageLoop.sendMessage(widget, Widget.Msg.BeforeDetach);
    widget.node.parentNode!.removeChild(widget.node);
    MessageLoop.sendMessage(widget, Widget.Msg.AfterDetach);
  }
}
2
3
4
5
6
7
8
9
10
11
12
# @lumino/coreutils
顾名思义,@lumino/coreutils 提供了核心工具,比如 Random、UUID、Promise 代理、JSON 等,其中最重要的是插件系统。这也是 JupyterLab 的工作方式。
interface IPlugin<T, U> {
  id: string; // 插件 ID
  description?: string; // 插件描述
  autoStart?: boolean | "defer"; //是否自动启用插件
  provides?: null | Token<U>; // 该插件提供的服务,Token 作为插件的唯一标识
  requires?: Token<any>[]; // 插件依赖服务类型(必需)
  optional?: Token<any>[]; // 插件依赖服务类型(可选)
  activate: ((app, ...args) => U | Promise<U>); // 激活插件,函数的返回值作为插件提供服务的具体实例。
  deactivate?: null | ((app, ...args) => void | Promise<void>); // 停用插件
}
2
3
4
5
6
7
8
9
10
JupyterLab 大量使用了插件,比如 @jupyterlab/markedparser-extension (opens new window) 提供了渲染 Markdown 内容的服务。
const plugin: JupyterFrontEndPlugin<IMarkdownParser> = {
  id: '@jupyterlab/markedparser-extension:plugin',
  description: 'Provides the Markdown parser.',
  autoStart: true,
  provides: IMarkdownParser,
  requires: [IEditorLanguageRegistry],
  optional: [IMermaidMarkdown],
  activate: (
    app: JupyterFrontEnd,
    languages: IEditorLanguageRegistry,
    mermaidMarkdown: IMermaidMarkdown | null
  ) => {
    return createMarkdownParser(languages, {
      blocks: mermaidMarkdown ? [mermaidMarkdown] : []
    });
  }
};

export const IMarkdownParser = new Token<IRenderMime.IMarkdownParser>(
  '@jupyterlab/rendermime:IMarkdownParser',
  'A service for rendering markdown syntax as HTML content.'
);
2
3
4
5
6
7
8
9
10
11
12
13
14
15
16
17
18
19
20
21
22
createMarkdownParser 创建 Markdown 解析器。JupyterLab 使用这个插件提供的 Markdown 解析器,渲染 "text/markdown" 类型的输出。
同时 @lumino/coreutils 提供了注册插件的类 PluginRegistry
Class PluginRegistry<T> {
  registerPlugins(plugins): void; // 注册插件
  deregisterPlugin(id, force?): void; // 注销插件
  activatePlugin(id): Promise<void>; // 激活插件
  deactivatePlugin(id): Promise<string[]> // 停用插件
}
2
3
4
5
6
@lumino/application 以及它的子类 @jupyterlab/application (opens new window) 使用 PluginRegistry 注册插件。
# 插件系统
JupyterLab UI 是由一个 shell widget(root 容器) + 一堆插件构成。
比如上面提到的 @jupyterlab/markedparser-extension 只是其中一个插件,提供渲染 Markdown 内容的服务。
# 注册插件
JupyterLab 怎么注册插件?JupyterLab 没有提供相关的文档,我们只能从代码层面寻找答案。
- 首先在
dev_mode/package.json里列出了需要的插件,JupyterLab 把插件分为两类:- 标准插件(
extensions) - MIME 插件(
mimeExtensions)
- 标准插件(
"jupyterlab": {
  "extensions": {
    "@jupyterlab/markedparser-extension": "",
    "@jupyterlab/rendermime-extension": "",
    ...
  },
  "mimeExtensions": {
    "@jupyterlab/javascript-extension": "",
    "@jupyterlab/json-extension": "",
    "@jupyterlab/mermaid-extension": "lib/mime.js",
    "@jupyterlab/pdf-extension": "",
    "@jupyterlab/vega5-extension": ""
  },
}
2
3
4
5
6
7
8
9
10
11
12
13
14
- Webpack(
dev_mode/webpack.config.js) 读取dev_mode/package.json里extensions与mimeExtensions,并使用Handlebars.js 模版(opens new window) 填充dev_mode/index.js里的模版内容,输出到index.out.js。
dev_mode/webpack.config.js (简化版)
// 1. 读取 `dev_mode/package.json` 里 `extensions` 与 `mimeExtensions` 内容
const packageData = require('./package.json');
const jlab = packageData.jupyterlab;
const { extensions, mimeExtensions } = jlab;

// 2. 使用 `Handlebars.js` 模版填充 `dev_mode/index.js` 里的模版内容
const source = fs.readFileSync('index.js').toString();
const template = Handlebars.compile(source);
const extData = {
  jupyterlab_extensions: extensions,
  jupyterlab_mime_extensions: mimeExtensions
};
// 3. 输出到 `index.out.js`
fs.writeFileSync(path.join(buildDir, 'index.out.js'), template(extData));
2
3
4
5
6
7
8
9
10
11
12
13
14
dev_mode/index.js (简化版)
/**
 * The main entry point for the application.
 */
export async function main() {
  var pluginRegistry = new PluginRegistry();
  var JupyterLab = require('@jupyterlab/application').JupyterLab;
  var register = [];

  // 1. 处理注册的 MIME 扩展
  const mimeExtensions = [];
  {{#each jupyterlab_mime_extensions}}
  if (!queuedFederated.includes('{{@key}}')) {
    try {
      let ext = require('{{@key}}{{#if this}}/{{this}}{{/if}}');
      ext.__scope__ = '{{@key}}';
      for (let plugin of activePlugins(ext)) {
        mimeExtensions.push(plugin);
      }
    } catch (e) {
      console.error(e);
    }
  }
  {{/each}}

  // 2. 处理已注册的标准扩展。
  {{#each jupyterlab_extensions}}
  if (!queuedFederated.includes('{{@key}}')) {
    try {
      let ext = require('{{@key}}{{#if this}}/{{this}}{{/if}}');
      ext.__scope__ = '{{@key}}';
      for (let plugin of activePlugins(ext)) {
        register.push(plugin);
      }
    } catch (e) {
      console.error(e);
    }
  }
  {{/each}}

  // 3. 注册标准插件
  pluginRegistry.registerPlugins(register);

  // 4. 实例化 Jupyter Application
  const lab = new JupyterLab({
    pluginRegistry,
    mimeExtensions,
    ...
  });
}
2
3
4
5
6
7
8
9
10
11
12
13
14
15
16
17
18
19
20
21
22
23
24
25
26
27
28
29
30
31
32
33
34
35
36
37
38
39
40
41
42
43
44
45
46
47
48
49
dev_mode/bootstrap.js加载index.out.js完成标准插件的注册
void (async function bootstrap() {
  let main = (await import('./index.out.js')).main;
  window.addEventListener('load', main);
})();
2
3
4
- JupyterLab 实例化时,注册 MIME 插件
export class JupyterLab extends JupyterFrontEnd<ILabShell> {
  constructor(options: JupyterLab.IOptions = { shell: new LabShell() }) {
    if (options.mimeExtensions) {
      for (const plugin of createRendermimePlugins(options.mimeExtensions)) {
        this.registerPlugin(plugin);
      }
    }
  }
}
2
3
4
5
6
7
8
9
# 使用插件
JupyterLab 又是怎么使用插件呢?我们以 @jupyterlab/markedparser-extension 渲染 text/markdown 类型的 output 为例进行说明。
- 首先
@jupyterlab/markedparser-extension(opens new window) 并不是单独使用,而是作为@jupyterlab/rendermime-extension(opens new window) 的依赖,@jupyterlab/rendermime-extension(opens new window) 创建了RenderMimeRegistry(opens new window) 实例,将@jupyterlab/markedparser-extension(opens new window) 提供的服务作为markdownParser参数。
const plugin: JupyterFrontEndPlugin<IRenderMimeRegistry> = {
  id: '@jupyterlab/rendermime-extension:plugin',
  description: 'Provides the render mime registry.',
  optional: [
    IDocumentManager,
    ILatexTypesetter,
    ISanitizer,
    IMarkdownParser,
    ITranslator
  ],
  provides: IRenderMimeRegistry,
  activate: activate,
  autoStart: true
};

/**
 * Activate the rendermine plugin.
 */
function activate(
  app: JupyterFrontEnd,
  docManager: IDocumentManager | null,
  latexTypesetter: ILatexTypesetter | null,
  sanitizer: IRenderMime.ISanitizer | null,
  markdownParser: IMarkdownParser | null,
  translator: ITranslator | null
): RenderMimeRegistry {
  return new RenderMimeRegistry({
    initialFactories: standardRendererFactories,
    markdownParser: markdownParser ?? undefined,
    // ...
  });
}
2
3
4
5
6
7
8
9
10
11
12
13
14
15
16
17
18
19
20
21
22
23
24
25
26
27
28
29
30
31
32
RenderMimeRegistry(opens new window) 添加 MIME 渲染映射
export class RenderMimeRegistry implements IRenderMimeRegistry {
  constructor(options: RenderMimeRegistry.IOptions = {}) {
    // Parse the options.
    this.translator = options.translator ?? nullTranslator;
    this.resolver = options.resolver ?? null;
    this.linkHandler = options.linkHandler ?? null;
    this.latexTypesetter = options.latexTypesetter ?? null;
    this.markdownParser = options.markdownParser ?? null;
    this.sanitizer = options.sanitizer ?? new Sanitizer();

    // Add the initial factories.
    if (options.initialFactories) {
      for (const factory of options.initialFactories) {
        this.addFactory(factory);
      }
    }
  }
}
2
3
4
5
6
7
8
9
10
11
12
13
14
15
16
17
18
其中 standardRendererFactories 包含 text/markdown 类型的渲染工厂
export const markdownRendererFactory: IRenderMime.IRendererFactory = {
  safe: true,
  mimeTypes: ['text/markdown'],
  defaultRank: 60,
  createRenderer: options => new widgets.RenderedMarkdown(options)
};
2
3
4
5
6
最终得到一个映射:'text/markdown' => options => new widgets.RenderedMarkdown(options)
而 widgets.RenderedMarkdown(options) 对应 RenderedMarkdown 类
- 为 MIME 类型创建一个渲染器
function createRenderer(mimeType: string): IRenderMime.IRenderer {
    return this._factories[mimeType].createRenderer({
      mimeType,
      resolver: this.resolver,
      sanitizer: this.sanitizer,
      linkHandler: this.linkHandler,
      latexTypesetter: this.latexTypesetter,
      markdownParser: this.markdownParser,
      translator: this.translator
    });
}
2
3
4
5
6
7
8
9
10
11
它将创建 RenderedMarkdown 实例
export class RenderedMarkdown extends RenderedHTMLCommon {
  constructor(options: IRenderMime.IRendererOptions) {
    super(options);
    this.addClass('jp-RenderedMarkdown');
  }

  render(model: IRenderMime.IMimeModel): Promise<void> {
    return (this._rendered = renderers.renderMarkdown({
      host: this.node,
      source: String(model.data[this.mimeType]),
      trusted: model.trusted,
      resolver: this.resolver,
      sanitizer: this.sanitizer,
      linkHandler: this.linkHandler,
      shouldTypeset: this.isAttached,
      latexTypesetter: this.latexTypesetter,
      markdownParser: this.markdownParser,
      translator: this.translator
    }));
  }
}
2
3
4
5
6
7
8
9
10
11
12
13
14
15
16
17
18
19
20
21
- 渲染代码输出的组件
OutputArea(opens new window) 通过RenderMimeRegistry(opens new window) 创建RenderedMarkdown实例,然后通过output.renderModel(model)调用RenderedMarkdown的render方法
function createRenderedMimetype(model: IOutputModel): Widget | null {
  let output = this.rendermime.createRenderer(mimeType);
	output.renderModel(model)
  return output
}
2
3
4
5
RenderedMarkdown的render方法调用renderers.renderMarkdown,最终使用@jupyterlab/markedparser-extension(opens new window) 提供的服务markdownParser渲染 markdown 内容。
export async function renderMarkdown(
  options: renderMarkdown.IRenderOptions
): Promise<void> {
  const { host, source, markdownParser, ...others } = options;

  let html = '';
  if (markdownParser) {
    // Separate math from normal markdown text.
    const parts = removeMath(source);

    // Convert the markdown to HTML.
    html = await markdownParser.render(parts['text']);

    // Replace math.
    html = replaceMath(html, parts['math']);
  } else {
    // Fallback if the application does not have any markdown parser.
    html = `<pre>${source}</pre>`;
  }

  // Render HTML.
  await renderHTML({
    host,
    source: html,
    ...others
  });
}
2
3
4
5
6
7
8
9
10
11
12
13
14
15
16
17
18
19
20
21
22
23
24
25
26
27
至于 JupyterLab 什么时候将 @jupyterlab/rendermime-extension (opens new window) 创建了 RenderMimeRegistry (opens new window) 实例给 OutputArea (opens new window),那又是另外一个故事了。
# Jupyter Server
Jupyter Server (opens new window) 为 Jupyter Web 应用程序提供核心服务和 REST API (opens new window)。可以使用 Jupyter Server 提供的框架和服务来创建应用程序(比如 JupyterLab)和服务。
Jupyter 服务器采用基于 ZeroMQ (opens new window) 的 双进程内核架构 (opens new window),并使用 Tornado (opens new window) 来处理 HTTP 请求。
# 安装
$ pip install jupyter_server
如果安装了 Anaconda (opens new window),那么已经安装了 jupyter_server
# 运行
$ jupyter server
然后就能看到服务地址,比如 http://localhost:8888/?token=xxx
# 配置文件
默认情况下,Jupyter Server 会在 Jupyter 路径下的 jupyter_server_config 文件中查找服务器特定的配置。
列出 Jupyter Server 将要查找的路径:
$ jupyter --paths

config:
    /Users/username/.jupyter
    /usr/local/etc/jupyter
    /etc/jupyter
data:
    /Users/username/Library/Jupyter
    /usr/local/share/jupyter
    /usr/share/jupyter
runtime:
    /Users/username/Library/Jupyter/runtime
2
3
4
5
6
7
8
9
10
11
12
config 目录下的路径按优先级顺序排列。如果同一个 trait 在多个位置列出,则会将其值设置为优先级最高的文件中的值。
Jupyter Server 使用 IPython 的 traitlets 系统进行配置。您可以快速在 .jupyter 目录下创建一个 jupyter_server_config.py 文件中,它将所有默认值注释掉:
$ jupyter server --generate-config
在 Python 文件中,这些特性将以 c.ServerApp 为前缀。例如,您的配置文件可能如下所示:
# inside a jupyter_server_config.py file.

c.ServerApp.port = 9999
2
3
相同的配置用 JSON 表示如下:
{
  "ServerApp": {
    "port": 9999
  }
}
2
3
4
5
# 命令行参数
您也可以使用 CLI 参数进行配置。每个参数前添加 --ServerApp 前缀,如下所示:
$ jupyter server --ServerApp.port=9999
# 架构
下面是 Jupyter Server 系统架构
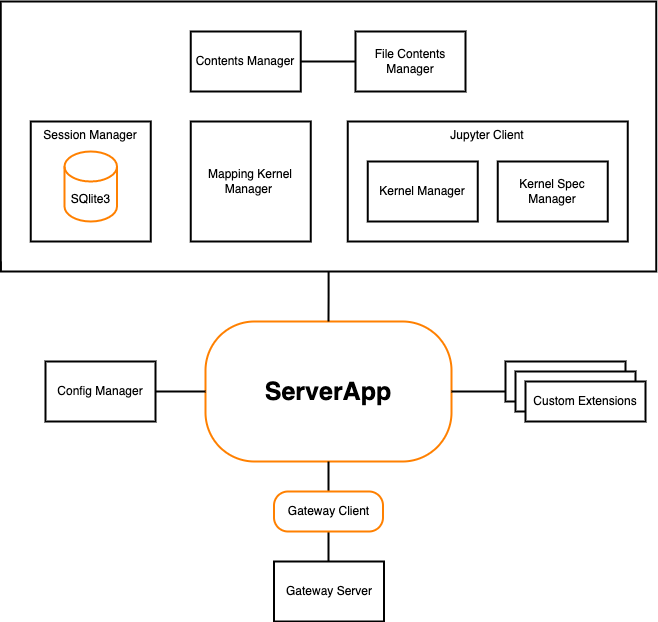
- ServerApp 是基于 Tornado (opens new window) 的应用程序,它将所有组件连接在一起。
- Config Manager 初始化 ServerApp 的配置。
- Custom Extensions 允许您创建自定义服务器的 REST API 端点。
- Gateway Server 是一种网络服务器,一旦进行配置,它就能为运行在其他主机上的 Jupyter 核心提供访问权限。
- Contents Manager and File Contents Manager 负责在文件系统上提供 Notebook 服务。
- Session Manager 处理用户的会话。当用户启动新的内核时,Session Manager 会启动一个进程为该用户配置内核,并生成一个新的 Session ID。每个打开的 Notebook 都有一个独立的 Session,但不同的 Notebook 内核可以使用相同的 Session。如果用户希望在多个打开的 Notebook 之间共享数据,这一点非常有用。会话管理器使用 SQLite3 数据库来存储会话信息。默认情况下,该数据库存储在内存中,但也可以配置为保存到磁盘上。
- Mapping Kernel Manager 负责管理服务器应用程序内运行的内核的生命周期。它为用户的 Session 启动新的内核,并支持对该内核的中断、重启和关闭操作。
- Jupyter Client 被 Jupyter Server 用来与 Notebook 内核一起工作。
- Kernel Manager 管理 Notebook 的单个内核。
- Kernel Spec Manager 解析符合内核 JSON 规范的文件,并提供可用内核配置的列表。
更多详情请参考 Jupyter Server Architecture (opens new window)。
# 创建 Session 工作流
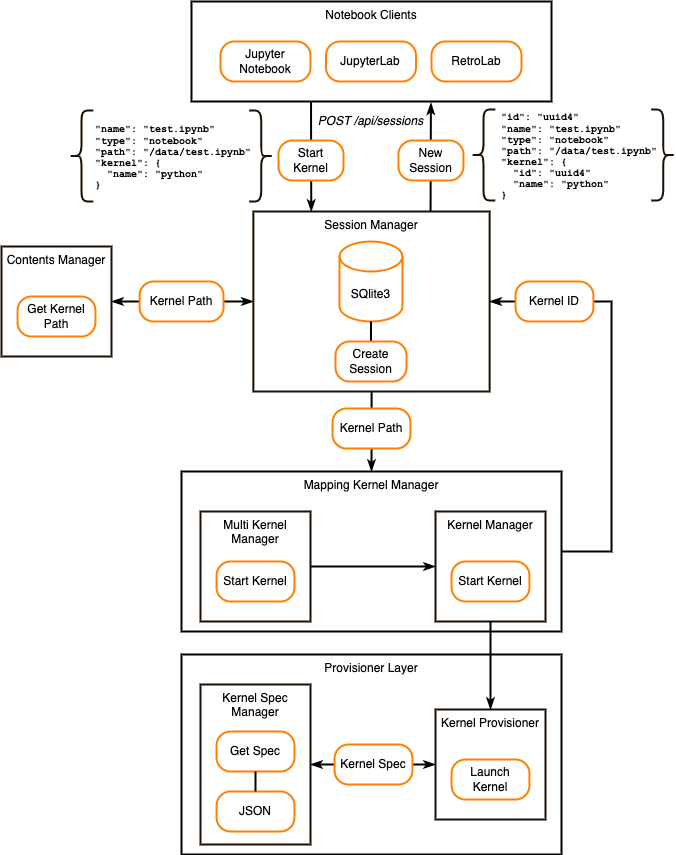
当用户启动一个新内核时:
- Notebook Clients 向 Jupyter 服务器发送
POST /api/sessions(opens new window) 请求。此请求包含所有必要的数据,例如 Notebook 名称、类型、路径和内核名称等。 - Session Manager 根据输入数据向 Contents Manager 请求内核文件系统路径。
- Session Manager 将内核路径发送给 Mapping Kernel Manager 。
- Mapping Kernel Manager 使用 Multi Kernel Manager 和 Kernel Manager 启动内核创建进程。
- Kernel Manager 使用 Provisioner Layer 启用一个新内核。
- Kernel Provisioner 负责根据内核规范启动内核。
- Kernel Spec Manager 从 JSON 文件中获取内核规范。该规范位于
kernel.json文件中。 - 一旦 Kernel Provisioner 启动内核, Kernel Manager 为 Session Manager 生成新的内核 ID。
- Session Manager 将新的会话数据保存到 SQLite3 数据库(会话 ID、notebook 路径、notebook 名称、notebook 类型、内核 ID 等)。
- Notebook Clients 接收已创建的会话数据。
更多详情请参考 Create Session Workflow (opens new window)。
# @jupyterlab/services
我们可以通过 Jupyter Server REST API (opens new window) 和 WebSocket 与 Jupyter Server 进行连接,执行代码,但是 JupyterLab 提供了一个 @jupyterlab/services (opens new window) 库,它封装了 Jupyter Server REST API (opens new window)、WebSocket、Jupyter Messaging Protocol (opens new window) 等实现细节,方便我们快速集成。
简便流程如下:
- 创建 ServerSettings
import { ServerConnection } from '@jupyterlab/services';

// 假设 jupyter server 地址是 http://localhost:8888/?token=xxx
// baseUrl 必须以 / 结尾
const serverSettings = ServerConnection.makeSettings({
  baseUrl: 'http://localhost:8888/',
  token: 'xxx',
  wsUrl: 'ws://localhost:8888/',
  appendToken: true,
});
2
3
4
5
6
7
8
9
10
- 启动 / 连接 Kernel
export async function createKernelSession(
  settings: ServerConnection.ISettings,
  kernelName: string = 'python3',
): Promise<Session.ISessionConnection> {
  // 创建 KernelManager
  const kernelManager = new KernelManager({ serverSettings: settings });

  // 创建 SessionManager
  const sessionManager = new SessionManager({
    serverSettings: settings,
    kernelManager,
  });

  // 创建新会话
  const session = await sessionManager.startNew({
    path: `notebook-${Date.now()}.ipynb`,
    type: 'notebook',
    name: '',
    kernel: {
      name: kernelName,
    },
  });

  return session;
}
2
3
4
5
6
7
8
9
10
11
12
13
14
15
16
17
18
19
20
21
22
23
24
25
- 执行代码
const future = kernel.requestExecute({ code });

// 实时接收输出
future.onIOPub = handleMessage;

// 执行完成
future.done.then(() => {
  console.log('execution finished');
});
2
3
4
5
6
7
8
9
# 实现
至此,我们分析了
- Notebook 的文件结构
- JupyterLab 的架构
- JupyterLab 的 UI 框架、插件系统
- Jupyter Server 的架构
- 通过
@jupyterlab/services连接 Jupyter Server,执行代码
因此,我们可以仿照 JupyterLab,使用 React 实现 Jupyter Notebook。
- 使用
react-md-editor(opens new window) 渲染和编辑 Markdown Cell - 使用
monaco-react(opens new window) 或者react-codemirror(opens new window) 渲染与编辑 Code Cell - 使用
@jupyterlab/outputarea(opens new window) 封装 Code 输出 - 使用
@jupyterlab/services(opens new window) 连接 Jupyter Serve 执行代码
一个简单版的 JupyterLab 就完成了。
我们也可以进一步研究 JupyterLab 的源代码,实现更多功能,比如和 JupyterLab 一样使用插件系统。
# 完整代码
cp3hnu/jupyter-react (opens new window)