# Playwright 端到端测试
Playwright 是一个面向现代 Web 应用的端到端测试框架。它集成了测试运行器、断言、隔离、并行化和丰富的工具。Playwright 支持 Windows、Linux 和 macOS 上的 Chromium、WebKit 和 Firefox 内核浏览器,支持本地测试和持续集成 (CI) 测试。
# 安装
$ cd project-dir
$ npm init playwright@latest
2
它会询问四个问题:
Do you want to use TypeScript or JavaScript? TypeScript 还是 JavaScript,默认值:
TypeScriptWhere to put your end-to-end tests? 测试文件夹名称,默认值:
tests,如果tests已存在,则默认值为e2eAdd a GitHub Actions workflow?
是否添加 GitHub Actions 工作流?默认值:
是Install Playwright browsers (can be done manually via 'npx playwright install')? 是否安装 Playwright 浏览器,默认值:
是
如果同意安装 Playwright browsers,则 Playwright 开始下载并安装浏览器(Firefox、WebKit、Chromium),文件存放在 ~/Library/Caches/ms-playwright 目录下
然后在目录根目录下创建:
playwright.config.ts
tests/
  example.spec.ts
2
3
playwright.config.ts是 Playwright 的配置文件,配置目标浏览器、超时、重试次数、项目、报告器等。tests/example.spec.ts是一个最小的测试样例。
如果同意添加 GitHub Actions 工作流,还会在根目录下创建 .github 文件夹,里面是 GitHub Actions 工作流相关的配置。
# VS Code 插件
我们还可以安装 VS Code 扩展 (opens new window),创建和运行测试。
# 更新
Playwright 每次发布新版本都会更新其支持的浏览器版本,以确保最新版本始终支持最新的浏览器。
这意味着每次更新 Playwright 后,都需要重新安装新的浏览器。
# 更新 Playwright
$ npm install -D @playwright/test@latest

# 下载新的浏览器和依赖项
$ npx playwright install --with-deps

# 查看最新版本
$ npx playwright --version

# 列出 playwright 安装的所有浏览器
$ npx playwright install --list

# 卸载 playwright 安装的浏览器
$ npx playwright uninstall
2
3
4
5
6
7
8
9
10
11
12
13
14
# CLI 常用命令
# Runs the end-to-end tests.
$ npx playwright test

# Starts the interactive UI mode.
$ npx playwright test --ui

# Runs the tests only on Desktop Chrome.
$ npx playwright test --project=chromium

# Runs the tests in a specific file.
$ npx playwright test example

# Run tests at a specific line
$ npx playwright test my-spec.ts:42

# Run tests by title
$ npx playwright test -g "add a todo item"

# Runs the tests in debug mode.
$ npx playwright test --debug

# Auto generate tests with Codegen.
$ npx playwright codegen

# Open HTML Test Reports
$ npx playwright show-report
2
3
4
5
6
7
8
9
10
11
12
13
14
15
16
17
18
19
20
21
22
23
24
25
26
# 写测试
Playwright 测试与 Jest (opens new window)、Vitest (opens new window)、Testing Library (opens new window) 一样,执行动作,判断结果与预期是否相符。
但是 Playwright 的优点是会自动等待可操作性 (opens new window)检查通过后再执行每个操作,我们不需要手动添加等待或处理竞态条件。
下面是 Playwright 生成的测试样例代码
import { test, expect } from '@playwright/test';

test('has title', async ({ page }) => {
  await page.goto('https://playwright.dev/');

  // Expect a title "to contain" a substring.
  await expect(page).toHaveTitle(/Playwright/);
});

test('get started link', async ({ page }) => {
  await page.goto('https://playwright.dev/');

  // Click the get started link.
  await page.getByRole('link', { name: 'Get started' }).click();

  // Expects page to have a heading with the name of Installation.
  await expect(page.getByRole('heading', { name: 'Installation' })).toBeVisible();
});
2
3
4
5
6
7
8
9
10
11
12
13
14
15
16
17
18
从这份测试样例代码我们可以看到,主要由两部分组成:Actions (opens new window) 和 Assertions (opens new window)。
- Actions:模拟用户点击动作
- Assertions:表达用户期望的结果
# Actions
Actions 负责模拟真实用户在页面上的操作,比如打开页面、点击按钮、填写表单、上传文件等。Playwright 会在执行每个 Action 前自动完成可操作性 (opens new window)检查(元素可见、稳定、可接收事件),因此通常不需要手动 sleep 或处理竞态条件。
常见的 Actions 如下:
| 方法 | 说明 |
|---|---|
page.goto(url) | 打开指定 URL |
locator.click() | 单击元素,支持双击 dblclick()、右键 click({ button: 'right' }) |
locator.hover() | 鼠标悬停在元素上 |
locator.fill(text) | 填写输入框、文本域或 contenteditable 元素 |
locator.pressSequentially(text) | 模拟键盘逐字符输入,适用于有特殊键盘处理的场景 |
locator.press(key) | 按下键盘按键,如 Enter、Control+ArrowRight |
locator.check() / locator.uncheck() | 勾选或取消勾选复选框、单选框 |
locator.selectOption(value) | 在下拉框中选择一项或多项 |
locator.setInputFiles(path) | 为 <input type="file"> 选择文件 |
locator.focus() | 将焦点移到指定元素 |
locator.dragTo(target) | 将元素拖拽到目标位置 |
locator.scrollIntoViewIfNeeded() | 将元素滚动到可视区域 |
下面是一个综合示例:
await page.goto('https://example.com/login');
await page.getByLabel('用户名').fill('admin');
await page.getByLabel('密码').fill('secret');
await page.getByRole('button', { name: '登录' }).click();
2
3
4
更多详情,请参考 Playwright - Actions (opens new window)。
# Assertions
Assertions 用来验证页面状态是否符合预期。Playwright 通过 expect 函数提供断言能力,其中面向 Web 的异步断言会自动重试,直到条件满足或超时(默认 5 秒),从而有效减少因页面异步渲染导致的测试不稳定。
常见的 Assertions 如下:
| 断言 | 说明 |
|---|---|
await expect(locator).toBeVisible() | 元素可见 |
await expect(locator).toBeHidden() | 元素不可见 |
await expect(locator).toHaveText(text) | 元素文本完全匹配 |
await expect(locator).toContainText(text) | 元素文本包含指定内容 |
await expect(locator).toHaveValue(value) | 输入框的值匹配 |
await expect(locator).toBeChecked() | 复选框或单选框已勾选 |
await expect(locator).toBeEnabled() / toBeDisabled() | 元素可用 / 不可用 |
await expect(locator).toHaveCount(n) | 匹配到的元素数量 |
await expect(locator).toHaveAttribute(name, value) | 元素具有指定属性 |
await expect(page).toHaveTitle(title) | 页面标题匹配 |
await expect(page).toHaveURL(url) | 页面 URL 匹配 |
断言也支持取反和软断言:在 matcher 前加 .not 可验证相反条件;使用 expect.soft() 时,断言失败不会立即终止测试,而是继续执行并在最后标记测试失败。
await expect(page.getByRole('heading', { name: '欢迎' })).toBeVisible();
await expect(page).toHaveURL(/dashboard/);
await expect(page.getByLabel('记住我')).toBeChecked();
2
3
更多详情,请参考 Playwright - Assertions (opens new window)。
# Codegen
写 Playwright 测试文件是比较麻烦的,难点往往不在于 Actions 或 Assertions 的语法,而在于如何准确定位页面上的交互元素(locator)。一个按钮可能有多种选择方式:getByRole、getByText、getByTestId……选错了就会导致测试不稳定甚至直接失败。
为此,Playwright 提供了 Codegen(测试生成器)功能,可以录制测试:打开浏览器,像真实用户一样操作页面,Playwright 会同步生成对应的测试代码。它还会分析页面结构,优先推荐 role、text、test id 等更稳定的 locator,如果匹配到多个元素,会自动优化 locator 使其唯一目标元素。
操作流程
- 启动 Codegen。在终端运行以下命令,
url参数可选,也可以启动后在浏览器地址栏手动输入:
$ npx playwright codegen https://playwright.dev
命令会打开两个窗口:浏览器窗口(用于操作页面)和 Playwright Inspector(显示实时生成的代码)。
录制操作。在浏览器中执行点击、填写、导航等操作,Inspector 会同步生成对应的 Actions 代码。
录制断言。点击 Inspector 工具栏中的断言图标,再点击页面元素,可生成以下断言:
assert visibility:断言元素可见assert text:断言元素包含指定文本assert value:断言输入框具有指定值
复制代码。操作完成后,点击 Inspector 中的 Record 按钮停止录制,再点击 Copy 将生成的代码粘贴到测试文件中。
生成 Locator(可选)。停止录制后,点击 Pick Locator,在页面上悬停或点击元素,即可获取并复制对应的 locator 代码。
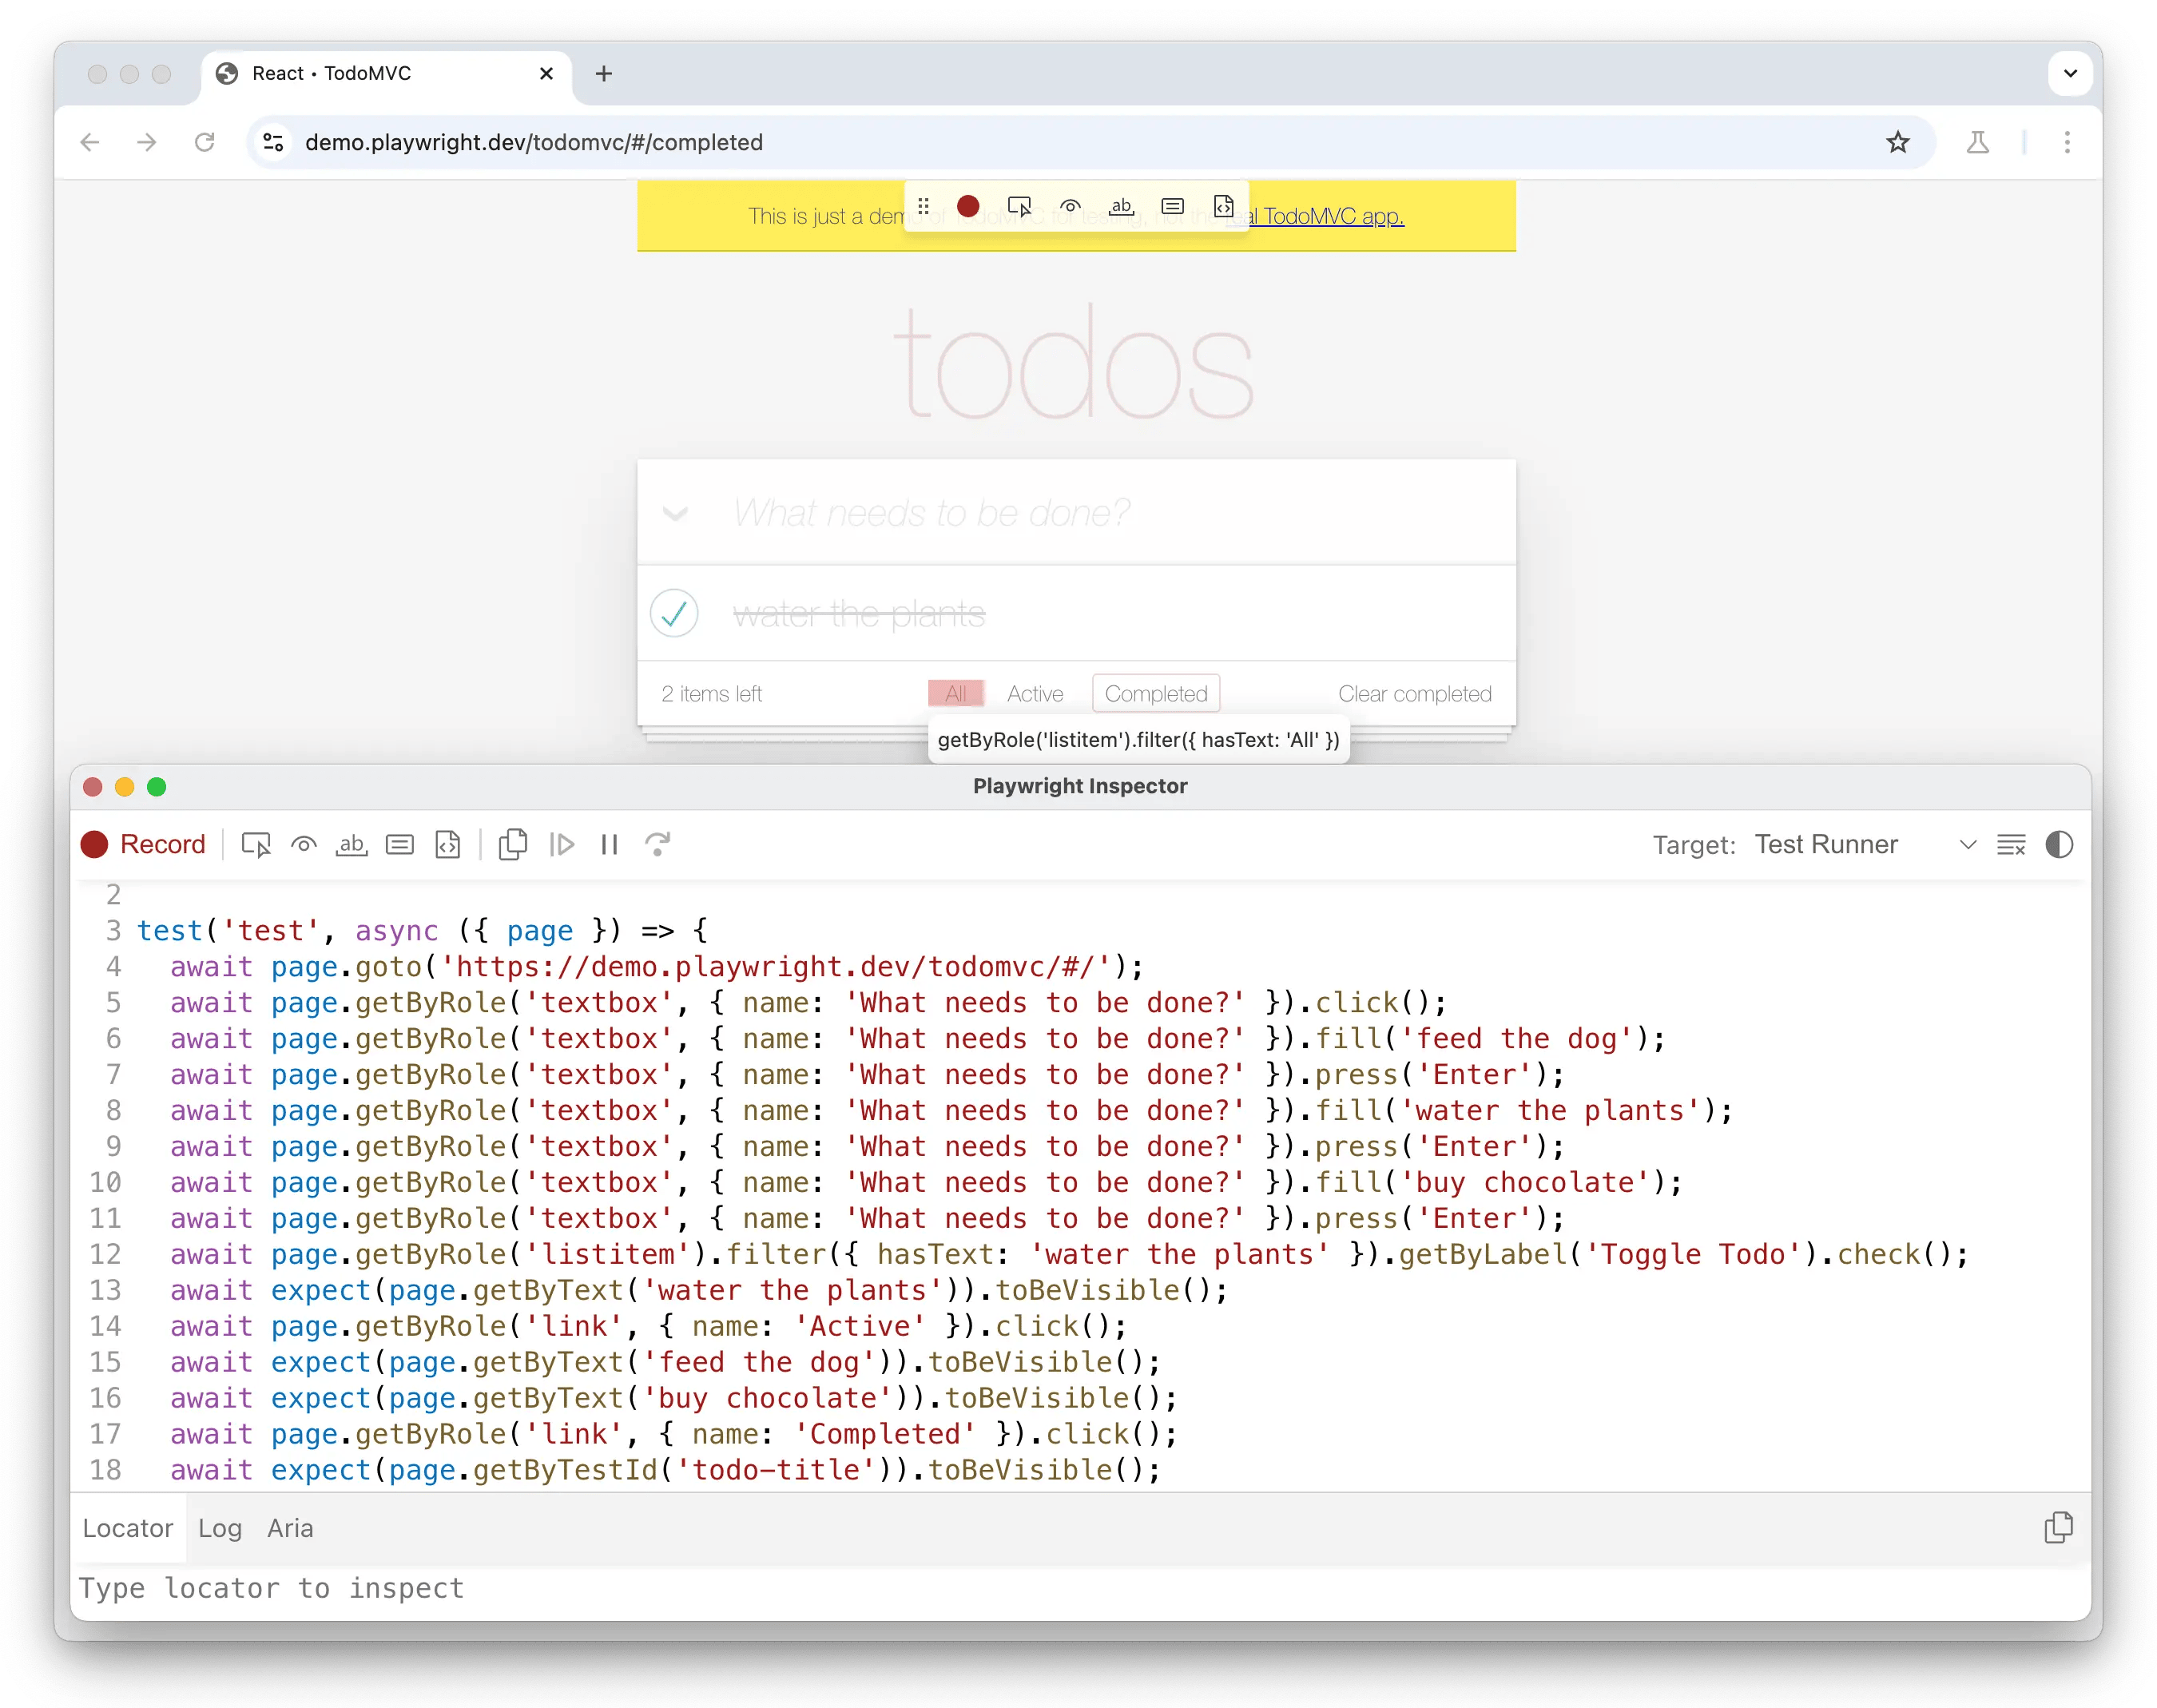
如果安装了 VS Code 扩展 (opens new window),也可以直接在 Testing 侧边栏点击 Record new 录制测试,体验与 CLI 类似。
更多详情,请参考 Playwright - Test generator (opens new window)。
# 执行测试
写好测试文件之后,运行 npx playwright test 进行测试
$ npx playwright test
还可以启动 UI 界面,进行交互式测试
$ npx playwright test --ui
查看测试报告
$ npx playwright show-report
调试测试
$ npx playwright test --debug
# Test Agents
如果觉得 Codegen 还不够智能,可以使用 Playwright 新推出的智能体 Test Agents:planner、generator、healer。
- planner:探索应用程序,生成了一个 Markdown 测试计划
- generator:将 Markdown 计划转换为 Playwright 测试文件
- healer:执行测试套件并自动修复失败的测试
# 安装
Playwright Test Agents 目前提供 3 个 AI Agents 快速安装
# vscode
$ npx playwright init-agents --loop=vscode

# claude code
$ npx playwright init-agents --loop=claude

# opencode
$ npx playwright init-agents --loop=opencode
2
3
4
5
6
7
8
通过分析它的安装过程,其实也很容易移植到别的 AI Agent,比如下面的命令
$ npx playwright init-agents --loop=vscode
其实是在当前目录下,添加了这些文件
Writing file: .github/chatmodes/🎭 generator.chatmode.md
Writing file: .github/chatmodes/🎭 healer.chatmode.md
Writing file: .github/chatmodes/ 🎭 planner.chatmode.md
Writing file: .vscode/mcp.json
Writing file: tests/seed.spec.ts
2
3
4
5
它一共做了下面三件事情:
- 安装了三个 SubAgent,分别对应 planner、generator、healer
- 添加
playwright-testMCP 服务
{
  "servers": {
    "playwright-test": {
      "type": "stdio",
      "command": "npx",
      "args": [
        "playwright",
        "run-test-mcp-server"
      ]
    }
  },
  "inputs": []
}
2
3
4
5
6
7
8
9
10
11
12
13
- 创建了一个
tests/seed.spec.ts文件,这个文件用于 planner,生成测试计划
import { test, expect } from '@playwright/test';

test.describe('Test group', () => {
  test('seed', async ({ page }) => {
    // generate code here.
  });
});
2
3
4
5
6
7
所以很容易移植到别的 AI Agent,比如 Cursor
- 将 3 个 SubAgents 移动到
.cursor/agents目录下 - 添加
playwright-testMCP 服务到.cursor/mcp.json
然后就可以在 Cursor 里使用 Playwright Test Agents 了
# 使用 Agents
使用 Playwright Test Agents 非常简单
首先使用 planner 生成测试计划,它将生成 markdown 文件
使用 generator 将 markdown 计划转换为 Playwright 测试文件
使用 healer 执行测试套件并自动修复失败的测试