# CopilotKit - The frontend stack for Agent
CopilotKit (opens new window) 是面向 Agent 应用的前端栈。它不只是聊天 UI,更关注 Agent 如何接入应用,比如读取页面上下文、调用前端工具、渲染真实 React 组件,以及在需要时暂停等待用户审批。
可以把 CopilotKit 理解成:把 Agent 接到产品上的一套标准能力,而不是单纯再包一层 Chat 组件。
核心能力如下:
| 产品能力 | 说明 |
|---|---|
| Chat UI | 可嵌入页面、侧边栏、浮窗的对话界面 |
| Generative UI | Agent 调用工具时,在聊天里渲染真实的 React 组件,而不是只吐文本 |
| Shared State | 应用状态与 Agent 状态双向同步 |
| Human-in-the-Loop | Agent 中途停下来,等人审批、选择、填表后再继续 |
| Frontend Tools | Agent 直接调用浏览器里的函数(改 UI、读当前页面、操作本地状态) |
| Headless UI | 不要预置皮肤时,可以定制自己的 UI |
| Any Agent | 后端只要支持 AG-UI,都可以接入 |
CopilotKit 当前版本 v1.68.1
# 我的应用
我使用 CopilotKit 创建了一个 UI Design Studio Project (opens new window)。效果如下:
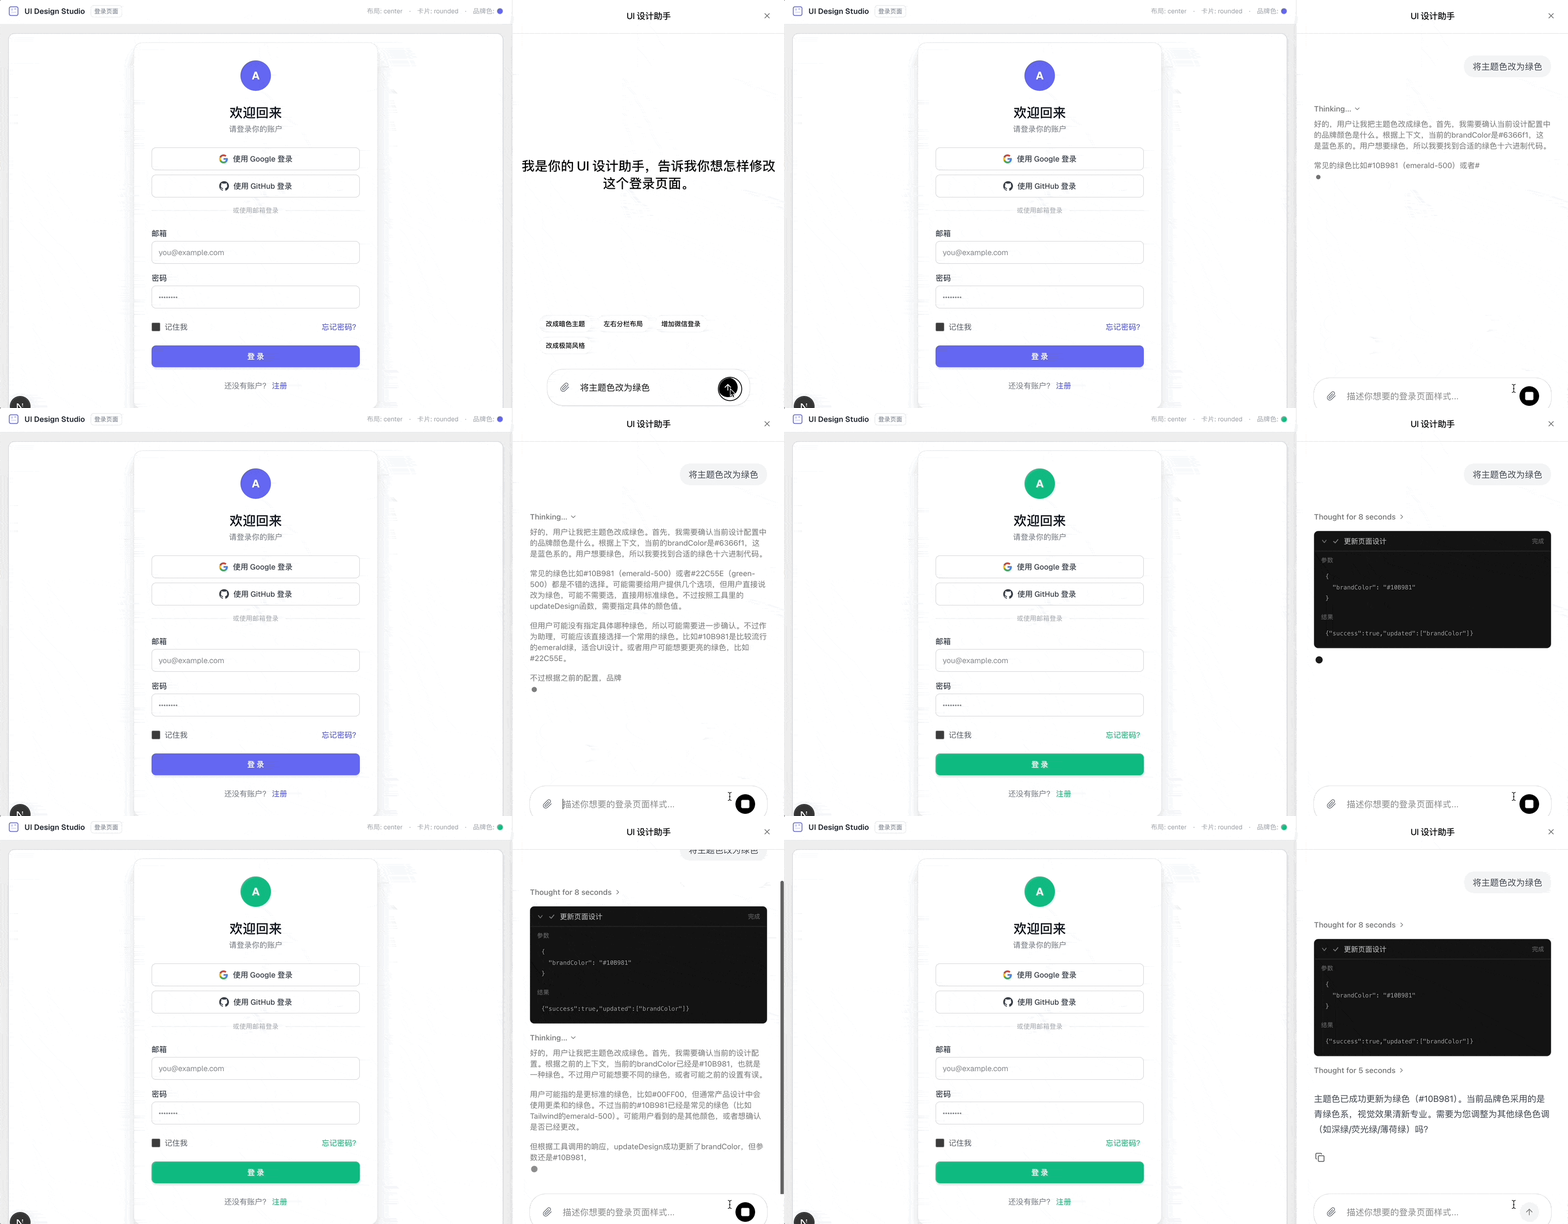
使用 Next.js + CopilotKit,实现左侧实时预览登录页,右侧侧边栏开启 agent 对话,agent 可改页面设计。
# 架构
CopilotKit 采用三层结构:Frontend、Runtime、Agent,中间用 AG-UI (opens new window) 事件协议连接。更多详情,请参考 Architecture (opens new window)。
# 三层职责
Frontend
框架原生 SDK,加上预置聊天组件 CopilotChat / CopilotSidebar / CopilotPopup。可以通过插槽的方式修改内部组件,甚至可以完全定制(Headless UI).
Runtime
挂在应用服务器(Next.js、Express、Hono、Bun、Deno、Workers)上的请求处理程序。可以负责鉴权、工具调用转发、AG-UI 数据流等。
Agent
任意 AG-UI 兼容后端。可以是内置的 BuiltInAgent,也可以是 LangGraph、Mastra、CrewAI、Pydantic AI、Microsoft Agent Framework。它负责跑 prompt、调用工具、发出状态,并把事件流式传回 Runtime。
# 请求过程
一句话概括:用户说话 → 前端 POST 到 Runtime → Runtime 驱动 Agent → 事件经 SSE 流回前端。
如果工具定义在浏览器里,Runtime 会把调用转发到前端,执行完再把结果送回 Agent。
# 集成 CopilotKit
# 手动集成
# 内置模型
CopilotKit 天然支持 OpenAI、Anthropic、Google Gemini、MiniMax。下面以 Next.js + BuiltInAgent 为例,更多详情,请参考 Quickstart (opens new window)。
前置条件
- Node.js 20+
- OpenAI API Key(也可换成 Anthropic / Google / Custom Models (opens new window))
- React 前端(示例用 Next.js)
- 安装依赖
$ npm install @copilotkit/react-core @copilotkit/runtime
- 配置环境变量
# .env
OPENAI_API_KEY=your_openai_api_key
2
- 创建 Copilot Runtime(API Route)
在 app/api/copilotkit/route.ts 里配置 BuiltInAgent 和 CopilotRuntime。模型用内置字符串即可:
import {
  CopilotRuntime,
  createCopilotRuntimeHandler,
} from "@copilotkit/runtime";
import { BuiltInAgent } from "@copilotkit/runtime/v2";
import { NextRequest } from "next/server";

const builtInAgent = new BuiltInAgent({
  model: "openai:gpt-5.4-mini",
});

const runtime = new CopilotRuntime({
  agents: { default: builtInAgent },
});

export const POST = async (req: NextRequest) => {
  const { handleRequest } = createCopilotRuntimeHandler({
    runtime,
    endpoint: "/api/copilotkit",
  });

  return handleRequest(req);
};
2
3
4
5
6
7
8
9
10
11
12
13
14
15
16
17
18
19
20
21
22
23
BuiltInAgent 底层用的是 Vercel AI SDK,内置 openai:、anthropic:、google: 和 minimax:模型前缀。更多详情,请参考 Model Selection (opens new window)。
- 配置 CopilotKit Provider
在 app/layout.tsx 里用 CopilotKit 包裹应用:
import { CopilotKit } from "@copilotkit/react-core/v2";
import "@copilotkit/react-core/v2/styles.css";

export default function RootLayout({ children }: { children: React.ReactNode }) {
  return (
    <html lang="en">
      <body>
        <CopilotKit runtimeUrl="/api/copilotkit">
          {children}
        </CopilotKit>
      </body>
    </html>
  );
}
2
3
4
5
6
7
8
9
10
11
12
13
14
- 添加聊天界面
import { CopilotSidebar } from "@copilotkit/react-core/v2";

export default function Page() {
  return (
    <main>
      <h1>Your App</h1>
      <CopilotSidebar />
    </main>
  );
}
2
3
4
5
6
7
8
9
10
- 启动
$ npm run dev
到这里已经可以对话了。
# 接入其他模型
任何 OpenAI 兼容 API,都可以用 @ai-sdk/openai-compatible 或 @ai-sdk/openai 的 createOpenAI({ baseURL }) 包一层,再交给 BuiltInAgent。
下面以千问为例说明怎么接入其他模型。更多详情,请参考 Model Selection - Custom Models (AI SDK) (opens new window)。
- 安装 AI SDK provider
$ npm install @ai-sdk/openai-compatible
- 配置千问环境变量
阿里云百炼(DashScope)提供 OpenAI 兼容接口。复制 .env.example 为 .env:
# 阿里云百炼:https://bailian.console.aliyun.com/
DASHSCOPE_API_KEY=sk-...
DASHSCOPE_BASE_URL=https://dashscope.aliyuncs.com/compatible-mode/v1
DASHSCOPE_MODEL=qwen-plus
DASHSCOPE_ENABLE_THINKING=true   # 设为 false 可关闭思考链
2
3
4
5
- 封装模型
import { createOpenAICompatible } from "@ai-sdk/openai-compatible";

export const QWEN_MODEL_ID = process.env.DASHSCOPE_MODEL;

const dashscope = createOpenAICompatible({
  name: "qwen",
  apiKey: process.env.DASHSCOPE_API_KEY,
  baseURL: process.env.DASHSCOPE_BASE_URL,
  includeUsage: true,
  transformRequestBody: (body) => ({
    ...body,
    enable_thinking: process.env.DASHSCOPE_ENABLE_THINKING !== "false",
    incremental_output: true,
  }),
});

export const qwen = dashscope.chatModel(QWEN_MODEL_ID);
2
3
4
5
6
7
8
9
10
11
12
13
14
15
16
17
- Runtime 里使用千问
import {
  BuiltInAgent,
  CopilotRuntime,
  createCopilotRuntimeHandler,
} from "@copilotkit/runtime/v2";
import { qwen } from "@/lib/qwen";

const agent = new BuiltInAgent({
  model: qwen, // 传入 LanguageModel
  maxSteps: 8,
  tools: agentTools,
  prompt: "...",
});

const runtime = new CopilotRuntime({
  agents: {
    default: agent,
  },
});

const handler = createCopilotRuntimeHandler({
  runtime,
  basePath: "/api/copilotkit",
});

export const GET = handler;
export const POST = handler;
export const OPTIONS = handler;
2
3
4
5
6
7
8
9
10
11
12
13
14
15
16
17
18
19
20
21
22
23
24
25
26
27
28
# CopilotKit CLI
上面是手动集成:自己装依赖、写 Runtime、配 Provider。如果想从零快速搭一个可跑的示例项目,也可以用官方 CLI:
$ npx copilotkit@latest create
执行后会进入交互式向导,按提示选择项目名称、Agent 框架、前端模板等,生成一套已经接好 CopilotKit 的脚手架。
输入项目名称
选择智能体框架
Copilotkit 提供了 21 agent framework,供我们选择。下面是这 21 个 agent framework 的简单介绍
| 分类 | 选项 | 简介 |
|---|---|---|
| LangGraph 系列 | 🦜 LangGraph (Python) | Python 版 LangGraph,官方文档称功能覆盖最全,HITL、checkpoint 支持最成熟 |
| 🦜 LangGraph (JavaScript) | TS/JS 版 LangGraph,走 AG-UI adapter,纯前端技术栈可用 | |
| Claude 系 | 🔆 Claude Agent SDK (TypeScript) | 基于 Anthropic Claude Agent SDK 的 TS 模板 |
| 🔆 Claude Agent SDK (Python) | 同上的 Python 版,官方标注支持生成式 UI、共享状态、HITL、子 agent、流式输出全特性 | |
| 其他 Python/TS 框架 | 🌑 Mastra | TypeScript 原生 agent 框架,自带 tools/memory/workflow |
| 🔼 Pydantic AI | 基于 Pydantic 的类型化 Python agent 框架 | |
| 🧬 AWS Strands (Python) | AWS Strands agent,Python 版(不经 AgentCore 部署) | |
| Google ADK 相关 | 🤖 ADK | Google Agent Development Kit,Gemini 驱动,经 AG-UI 接入 |
| 🔺 Angular + ADK | ADK 的 Angular 前端模板(其余大多数模板默认是 React/Next.js) | |
| 微软相关 | 🟦 Microsoft Agent Framework (.NET) | MS Agent Framework 的 .NET 实现 |
| 🟦 Microsoft Agent Framework (Python) | MS Agent Framework 的 Python 实现 | |
| 协议/生态 | 🧩 MCP Apps | 基于 Model Context Protocol 的 App 集成模板,可把 MCP 工具服务器接入生成式 UI |
| 🤖 A2A | Agent-to-Agent 协议模板,用于多 agent 间互通 | |
| 多 Agent 编排 | 👥 CrewAI Flows | CrewAI 的 Flow(流程编排)模式,比 Crew 更强调确定性步骤控制 |
| 🦙 LlamaIndex | LlamaIndex workflow 接入 CopilotKit | |
| 🧠 Agno | 带 tools、state、生成式 UI 示例的轻量 agent 框架 | |
| 🤖 AG2 | 支持 chat、tools、HITL 流程的多 agent 框架(原 AutoGen) | |
| AWS AgentCore 部署 | ⛅ AgentCore + LangGraph | 部署到 AWS Bedrock AgentCore 的 LangGraph 模板,含 CDK 基础设施和一键部署脚本 |
| ⛅ AgentCore + Strands | 部署到 AWS Bedrock AgentCore 的 Strands 模板,同样含完整部署脚本 | |
| 生成式 UI 专用 | 🎨 A2UI | Agent-to-UI 模板,agent 直接描述/驱动 UI 结构,适合动态表单类场景 |
| ✨ Open Generative UI | 专为生成式 UI 优化的模板,配套 useComponent 等 hook,直接渲染真实 React 组件 |
因为我对 JavaScript 比较熟悉,所以我选择 LangGraph (JavaScript)
创建 CopilotKit 账号,如果已经有了账号,直接进行验证
创建或连接一个 Intelligence project
这一步是在问:这套 App 的聊天记录,要存到云端的哪个「项目」里?
可以把它想成 ChatGPT 的历史会话存放处。一个 Intelligence project 就是 CopilotKit 云端的一个小仓库,专门存这套 App 的对话历史(threads)、消息和分析数据。不接的话,聊天只活在当前浏览器里,一刷新就没了;接上之后,关掉页面再打开还能继续聊,换设备也能找回。
刚开始随便新建一个就行。后面如果有正式环境、测试环境,再分开建,免得聊天记录混在一起。更多说明见 Cloud-Hosted Enterprise Intelligence (opens new window)。
- 选择 Channel,可以先跳过
这一步是在问:要不要把 Agent 接到 Slack、Teams 这类聊天工具里?
Channel 的意思是:用户不用打开你的网页,直接在 Slack / Teams 里跟 Agent 对话。CopilotKit 负责对接这些平台,消息转给你的 Agent,回复再发回对应的频道。刚搭脚手架、只想先在网页里试跑时,这一步可以跳过,以后要用再配。更多说明见 Channels (opens new window)。
- 设置
OPENAI_API_KEY,如果暂时没有,也可以先跳过。
向导结束后,CLI 会生成项目并安装依赖。进入目录后启动开发服务即可:
$ cd <your-app-name>
$ npm run dev
2
之后按提示补上 API Key、按需配置 Channel 或 Intelligence,就可以在浏览器里试对话了。
CLI 适合快速摸清整套结构;真正接到自己的业务里,还是要回到前面的手动集成。
# 组件与 Hook
完整 API 见 References (opens new window),选型可参考 Which Hook for Which Job (opens new window)。
# 组件一览
| 组件 | 功能 |
|---|---|
CopilotKit | 应用根 Provider,连接 Runtime,提供 Agent 注册表与全局上下文 |
CopilotChat | 开箱即用的完整聊天界面,自动绑定 Agent、管理消息与运行态 |
CopilotSidebar | 侧栏形态聊天,固定面板 + 开关按钮,适合与主内容并排 |
CopilotPopup | 浮窗形态聊天,右下角唤起,不占主布局 |
CopilotThreadsDrawer | 会话抽屉,列出 / 切换 / 重命名 / 归档 / 删除历史对话 |
CopilotChatMessageView | 消息列表,按角色渲染 assistant / user / reasoning 等 |
CopilotChatAssistantMessage | 单条助手消息:Markdown、工具调用、复制 / 重新生成等操作 |
CopilotChatReasoningMessage | 推理消息组件,用于展示模型 thinking/reasoning 的折叠内容 |
CopilotChatUserMessage | 单条用户消息:附件、编辑、多分支回复切换 |
CopilotChatView | 聊天布局核心:消息区 + 输入区 + 建议 + 欢迎屏,支持 slot 定制 |
CopilotChatInput | 输入区:文本、发送、附件、语音转写等 |
# Hook一览
| Hook | 功能 |
|---|---|
useAgent | 访问 AG-UI Agent 实例:消息、状态、运行态、事件订阅、主动触发 run |
useAgentContext | 把应用内的可序列化状态注册为 Agent 上下文(当前页面、选中项等) |
useFrontendTool | 注册在浏览器执行的前端工具,Agent 可调用并可选 inline 渲染 UI |
useHumanInTheLoop | 交互式前端工具,Agent 暂停等人操作后再继续(审批、选方案、填表) |
useInterrupt | 处理 Agent 运行时级中断,用户 resolve / cancel 后恢复或取消 |
useConfigureSuggestions | 配置空会话或特定时机展示的建议胶囊文案 |
useSuggestions | 读取当前可用的建议列表 |
useCopilotChatConfiguration | 读写聊天文案、agentId、threadId、弹层开关等 UI 配置 |
useCopilotKit | 底层 CopilotKit 实例,用于连接状态、runTool 等进阶控制 |
useCapabilities | 读取 Agent 声明的能力,按能力动态开关 UI 功能 |
useThreads | 管理会话 thread:列表、重命名、归档、删除、分页与实时同步 |
useRenderTool | 为指定工具名(或通配符)注册工具调用的展示 UI |
useDefaultRenderTool | 为未单独注册 renderer 的工具提供默认展示 UI |
useComponent | 把 React 组件注册为工具 renderer,Agent 调用时在聊天里渲染该组件 |
useRenderToolCall | Headless 场景下获取工具调用的渲染函数,自行嵌入自定义聊天布局 |
# Hook 详解
真正把 Agent「接到产品」上的,通常是下面几个 Hook。
# useFrontendTool
useFrontendTool 在浏览器里注册工具。Agent 调用后,handler 在客户端执行,可以直接读写 React 状态、改 UI。
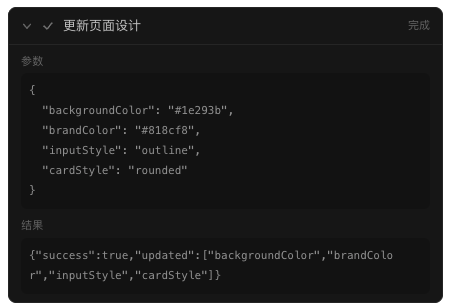
例如我做的登录页设计助手,可以注册两个工具:读当前配置、修改设计。
读配置 getDesignConfig
useFrontendTool({
  name: "getDesignConfig",
  description:
    "Read the current login page design configuration. Call this first to understand the current state before making changes.",
  parameters: z.object({}),
  handler: async () => config, // 返回当前 LoginDesignConfig
});
2
3
4
5
6
7
改设计 updateDesign
useFrontendTool({
  name: "updateDesign",
  description:
    "Update login page design properties. Only include the fields you want to change.",
  parameters: z.object({
    brandColor: z.string().optional(),
    backgroundColor: z.string().optional(),
    layout: z.enum(["center", "left", "split"]).optional(),
    // ... 其它可选字段:title、cardStyle、showSocialLogin 等
  }),
  handler: async (patch) => {
    onUpdateDesign(patch); // 更新画布上的登录页预览
    return { success: true, updated: Object.keys(patch) };
  },
});
2
3
4
5
6
7
8
9
10
11
12
13
14
15
用户说「改成暗色主题」时,Agent 会先调 getDesignConfig,再调 updateDesign,左侧预览随即变化——这就是前端工具把 Agent 接到产品 UI 的典型路径。
# useComponent
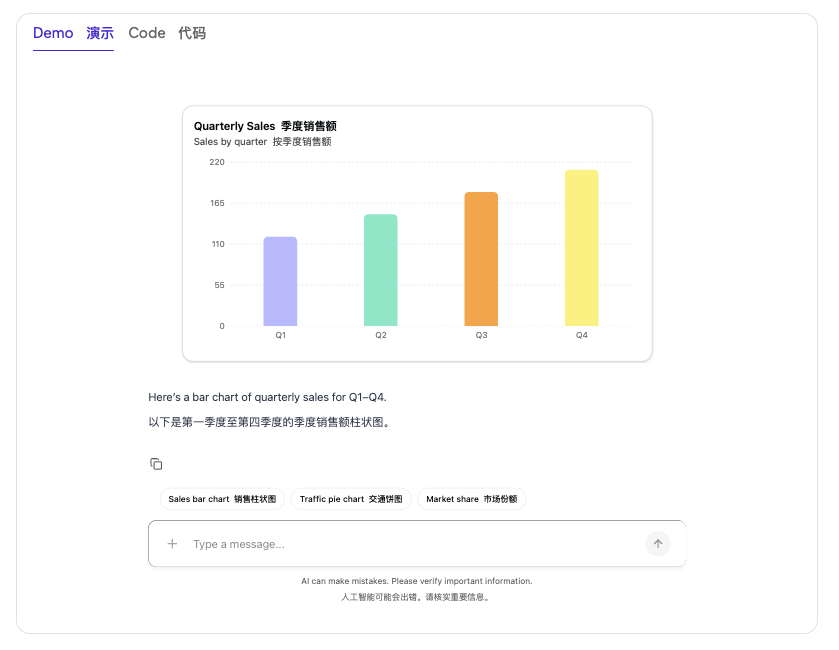
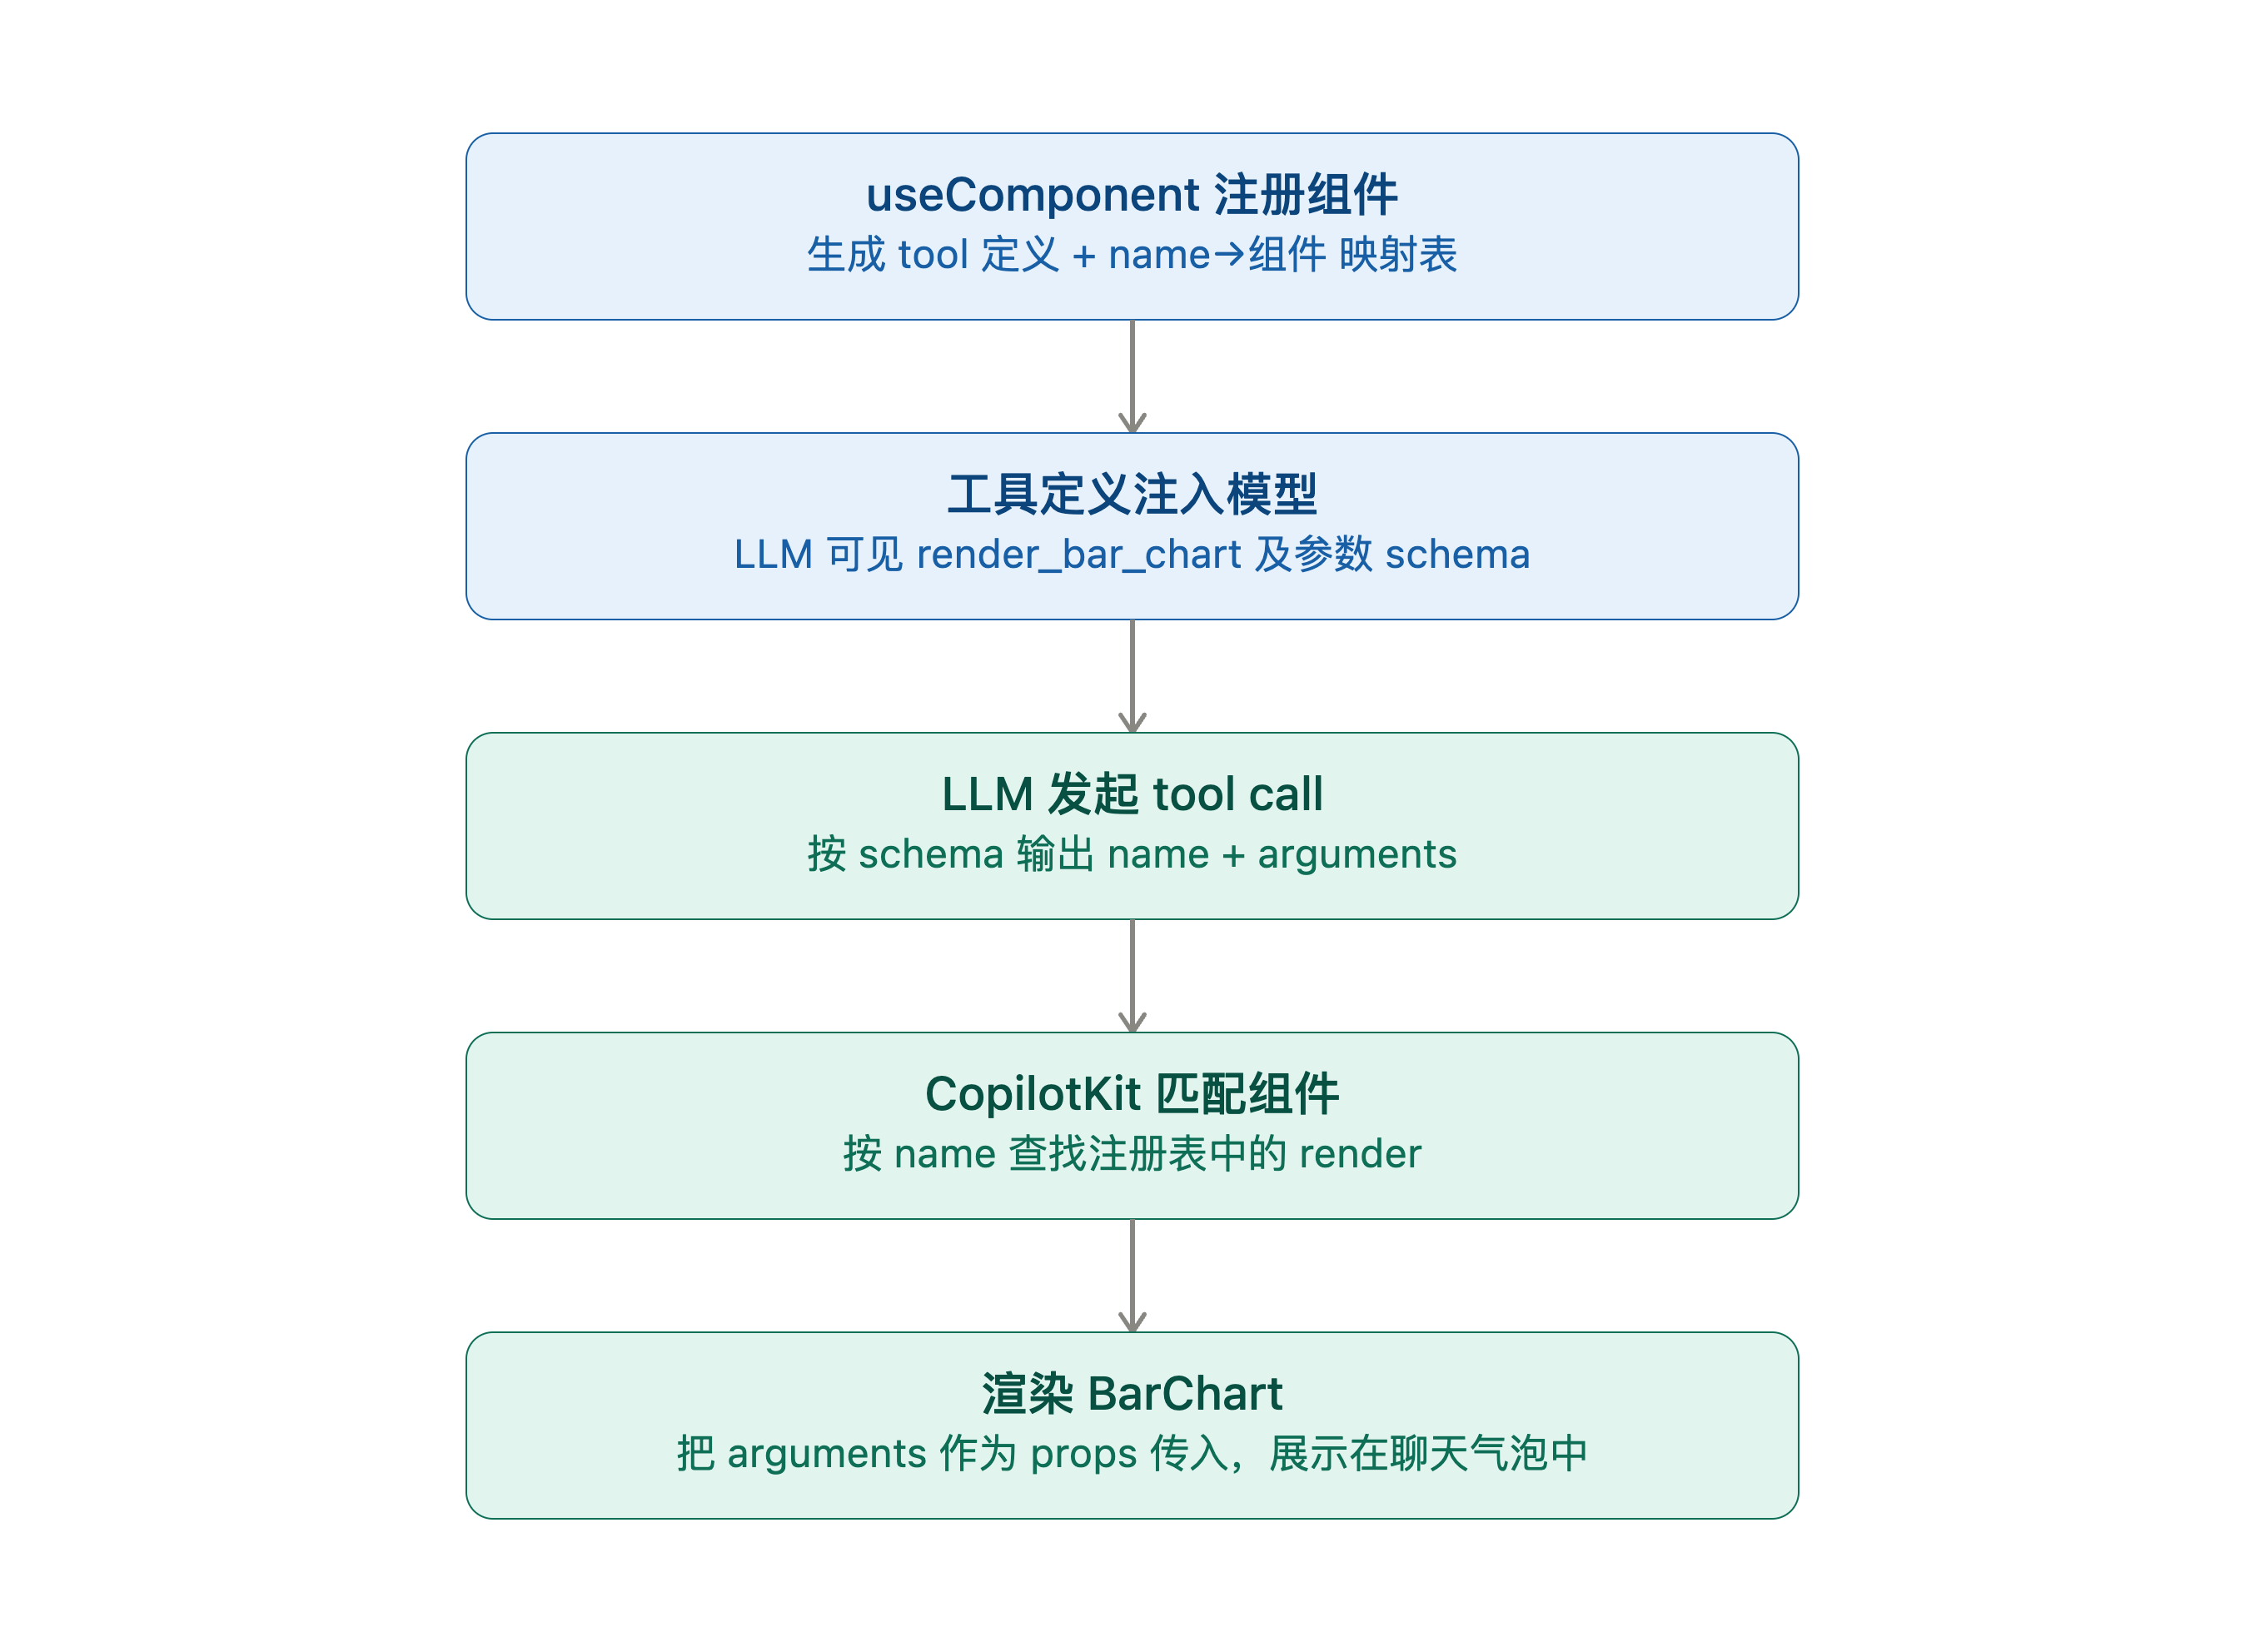
useComponent 让 Agent 通过调用工具的方式,直接在聊天中渲染 React 组件。
定义工具:
useComponent({
  name: "render_bar_chart",
  description: "Display a bar chart with labeled numeric values.",
  parameters: barChartPropsSchema,
  render: BarChart,
});
2
3
4
5
6
实现效果:
实现流程:
# useRenderTool
useRenderTool 只负责渲染,不注册 handler。工具可以是前端定义的,也可以是服务端定义的。
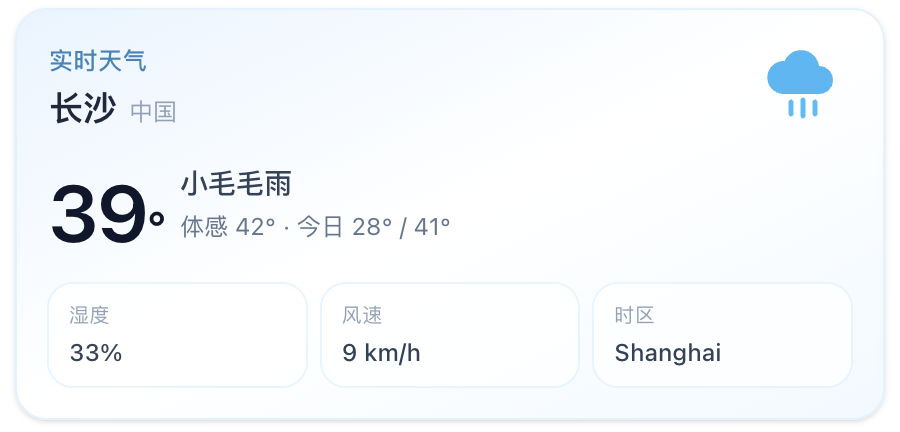
以 get_weather 为例:按城市展示一张天气卡片。
import { useRenderTool } from "@copilotkit/react-core/v2";
import { z } from "zod";

useRenderTool(
  {
    name: "get_weather",
    parameters: z.object({
      city: z.string().describe("City name"),
      units: z.enum(["celsius", "fahrenheit"]).default("celsius"),
    }),
    render: ({ parameters, status, result }) => {
      if (status === "inProgress" || status === "executing") {
        return <div>正在查询 {parameters.city} 的天气…</div>;
      }
      if (status === "complete" && result) {
        const data = typeof result === "string" ? JSON.parse(result) : result;
        return (
          <div className="my-3 overflow-hidden rounded-2xl border border-sky-100 bg-linear-to-br from-[#e8f4ff] via-white to-[#f0f9ff] p-4 shadow-sm">
            <div className="flex items-start justify-between gap-3">
              <div className="min-w-0">
                <p className="text-[12px] font-medium tracking-wide text-sky-700/80">实时天气</p>
                <h3 className="mt-0.5 truncate text-[17px] font-semibold text-slate-800">
                  {weather.city}
                  {weather.country ? (
                    <span className="ml-1.5 text-[12px] font-normal text-slate-400">{weather.country}</span>
                  ) : null}
                </h3>
              </div>
              <WeatherGlyph icon={weather.icon} />
            </div>

            <div className="mt-3 flex items-end gap-2">
              <span className="text-[40px] font-semibold leading-none tracking-tight text-slate-900">
                {Math.round(weather.temperature)}
                <span className="text-[22px] font-medium">°</span>
              </span>
              <div className="mb-1 space-y-0.5">
                <p className="text-[14px] font-medium text-slate-700">{weather.condition}</p>
                <p className="text-[12px] text-slate-500">
                  体感 {Math.round(weather.apparentTemperature)}° · 今日 {Math.round(weather.low)}° /{" "}
                  {Math.round(weather.high)}°
                </p>
              </div>
            </div>

            <div className="mt-4 grid grid-cols-3 gap-2">
              <Metric label="湿度" value={`${Math.round(weather.humidity)}%`} />
              <Metric label="风速" value={`${Math.round(weather.windSpeed)} km/h`} />
              <Metric label="时区" value={shortTimezone(weather.timezone)} />
            </div>
          </div>
        );
      }
      return null;
    },
  },
  [],
);
2
3
4
5
6
7
8
9
10
11
12
13
14
15
16
17
18
19
20
21
22
23
24
25
26
27
28
29
30
31
32
33
34
35
36
37
38
39
40
41
42
43
44
45
46
47
48
49
50
51
52
53
54
55
56
57
58
渲染效果:
未单独注册 renderer 的工具,可用 name: "*" 通配,或使用 useDefaultRenderTool 做兜底。
# useHumanInTheLoop
useHumanInTheLoop 注册的是等人回复的前端工具。Runtime / Agent 会停在工具调用上;用户操作后通过 respond 把结果送回,Agent 再继续。
useHumanInTheLoop({
  name: "askUserToChoose",
  description:
    "Present design options to the user and wait for them to pick one. " +
    "Use this when choosing a color scheme, layout, or feature to include/exclude.",
  parameters: z.object({
    question: z.string().describe("The question to ask"),
    options: z
      .array(
        z.object({
          label: z.string(),
          value: z.string(),
          description: z.string().optional(),
        }),
      )
      .min(2)
      .max(6),
  }),
  render: ({ status, args, respond }) => (
    <div className="my-3 rounded-lg border bg-white p-4">
      <p className="mb-3 text-[13px] font-medium">{args.question}</p>
      <div className="flex flex-wrap gap-2">
        {(args.options ?? []).map((opt) => (
          <button
            key={opt.value}
            type="button"
            disabled={status !== "executing"}
            onClick={() => respond?.({ chosen: opt.value, label: opt.label })}
          >
            {opt.label}
          </button>
        ))}
      </div>
      {status === "complete" && (
        <p className="mt-2 text-[11px] text-gray-400">✓ 已选择</p>
      )}
    </div>
  ),
});
2
3
4
5
6
7
8
9
10
11
12
13
14
15
16
17
18
19
20
21
22
23
24
25
26
27
28
29
30
31
32
33
34
35
36
37
38
39

# Runtime
Runtime 是挂在你自己应用服务器上的请求处理程序。常见挂载点是 Next.js 的 /api/copilotkit,也可以是 Express、Hono、Bun、Deno、Cloudflare Workers。
可以把它想成:前端和 Agent 之间的接线盒。
前端不直接连 LangGraph / BuiltInAgent;消息先打到 Runtime,再由 Runtime 转给 Agent,并把 Agent 吐出的 AG-UI 事件流回浏览器。API Key、鉴权、前端工具转发,也通常在这一层做。
# 职责
| 职责 | 说明 |
|---|---|
| 接请求 | 接收前端的 POST(消息、agentId、threadId、状态等) |
| 选 Agent | 按配置找到对应的 Agent(比如 default),打开一次 AG-UI run |
| 转事件流 | 把 Agent 的文本、工具调用、状态更新等事件流式回前端 |
| 中转前端工具 | Agent 要调浏览器里的工具时,Runtime 把调用转给前端,再把结果送回 Agent |
| 可选鉴权 / 持久化 | 校验身份;需要会话历史时,再接到 Intelligence 等平台 |
# 核心代码
核心就两样:
CopilotRuntime- 加载 AgentcreateCopilotRuntimeHandler- 把它挂成 HTTP handler
import {
  BuiltInAgent,
  CopilotRuntime,
  createCopilotRuntimeHandler,
} from "@copilotkit/runtime/v2";

const runtime = new CopilotRuntime({
  agents: {
    default: new BuiltInAgent({ model: "openai:gpt-5.4-mini" }),
  },
});

const handler = createCopilotRuntimeHandler({
  runtime,
  basePath: "/api/copilotkit",
});

export const GET = handler;
export const POST = handler;
2
3
4
5
6
7
8
9
10
11
12
13
14
15
16
17
18
19
# Agent
Agent 是真正「思考和行动」的那一层:跑 prompt、决定调哪些工具、发出状态,再通过 AG-UI 把事件流回 Runtime。
在 CopilotKit 里,Agent 不绑死某一种框架,只要支持 AG-UI。
一句话:Agent 决定「会什么」;Runtime 决定「怎么接到你的 App」;Frontend 决定「用户看见什么」。
# 常见选择
| 类型 | 是什么 | 适合谁 |
|---|---|---|
| BuiltInAgent | CopilotKit 内置,进程内跑,底层常用 Vercel AI SDK | 想最快跑通、逻辑不复杂 |
| LangGraph / Mastra / CrewAI 等 | 外部 Agent 框架,经 AG-UI adapter 接入 | 已有编排、多步工作流、团队栈已定 |
| 自研 AG-UI Agent | 自己实现协议事件流 | 要完全掌控后端 |
前面「手动集成」用的就是 BuiltInAgent,和 Runtime 同进程,不用再起一个独立 Agent 服务。
CLI 里选 LangGraph (JavaScript) 等,则是脚手架出外部 Agent + adapter。
# 核心代码
const agent = new BuiltInAgent({
  model: "openai:gpt-5.4-mini", // 或传入自定义 LanguageModel(如千问)
  prompt: "You are a helpful assistant...",
  tools: agentTools,            // 服务端工具
  maxSteps: 8,
});
2
3
4
5
6
# AG-UI
AG-UI (opens new window) 全称 Agent–User Interaction Protocol,是一套开放的、基于事件的协议,用来标准化「Agent 后端」和「应用」怎么对话。可以把它想成:Agent 和前端之间的 USB-C。
没有它时,每个 Agent 框架(LangGraph、Mastra、CrewAI……)输出格式都不一样,前端要为每种后端单独写对接。有了 AG-UI,后端只要按约定往外发送事件流,前端(比如 CopilotKit)统一监听这些事件:流式文字、工具调用、状态同步、等人审批,都能用同一套语义处理。
所以 CopilotKit 宣传的「Any Agent」——后端只要支持 AG-UI 就能接入——靠的就是这层协议。
# 和 MCP、A2A 的关系
它们不是互相替代,而是各管一段连接:
| 协议 | 连谁 | 一句话 |
|---|---|---|
| AG-UI | Agent ↔ 用户 / 应用 | 怎么把 Agent 接到界面上:流式回复、工具 UI、共享状态、人工审批 |
| MCP | Agent ↔ 工具 / 数据 | 怎么让 Agent 调用外部能力:文件、数据库、搜索、API |
| A2A | Agent ↔ Agent | 怎么让多个 Agent 互相发现、分工、协作 |
一个完整的 Agent 产品里,常见组合是:对内用 MCP 干活,对外用 AG-UI 对人,需要多 Agent 协作时再上 A2A。
另外别和 A2UI 搞混:A2UI 更偏向「Agent 怎么描述要渲染的 UI」;AG-UI 是「Agent 和前端怎么通信」。两者可以一起用。
# 怎么工作
核心很简单:Agent 跑一次 run,就持续发出一串类型化事件;前端订阅这些事件,按事件类型更新 UI。
传输方式不绑死某一种:常见是 HTTP + SSE,也可以是 WebSocket 等。CopilotKit Runtime 这边,通常就是把 AG-UI 事件流转成前端能消费的 SSE。
一次典型的 run 大致是:
# 常见事件类型
事件都带一个 type,前端靠它判断该怎么渲染。主要几类:
| 类别 | 代表事件 | 作用 |
|---|---|---|
| 生命周期 | RUN_STARTED、RUN_FINISHED、RUN_ERROR | 一次对话 run 的开始、正常结束、出错 |
| 文本消息 | TEXT_MESSAGE_START / CONTENT / END | 流式打字效果的回复 |
| 工具调用 | TOOL_CALL_START / ARGS / END | Agent 要调工具;前端可据此渲染工具 UI 或执行前端工具 |
| 状态同步 | STATE_SNAPSHOT、STATE_DELTA、MESSAGES_SNAPSHOT | 整份状态、增量补丁、消息历史快照 |
| 其它 | STEP_*、CUSTOM、RAW | 步骤进度、自定义扩展 |
前端工具、Human-in-the-Loop,本质上也是这条事件流上的约定:Agent 发出工具调用并暂停,人在 UI 里操作完,结果再送回 Agent,run 继续。
# CopilotKit VS Assistant-ui
CopilotKit (opens new window) 和 Assistant-ui (opens new window) 都能构建 AI 对话界面,但关注层次不同:
- CopilotKit 更关注 Agent 如何接入应用、读取上下文、调用前端工具、执行等待用户响应。
- Assistant-ui 更关注如何构建精细、可组合的聊天界面。
简单来说,CopilotKit 更像「Agent 应用前端栈」;Assistant-ui 更像「聊天 UI 工具包」。
# 各自优缺点
| CopilotKit | Assistant-ui | |
|---|---|---|
| 优点 | 内置 Agent Runtime、前端工具、共享上下文和 Human-in-the-Loop 支持 Chat、Sidebar、Popup 等开箱即用界面 以 AG-UI 解耦前端与 Agent 后端 支持 React、Vue、Angular、React Native 和 Channels | 提供高度可组合的 Thread、Message、Composer 等聊天原语 聊天交互细节成熟,便于实现自定义 ChatGPT 风格界面 与 Vercel AI SDK、LangGraph 及自定义 Runtime 集成灵活 UI 代码由项目持有,样式和交互可控性高 |
| 缺点 | 引入 Runtime、Agent 与协议层后整体架构较重 只做普通聊天时可能超出实际需求 高度定制聊天界面需要使用 slots 或 Headless API 部分完整 Threads 能力依赖 Enterprise Intelligence Platform | 主要解决聊天 UI,不提供 CopilotKit 那样完整的应用状态协作层 Agent 编排、应用上下文同步和复杂暂停恢复通常需要自行接入 主要面向 React Web,多端覆盖范围较窄 复杂 Agent 产品需要组合其他后端框架和基础设施 |
# 详细对比
| 维度 | CopilotKit | Assistant-ui |
|---|---|---|
| 产品定位 | Agent 应用前端栈 | React AI 聊天 UI 工具包 |
| 主要目标 | 让 Agent 读取应用上下文、操作 UI、调用工具并与用户协作 | 快速构建可定制、体验完整的聊天界面 |
| UI 方式 | 预置组件、slots 和 Headless API | Thread、Message、Composer 等组合原语 |
| Agent 连接 | Copilot Runtime + AG-UI | Runtime Adapter,可接 AI SDK、LangGraph 或自定义后端 |
| 前端工具 | useFrontendTool,工具执行和展示均有统一生命周期 | 支持工具 UI,但具体执行和 Agent 接线更多取决于所用 Runtime |
| 应用上下文 | useAgentContext 将页面状态提供给 Agent | 通常通过模型上下文或自定义 Runtime 自行传递 |
| Human-in-the-Loop | useHumanInTheLoop、useInterrupt | 可实现审批和交互式工具,但暂停恢复逻辑通常由后端负责 |
| Generative UI | useComponent、useRenderTool 等 | 通过工具调用和自定义消息部件渲染 React UI |
| 历史会话 | useThreads、CopilotThreadsDrawer;完整托管能力可接 Enterprise Intelligence | ThreadList + Assistant Cloud,或自建历史记录 Adapter |
| 多端支持 | React、Vue、Angular、React Native、Slack、Teams | 主要是 React Web |
| 适合场景 | Agent 操作表单、画布、业务状态和审批流程 | 知识问答、客服聊天、ChatGPT 风格对话产品 |
# 怎么选
| 场景 | 建议 |
|---|---|
| Agent 需要读取或修改当前页面状态 | CopilotKit |
| Agent 需要调用前端工具或等待用户审批 | CopilotKit |
| 核心需求是高度定制的 ChatGPT 风格聊天界面 | Assistant-ui |
| 有自己的后台服务,只需要完善聊天 UI | Assistant-ui |
| 既需要复杂 Agent 能力,也需要高度定制聊天界面 | 可以组合,但需要自行实现 CopilotKit / AG-UI 与 Assistant-ui Runtime 之间的适配 |
总结:
如果项目里 Agent 要操作页面状态、调用前端工具、做审批流程,CopilotKit 会更省心;
如果核心只是做一套体验完整的聊天界面,Assistant-ui 会更直接。
# References
- CopilotKit Docs (opens new window)
- CopilotKit React V2 Reference (opens new window)
- Quickstart(Built-in Agent) (opens new window)
- Architecture (opens new window)
- Connect AG-UI agents (opens new window)
- Which Hook for Which Job (opens new window)
- CopilotKit Slots (opens new window)
- CopilotKit Integrations (opens new window)
- CopilotKit Interactive Dojo (opens new window)
- AG-UI Interactive Dojo (opens new window)
- CopilotKit Examples (opens new window)
- AG-UI 协议 (opens new window) · Events (opens new window) · Architecture (opens new window)
- AG-UI GitHub (opens new window)
- assistant-ui (opens new window) · GitHub (opens new window)
- A2UI (opens new window)
- Get started with A2UI (opens new window)
- OpenUI (opens new window)
- CopilotKit vs assistant-ui vs AI SDK (opens new window)
- Codeables 对比 (opens new window)