# Assistant-UI 进阶
上一篇 Assistant UI - The composable AI chat UI toolkit 介绍了 Assistant UI 的整体架构、Primitives、Runtime,以及如何接入 AI SDK 构建一个可以流式对话的聊天界面。不过,基础对话只是起点:当聊天界面真正进入应用,还需要更自然的上下文引用、更快捷的指令入口、可视化的工具调用,以及需要用户参与的人机协作。
本篇在上一篇的基础上继续向前,依次介绍 Mentions、Slash Commands、工具、Generative UI 与 Interactables,让 Assistant UI 从一个「能聊天」的界面,逐步变成一个可以融入真实业务流程的智能助手。
# Mentions
Mentions 允许用户在输入框中键入 @,从弹出的候选列表中选择工具、用户、文件等对象。它不只是一个下拉框,而是由三个部分组成:
- Trigger:监听
@,提取光标前的搜索词; - Adapter:提供分类、候选项和同步搜索;
- Formatter:把选中的对象序列化为 directive,例如
:file[src/app.tsx]。
普通的 ComposerPrimitive.Input 会直接显示 directive 文本。使用 Lexical 后,directive 在输入框中会显示为不可拆分的 Chip,删除、选择和撤销时都作为一个整体处理,更适合 IDE 这类需要频繁引用文件的场景。
# 安装依赖
首先添加 @assistant-ui/composer-trigger-popover 和 @assistant-ui/directive-text 组件
$ npx shadcn@latest add @assistant-ui/composer-trigger-popover @assistant-ui/directive-text
命令会把 composer-trigger-popover.aui.tsx、directive-text.aui.tsx 复制到项目中,可以继续修改样式和交互。
然后安装 @assistant-ui/react-lexical 以及相关依赖包
$ npm install @assistant-ui/react-lexical lexical @lexical/react @lexical/utils @lexical/history @lexical/plain-text
# 在 IDE 中引用文件
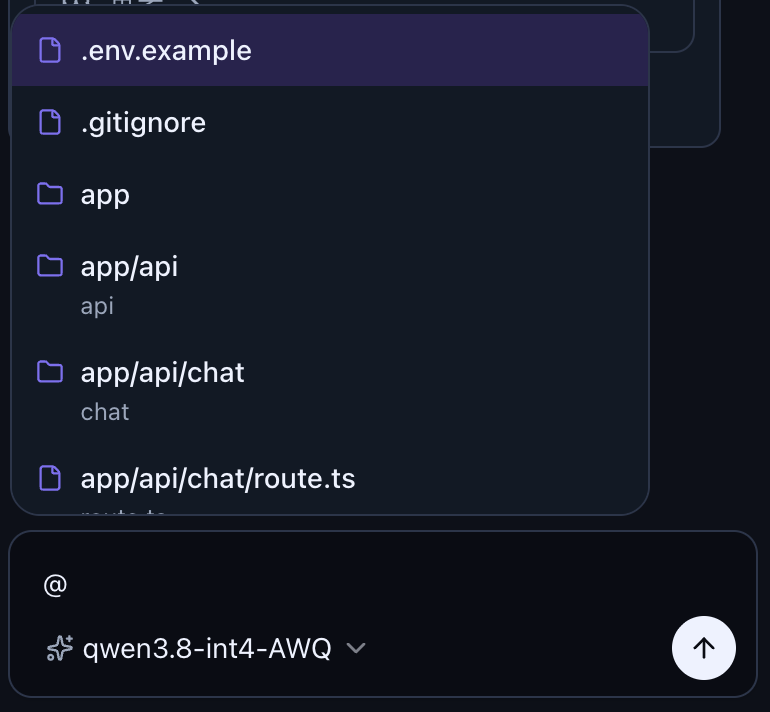
以 Web IDE 为例,工作区已经有一棵文件树。用户在对话框中输入 @agent 时,希望看到路径中包含 agent 的文件。选择文件后,输入框显示一个文件 Chip,发送给 Agent 的消息则保留完整路径。
先把文件树节点转换成 Assistant-UI 可以识别的 Mention:
import type { Unstable_Mention } from "@assistant-ui/react";

type FileNode = {
  path: string;
  name?: string;
  type: "file" | "directory";
};

const FILE_MENTION_ICON_MAP = {
  file: "File",
  directory: "Folder",
} as const;

function fileNodesToMentions(files: FileNode[]): Unstable_Mention[] {
  return files.map((item) => {
    const type = item.type === "directory" ? "directory" : "file";
    const name = item.name || item.path.split("/").pop() || item.path;

    return {
      id: item.path,
      type,
      label: item.path,
      description: name !== item.path ? name : undefined,
      icon: FILE_MENTION_ICON_MAP[type],
    };
  });
}
2
3
4
5
6
7
8
9
10
11
12
13
14
15
16
17
18
19
20
21
22
23
24
25
26
27
这里直接把 path 同时作为 id 和 label。路径不只是展示文本,也是 Agent 后续定位文件的稳定标识;type 则用于区分文件和目录。
接着用 unstable_useMentionAdapter 建立文件搜索 Adapter:
import { useMemo } from "react";
import { unstable_useMentionAdapter } from "@assistant-ui/react";
import { FileIcon, FolderIcon } from "lucide-react";
import { ComposerTriggerPopover } from "@/components/assistant-ui/elements/composer-trigger-popover.aui";
import { useIdeStore } from "@/store/ide";

const MENTION_LIMIT = 50;

function FileMentionTrigger() {
  const files = useIdeStore((state) => state.files);
  const items = useMemo(() => fileNodesToMentions(files), [files]);
  const mention = unstable_useMentionAdapter({
    items,
    includeModelContextTools: false,
    iconMap: { File: FileIcon, Folder: FolderIcon },
    fallbackIcon: FileIcon,
  });

  const adapter = useMemo(
    () => ({
      categories: mention.adapter.categories,
      categoryItems: mention.adapter.categoryItems,
      search: (query: string) =>
        (mention.adapter.search?.(query) ?? []).slice(0, MENTION_LIMIT),
    }),
    [mention.adapter],
  );

  return (
    <ComposerTriggerPopover
      char="@"
      adapter={adapter}
      directive={mention.directive}
      iconMap={mention.iconMap}
      fallbackIcon={mention.fallbackIcon}
      emptyItemsLabel="没有匹配的文件"
      className="max-h-64 w-80 overflow-y-auto"
    />
  );
}
2
3
4
5
6
7
8
9
10
11
12
13
14
15
16
17
18
19
20
21
22
23
24
25
26
27
28
29
30
31
32
33
34
35
36
37
38
39
40
items 是当前工作区的文件快照,Adapter 的搜索方法是同步的,因此文件列表应先由接口加载到 Zustand、React Query 等外部状态中。这里最多展示 50 条结果,避免大型仓库一次渲染过多文件。
includeModelContextTools: false 表示这个弹窗只负责文件,不把已经注册的工具混入候选列表。
实现效果如下:
# 使用 Lexical Composer
把原来的 ComposerPrimitive.Input 替换成 LexicalComposerInput,并确保输入框和 Mention 弹窗位于同一个 TriggerPopoverRoot 中:
import { ComposerPrimitive } from "@assistant-ui/react";
import { LexicalComposerInput } from "@assistant-ui/react-lexical";

<ComposerPrimitive.Unstable_TriggerPopoverRoot>
  <ComposerPrimitive.Root className="relative flex flex-col rounded-xl border p-2">
    <LexicalComposerInput
      aria-label="发送消息"
      placeholder="发送消息,输入 @ 提及文件…"
      directiveChip={LexicalFilePathChip}
      className="max-h-40 overflow-y-auto px-1.5 py-1 text-sm"
    />

    <FileMentionTrigger />
    <ComposerPrimitive.Send>发送</ComposerPrimitive.Send>
  </ComposerPrimitive.Root>
</ComposerPrimitive.Unstable_TriggerPopoverRoot>
2
3
4
5
6
7
8
9
10
11
12
13
14
15
16
LexicalComposerInput 会发现同一个 Root 下注册的 Directive Trigger。选择文件后,它不会把 directive 当作普通文字展示,而是交给 directiveChip 渲染:
import { FileIcon, FolderIcon } from "lucide-react";

function LexicalFilePathChip({
  directiveId,
  directiveType,
  label,
}: {
  directiveId: string;
  directiveType: string;
  label: string;
}) {
  const Icon = directiveType === "directory" ? FolderIcon : FileIcon;

  return (
    <span
      className="mx-0.5 inline-flex items-center gap-1 rounded-md bg-foreground/10 px-1.5 py-0.5"
      data-directive-id={directiveId}
    >
      <Icon className="size-3" />
      <span>{label}</span>
    </span>
  );
}
2
3
4
5
6
7
8
9
10
11
12
13
14
15
16
17
18
19
20
21
22
23
实现效果如下:
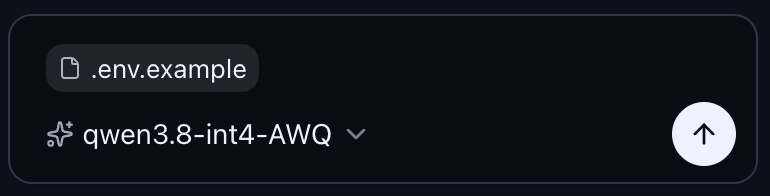
Chip 只是编辑器中的视觉表现,Composer 保存的仍是普通文本。以上面的文件为例,实际发送内容类似:
请检查 :file[src/components/ide/agent-panel.tsx] 中的会话切换逻辑
默认格式是 :type[label]{name=id};当 id 和 label 相同时,{name=...} 会被省略。这样消息可以正常持久化和传输,不需要让后端理解 Lexical 的内部数据结构。
# 在消息中还原 Chip
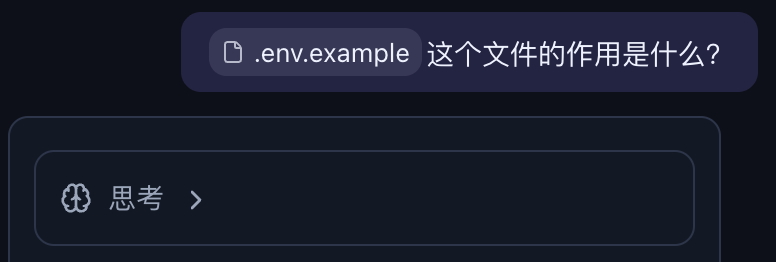
发送以后,用户消息也要把 directive 渲染为 Chip,否则会直接看到 :file[...]。使用 CLI 添加的 createDirectiveText 创建文本渲染器:
import {
  MessagePrimitive,
  unstable_defaultDirectiveFormatter,
} from "@assistant-ui/react";
import { createDirectiveText } from "@/components/assistant-ui/elements/directive-text.aui";

const FileDirectiveText = createDirectiveText(
  unstable_defaultDirectiveFormatter,
);

<MessagePrimitive.Parts
  components={{ Text: FileDirectiveText }}
/>;
2
3
4
5
6
7
8
9
10
11
12
13
Composer 和消息渲染必须使用同一个 Formatter,否则一端生成的 directive 可能无法被另一端解析。
实现效果如下:
# 从文件树直接插入
除了输入 @ 搜索,IDE 还可以在文件树的右键菜单中提供「添加到对话」。菜单把文件路径写入共享状态,对话面板再调用 Composer API 插入 directive:
import {
  unstable_defaultDirectiveFormatter,
  useAui,
} from "@assistant-ui/react";

function InsertFileButton({
  path,
  type,
}: {
  path: string;
  type: "file" | "directory";
}) {
  const aui = useAui();

  const insertMention = () => {
    const directive = unstable_defaultDirectiveFormatter.serialize({
      id: path,
      type,
      label: path,
    });
    const current = aui.composer.getState().text.trimEnd();
    aui.composer.setText(
      current ? `${current} ${directive} ` : `${directive} `,
    );
  };

  return <button onClick={insertMention}>添加到对话</button>;
}
2
3
4
5
6
7
8
9
10
11
12
13
14
15
16
17
18
19
20
21
22
23
24
25
26
27
28
这条路径绕过了弹窗选择,但 Formatter、Lexical Chip 和消息渲染仍然复用同一套机制。
最后需要注意,Mention 只引用对象,不会自动读取文件内容。后端收到的是带路径的 directive:如果接入的是 Coding Agent,它可以根据路径调用文件读取工具;如果只是普通 LLM,则需要在服务端解析 directive,读取对应文件并把内容加入模型上下文。不要把客户端传来的路径直接交给文件系统,服务端仍需检查路径是否属于当前工作区。
# 工具
工具让模型不再局限于生成文字,而是可以查询天气、访问数据库、操作浏览器或暂停等待用户输入。Assistant-UI 负责把工具的 Schema、执行逻辑和 React UI 接到 Runtime;真正决定是否调用工具的仍然是模型。
# 定义工具的方式
Assistant-UI 当前推荐使用 "use generative" 与 defineToolkit 定义工具。它是一种主要的组织方式,再根据 execute 的写法推断工具在哪里执行:
- Backend Tool:
execute是普通异步函数,在服务端调用数据库或第三方 API; - Frontend Tool:
execute内以"use client"开头,在浏览器中访问剪贴板、地理位置等客户端能力; - Human Tool:使用
humanTool(),渲染表单或选择器,并等待用户通过addResult提交结果; - Provider Tool:使用
providerTool(),接入 OpenAI Web Search 等由模型 Provider 执行的工具; - External Tool:使用
externalTool(),工具由 LangGraph、其他后端或外部 Agent 执行,Assistant-UI 只负责渲染; - Dynamic Tool:先用
stubTool()声明契约,再通过useAuiToolOverrides注入依赖 React state 的执行函数; - MCP Tool:使用
defineMcpToolkit()把 MCP Server 提供的工具合并进 Toolkit。
如果项目不能使用 generative compiler,也可以创建普通的 defineToolkit,显式填写 type: "backend" 并只注册 render。
# "use generative"
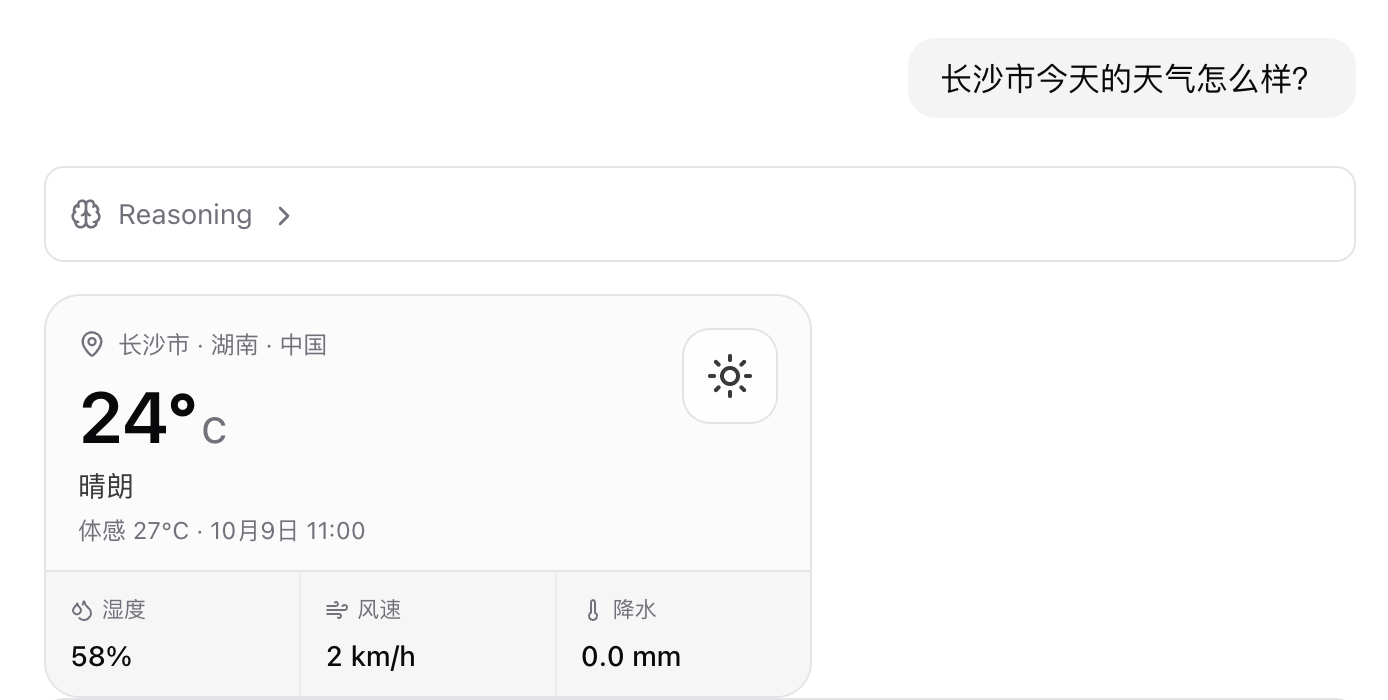
"use generative" 让 Schema、执行函数和 UI 写在同一个文件中,编译时再按客户端和服务端拆分。下面定义一个 get_weather:模型传入城市和温度单位,服务端查询天气,浏览器把结果渲染成天气卡片。
# 安装依赖
Next.js 项目需要安装 Assistant-UI 的编译插件;zod 用于定义模型可以看到的参数 Schema:
$ npm install @assistant-ui/react @assistant-ui/ai-sdk @assistant-ui/next ai zod
在 next.config.ts 中启用编译器:
import { withAui } from "@assistant-ui/next";

export default withAui({
  // 其他 Next.js 配置
});
2
3
4
5
# 定义 Toolkit
创建 app/tools/weather.tsx。文件第一行必须是 "use generative",并默认导出 defineToolkit:
"use generative";

import { defineToolkit } from "@assistant-ui/react";
import { z } from "zod";

export default defineToolkit({
  get_weather: {
    description: "查询指定城市当前的天气",
    parameters: z.object({
      location: z.string().describe("城市名称,例如 Changsha"),
      unit: z.enum(["celsius", "fahrenheit"]).default("celsius"),
    }),
    display: "standalone",
    execute: async ({ location, unit }) => {
      const response = await fetch(
        `https://wttr.in/${encodeURIComponent(location)}?format=j1`,
        { signal: AbortSignal.timeout(10_000) },
      );
      if (!response.ok) {
        throw new Error(`天气服务返回 ${response.status}`);
      }

      const data = await response.json();
      const current = data.current_condition?.[0];
      if (!current) throw new Error(`没有找到 ${location} 的天气`);

      return {
        location,
        temperature: Number(
          unit === "celsius" ? current.temp_C : current.temp_F,
        ),
        unit,
        condition: current.weatherDesc?.[0]?.value ?? "未知",
        humidity: Number(current.humidity),
        windSpeed: Number(current.windspeedKmph),
      };
    },

    render: ({ args, result, status }) => {
      if (status.type === "running") {
        return <div className="rounded-xl border p-4">正在查询 {args.location} 的天气…</div>;
      }

      if (status.type === "incomplete") {
        return <div className="rounded-xl border p-4 text-red-500">天气查询失败</div>;
      }

      if (!result) return null;

      return (
        <section className="my-3 rounded-xl border bg-sky-50 p-4 text-sky-950">
          <h3 className="text-lg font-semibold">{result.location}</h3>
          <p className="mt-2 text-3xl font-bold">
            {result.temperature}°{result.unit === "celsius" ? "C" : "F"}
          </p>
          <p>{result.condition}</p>
          <div className="mt-3 flex gap-4 text-sm">
            <span>湿度 {result.humidity}%</span>
            <span>风速 {result.windSpeed} km/h</span>
          </div>
        </section>
      );
    },
  },
});
2
3
4
5
6
7
8
9
10
11
12
13
14
15
16
17
18
19
20
21
22
23
24
25
26
27
28
29
30
31
32
33
34
35
36
37
38
39
40
41
42
43
44
45
46
47
48
49
50
51
52
53
54
55
56
57
58
59
60
61
62
63
64
65
这里没有在 execute 中写 "use client",所以编译器会把它识别为 Backend Tool:
- 服务端构建保留
description、parameters和execute; - 客户端构建保留 Schema、
display和render; - 服务端不会打包天气卡片,浏览器也不会拿到工具执行逻辑。
如果天气服务需要 API Key,把它放在 execute 读取的服务端环境变量中,不要为了调用接口而给 execute 添加 "use client"。
# 单独显示 Tool UI
display: "standalone"
Backend Tool 默认以内联方式出现在工具调用组中,思考链折叠时也会一起收起。display: "standalone" 会让天气卡片脱离折叠的 Tool Group,作为一块独立 UI 留在消息流中。
天气、图表、表单和审批这类需要用户直接查看或操作的结果适合 standalone;读取文件、搜索索引等过程型工具通常保留默认内联显示即可,否则一次 Agent 运行会产生大量卡片。
# 在客户端注册
客户端通过 Tools 把 Toolkit 注册到 Runtime:
"use client";

import {
  AssistantRuntimeProvider,
  AuiConfig,
  Tools,
} from "@assistant-ui/react";
import { useChatRuntime } from "@assistant-ui/ai-sdk";
import weatherToolkit from "@/app/tools/weather";

export function MyRuntimeProvider({
  children,
}: {
  children: React.ReactNode;
}) {
  const runtime = useChatRuntime();
  const config = AuiConfig({
    tools: Tools({ toolkit: weatherToolkit }),
  });

  return (
    <AssistantRuntimeProvider runtime={runtime} config={config}>
      {children}
    </AssistantRuntimeProvider>
  );
}
2
3
4
5
6
7
8
9
10
11
12
13
14
15
16
17
18
19
20
21
22
23
24
25
26
客户端注册负责执行 Frontend Tool 和渲染 Tool UI,但仅在客户端注册还不够:模型运行在服务端,必须让 API Route 也获得同一份工具 Schema。
# 暴露给模型
API Route 导入同一个文件时,generative compiler 会自动选择它的服务端版本。AISDKToolkit 把 Schema 和 Backend Tool 的 execute 转换为 AI SDK Tools:
import { openai } from "@ai-sdk/openai";
import { AISDKToolkit } from "@assistant-ui/ai-sdk";
import {
  convertToModelMessages,
  stepCountIs,
  streamText,
} from "ai";
import weatherToolkit from "@/app/tools/weather";

const tools = new AISDKToolkit({ toolkit: weatherToolkit });

export async function POST(request: Request) {
  const {
    messages,
    system,
    tools: frontendTools,
  } = await request.json();

  const result = streamText({
    model: openai("gpt-5.4-mini"),
    system,
    messages: await convertToModelMessages(messages),
    tools: await tools.tools({ frontend: frontendTools }),
    stopWhen: stepCountIs(5),
  });

  return result.toUIMessageStreamResponse();
}
2
3
4
5
6
7
8
9
10
11
12
13
14
15
16
17
18
19
20
21
22
23
24
25
26
27
28
一次天气查询的过程是:模型生成 get_weather 调用 → 服务端执行 execute → 工具结果回到模型 → 客户端的 render 收到相同结果并更新天气卡片。stopWhen 允许模型在工具执行后继续生成总结,而不是在第一次 Tool Call 后结束。
# 实现效果
# Generative UI
"use generative" 和 Generative UI 不是一回事:
"use generative"是编译 directive,解决 Schema、Executor 和 Renderer 如何跨客户端与服务端共置;上面的天气 Tool UI 是固定映射,get_weather永远由开发者编写的天气卡片渲染;- Generative UI 则由模型从应用提供的组件词汇表中选择组件,并在运行时组合布局。
例如面对销售数据,模型可以根据问题只展示几个 Fact,也可以组合 Card、Row、Chart 和 Table。模型输出的是受限 JSON 树,而不是任意 JSX。
# 安装依赖
安装 Generative UI 运行时,并添加官方样式组件:
$ npm install @assistant-ui/react-generative-ui
$ npx shadcn@latest add @assistant-ui/generative-ui
2
# 注册 present 工具
JSONGenerativeUI 把组件词汇表转换成一个模型可调用的 present 工具。官方默认词汇表包含 Card、Fact、Table、Chart、Form 等组件:
"use generative";

import { defineToolkit } from "@assistant-ui/react";
import {
  defaultGenerativeUILibrary,
  JSONGenerativeUI,
} from "@assistant-ui/react-generative-ui";

const generativeUI = new JSONGenerativeUI({
  library: defaultGenerativeUILibrary,
});

export default defineToolkit({
  present: generativeUI.present({
    display: "standalone",
  }),
});
2
3
4
5
6
7
8
9
10
11
12
13
14
15
16
17
这里再次使用 display: "standalone",让模型生成的界面作为独立内容展示,而不是藏在工具调用折叠区中。
# 与自定义工具合并
天气工具和 present 可以放在同一个 Toolkit 中,但随着工具增多,把它们分别定义再汇总更容易维护。假设目录结构如下:
app/
└── tools/
    ├── weather.tsx
    ├── generative-ui.tsx
    └── index.ts
2
3
4
5
weather.tsx 是前面定义的 get_weather,generative-ui.tsx 默认导出 present。然后在 index.ts 中合并:
"use generative";

import { defineToolkit } from "@assistant-ui/react";
import generativeUITools from "./generative-ui";
import weatherTools from "./weather";

export default defineToolkit({
  ...weatherTools,
  ...generativeUITools,
});
2
3
4
5
6
7
8
9
10
每个被拆分的文件都要满足两个条件:
- 第一行是
"use generative"; - 使用
default export导出defineToolkit(...)。
汇总文件也需要 "use generative",并通过默认导入展开子 Toolkit。编译器会检查这些模块是否可以安全跨越客户端和服务端边界,也会在工具重名时给出警告。
合并后的 Toolkit 包含两个职责不同的工具:
get_weather获取可信的实时数据,属于 Backend Tool;present根据已有数据组合界面,属于 Frontend Tool。
不要让 present 代替业务工具获取数据。它的参数由模型生成,适合描述布局,不应被当成天气、订单或数据库查询的事实来源。
# 前端接入
前端只需注册汇总后的 Toolkit。present 在浏览器完成渲染后会产生工具结果,需要再发送给模型才能继续对话,因此还要配置 sendAutomaticallyWhen:
"use client";

import {
  AssistantRuntimeProvider,
  AuiConfig,
  Tools,
} from "@assistant-ui/react";
import { useChatRuntime } from "@assistant-ui/ai-sdk";
import { lastAssistantMessageIsCompleteWithToolCalls } from "ai";
import toolkit from "@/app/tools";

export function MyRuntimeProvider({
  children,
}: {
  children: React.ReactNode;
}) {
  const runtime = useChatRuntime({
    sendAutomaticallyWhen: lastAssistantMessageIsCompleteWithToolCalls,
  });
  const config = AuiConfig({
    tools: Tools({ toolkit }),
  });

  return (
    <AssistantRuntimeProvider runtime={runtime} config={config}>
      {children}
    </AssistantRuntimeProvider>
  );
}
2
3
4
5
6
7
8
9
10
11
12
13
14
15
16
17
18
19
20
21
22
23
24
25
26
27
28
29
浏览器拿到的是 Toolkit 的客户端构建:
get_weather保留天气卡片的render,不包含服务端execute;present保留组件词汇表、执行逻辑和 Renderer;Tools({ toolkit })把两者注册到当前 Runtime。
如果缺少 sendAutomaticallyWhen,present 仍然可以渲染,但运行会停在这次 Frontend Tool Call,模型不会继续生成后续说明。
# 后端接入
API Route 同样导入汇总后的 Toolkit。这里导入的是编译器生成的服务端版本,再由 AISDKToolkit 转换成 AI SDK Tools:
import { openai } from "@ai-sdk/openai";
import { AISDKToolkit } from "@assistant-ui/ai-sdk";
import {
  convertToModelMessages,
  stepCountIs,
  streamText,
} from "ai";
import toolkit from "@/app/tools";

const aiToolkit = new AISDKToolkit({ toolkit });

export async function POST(request: Request) {
  const {
    messages,
    system,
    tools: frontendTools,
  } = await request.json();

  const result = streamText({
    model: openai("gpt-5.4-mini"),
    system: `${system ?? ""}

Use domain tools to retrieve factual data.
Use present to visualize data that has no dedicated tool UI.`,
    messages: await convertToModelMessages(messages),
    tools: await aiToolkit.tools({
      frontend: frontendTools,
    }),
    stopWhen: stepCountIs(10),
  });

  return result.toUIMessageStreamResponse();
}
2
3
4
5
6
7
8
9
10
11
12
13
14
15
16
17
18
19
20
21
22
23
24
25
26
27
28
29
30
31
32
33
服务端构建中的内容与客户端相反:
get_weather保留 Schema 和execute,所以天气请求只在服务端发生;present保留模型需要的 Schema,但不包含浏览器 Renderer;AISDKToolkit.tools()再把请求中上传的 Frontend Tools 与服务端工具合并。
stopWhen 和 sendAutomaticallyWhen 解决的是两段不同的续跑:前者允许服务端在 Backend Tool 返回后继续推理,后者允许浏览器执行完 present 后发起下一次请求。混合 Backend Tool 与 Frontend Tool 时,两者通常都需要。
假设应用定义了 get_sales_summary,用户说「汇总最近六个月的销售趋势,并生成仪表盘」,完整过程如下:
- 模型调用
get_sales_summary({ months: 6 }); - 服务端查询数据库,把销售额、增长率和每月趋势交回模型;
- 模型根据结果调用
present,生成 Card、Row、Fact 和 Chart 组成的 JSON; - 浏览器渲染独立的 Generative UI,并完成 Frontend Tool Call;
- Runtime 自动提交工具结果,模型继续生成最终说明。
模型调用 present 时,会生成类似下面的 JSON:
{
  "$type": "Card",
  "title": "近六个月销售概览",
  "children": [
    {
      "$type": "Row",
      "children": [
        { "$type": "Fact", "label": "销售额", "value": "¥1,280,000" },
        {
          "$type": "Fact",
          "label": "环比增长",
          "value": "12.4%",
          "trend": "up"
        }
      ]
    },
    {
      "$type": "Chart",
      "variant": "bar",
      "showAxis": true,
      "data": [
        { "label": "5月", "value": 168000 },
        { "label": "6月", "value": 182000 },
        { "label": "7月", "value": 195000 },
        { "label": "8月", "value": 211000 },
        { "label": "9月", "value": 238000 },
        { "label": "10月", "value": 286000 }
      ]
    }
  ]
}
2
3
4
5
6
7
8
9
10
11
12
13
14
15
16
17
18
19
20
21
22
23
24
25
26
27
28
29
30
31
$type 只能引用 Library 中允许的组件,属性还会经过对应的 Zod Schema 校验,未知组件不会被动态加载,也不会执行模型生成的代码。因此 Generative UI 的安全边界是组件白名单 + Props Schema。
# 实现效果
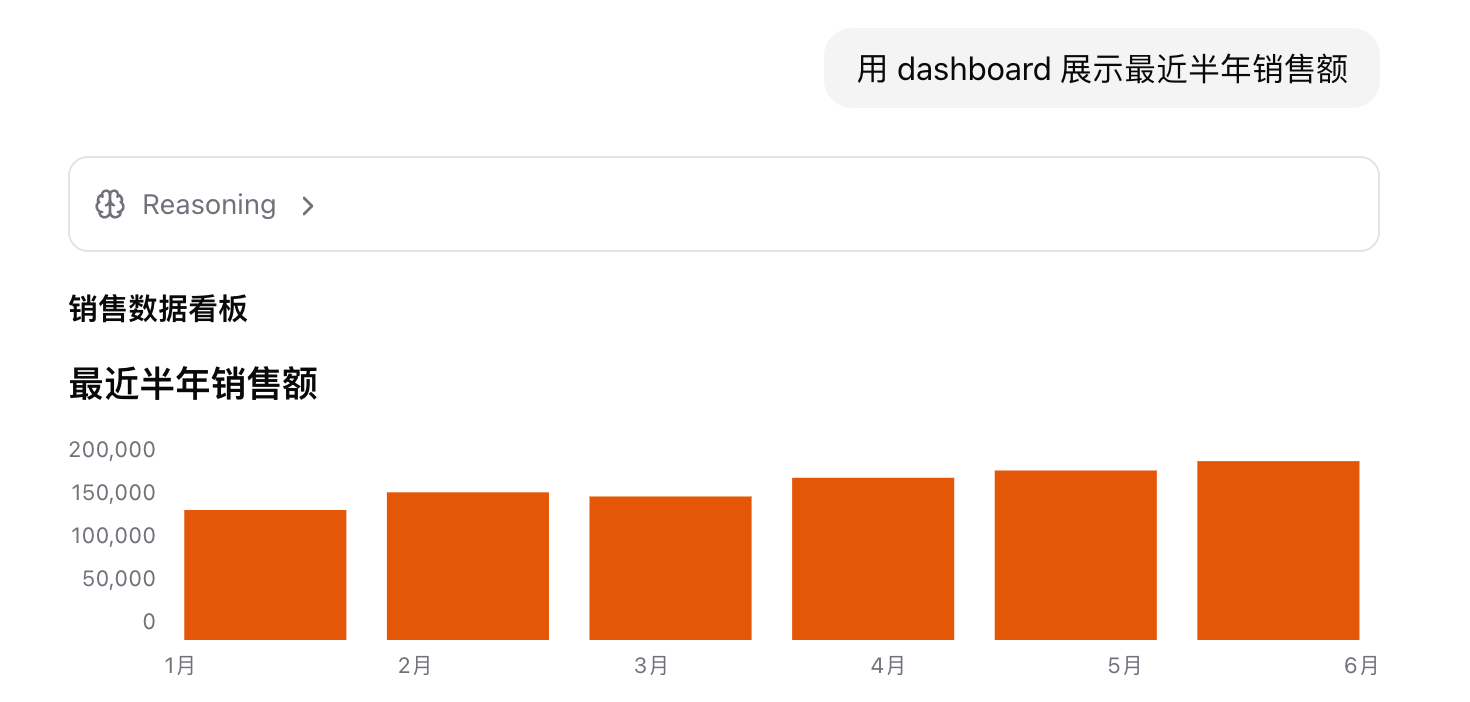
固定 Tool UI 更适合结构稳定、交互规则明确的业务组件,例如前面的天气卡片;
Generative UI 更适合仪表盘、数据摘要等布局会随回答变化的内容。
两者可以并存:get_weather 使用自己的 render,get_sales_summary 等数据型工具则把结果交给 present 组织展示。
# Interactable
Tool UI 通常围绕一次工具调用:模型传入参数,组件展示执行状态和结果。Interactable 则把 UI 变成一份由用户和 Agent 共同维护的状态:
- 用户通过 React 表单、编辑器等界面修改状态;
- Agent 通过自动生成的
update_{name}工具修改同一份状态; - 用户下一次发消息时,最新状态会作为 Snapshot 提供给模型;
- 每次用户编辑和 Agent 更新都会形成一个可恢复的版本。
Interactables 适合文档编辑器、任务看板、设置面板、Artifacts 等需要持续协作的界面。目前相关 API 仍带有 unstable_ 前缀,升级 Assistant-UI 时需要留意变更。
# 两种 Interactable
Assistant-UI 提供两种作用域:
- App-scoped:应用主动挂载组件,通过
unstable_useInteractable注册。它可以放在侧边栏或主内容区,并跨多个对话线程共享; - Thread-scoped:模型调用
unstable_interactableTool创建组件,组件出现在消息中,状态随当前 Thread 的消息历史保存。
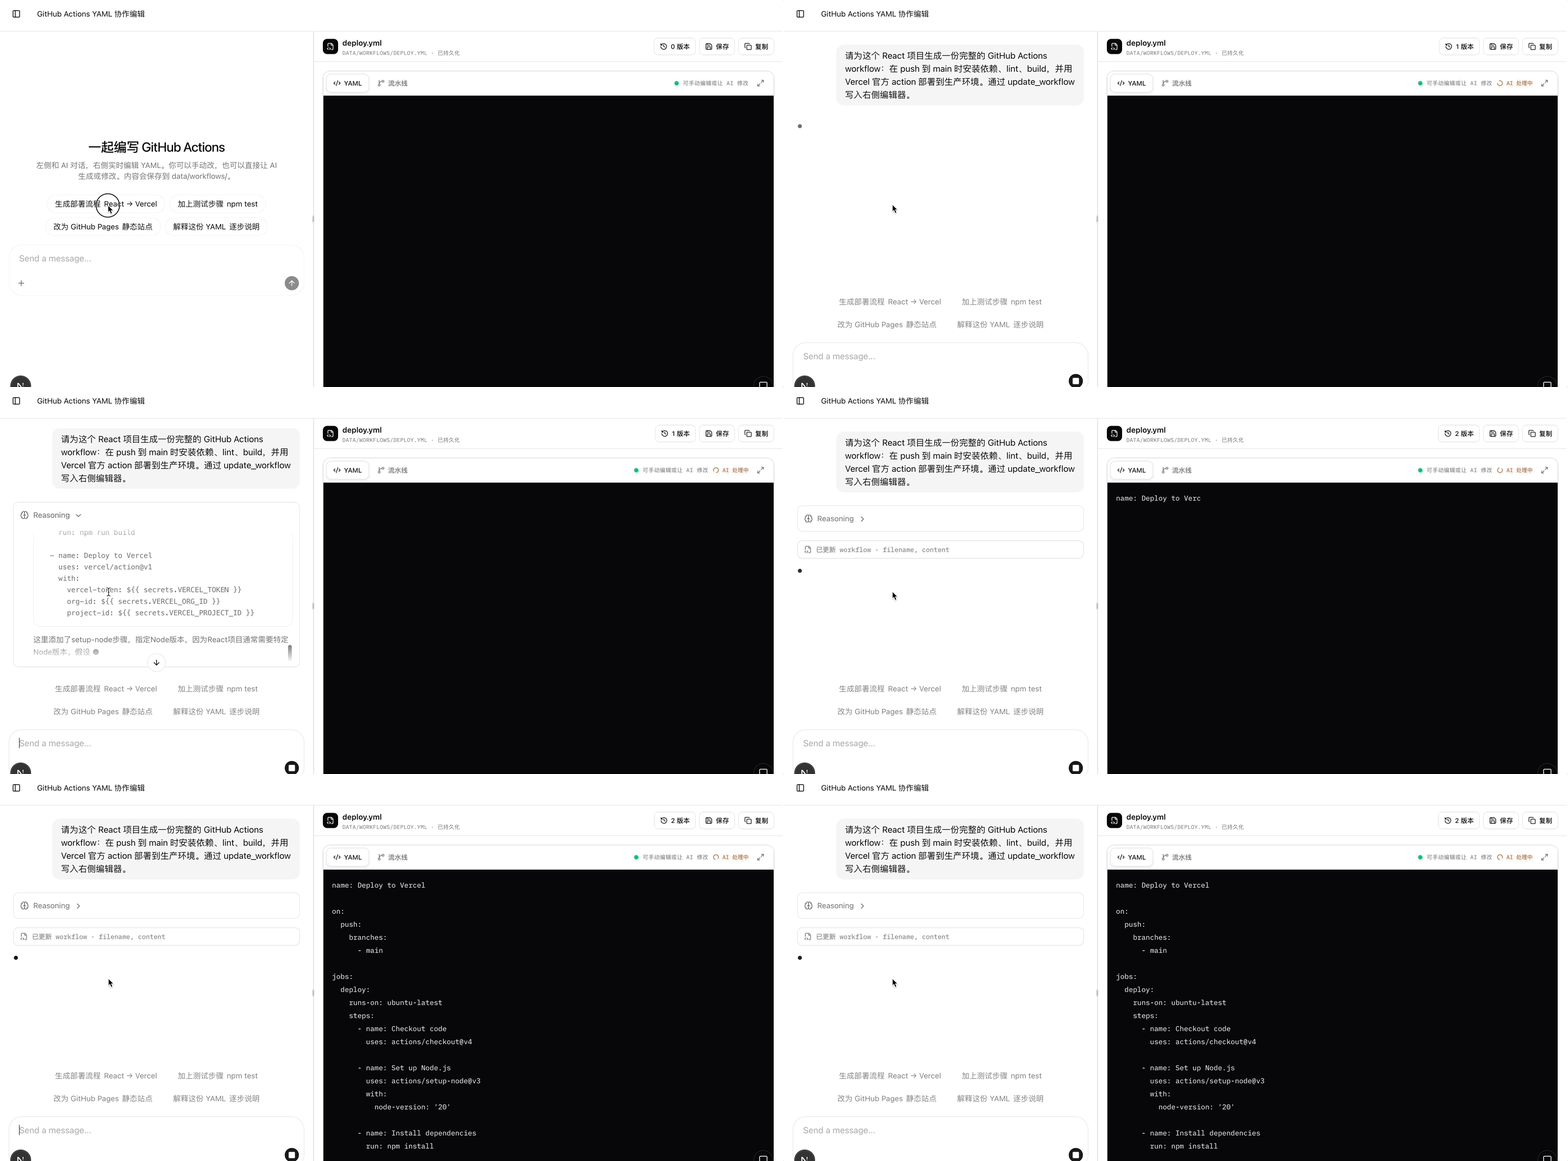
下面以 GitHub Actions YAML 编辑器为例进行讲解。它属于 App-scoped Interactable。用户和 Agent 协作创建、修改流水线 YAML。
# 安装依赖
$ npm install @assistant-ui/react @assistant-ui/ai-sdk ai zod
# 定义共享状态
Interactable 的 Schema 同时约束 React 状态和模型可调用的更新工具。这个例子只维护文件名和完整的 YAML 内容:
import { z } from "zod";

// Schema 会同时生成 React 状态类型和 update_workflow 的参数结构。
export const workflowSchema = z.object({
  filename: z
    .string()
    .describe("GitHub Actions 文件名,例如 deploy.yml 或 ci.yml"),
  content: z
    .string()
    .describe("完整的 GitHub Actions workflow YAML 内容"),
});

export type WorkflowState = z.infer<typeof workflowSchema>;

// 首次打开且没有持久化数据时使用的默认值。
export const INITIAL_WORKFLOW: WorkflowState = {
  filename: "deploy.yml",
  content: ``,
};
2
3
4
5
6
7
8
9
10
11
12
13
14
15
16
17
18
19
Schema 的字段说明会进入模型看到的工具定义,因此应该写清字段用途。顶层字段名不能使用 id,它是 Interactables 用于区分多个实例的保留参数。
# 注册 Interactables Scope
在 Runtime Provider 中注册 unstable_Interactables()。示例同时传入 Persistence Adapter,把编辑器状态保存到项目的 data/workflows/:
"use client";

import {
  AssistantRuntimeProvider,
  AuiConfig,
  Tools,
  unstable_Interactables,
} from "@assistant-ui/react";
import {
  AssistantChatTransport,
  useChatRuntime,
} from "@assistant-ui/ai-sdk";
import { lastAssistantMessageIsCompleteWithToolCalls } from "ai";
import toolkit from "@/lib/toolkit";
import { workflowFilePersistence } from "@/lib/workflow-persistence";

export function Assistant() {
  const runtime = useChatRuntime({
    transport: new AssistantChatTransport({ api: "/api/chat" }),
    sendAutomaticallyWhen: lastAssistantMessageIsCompleteWithToolCalls,
  });

  const config = AuiConfig({
    // 注册 Interactables Scope,并为 App-scoped 状态开启持久化。
    unstable_interactables: unstable_Interactables({
      persistence: workflowFilePersistence,
    }),
    // 其他普通工具仍然通过 Toolkit 注册。
    tools: Tools({ toolkit: toolkit }),
  });

  return (
    <AssistantRuntimeProvider runtime={runtime} config={config}>
      <main className="grid h-dvh grid-cols-[2fr_3fr]">
        <Thread />
        <WorkflowEditor />
      </main>
    </AssistantRuntimeProvider>
  );
}
2
3
4
5
6
7
8
9
10
11
12
13
14
15
16
17
18
19
20
21
22
23
24
25
26
27
28
29
30
31
32
33
34
35
36
37
38
39
40
unstable_Interactables 是所有 Interactable 的状态和工具注册中心。WorkflowEditor 挂载后,它会自动生成 update_workflow 工具,不需要在 workflowToolkit 中再次定义同名工具。
# 把编辑器注册为 Interactable
编辑器通过 unstable_useInteractable 取得共享状态。它的使用方式类似 useState,但 Agent 也可以更新这份状态:
import {
  unstable_useInteractable,
  type ToolCallMessagePartComponent,
} from "@assistant-ui/react";

// 使用固定 ID,保证刷新或重新挂载后仍恢复同一个实例。
const WORKFLOW_INSTANCE_ID = "main";

// 只在聊天中显示简短的更新回执,不重复渲染完整编辑器。
const WorkflowUpdateMarker: ToolCallMessagePartComponent = ({ args }) => {
  const changed = Object.keys(args ?? {}).filter((key) => key !== "id");

  return (
    <div className="my-2 rounded-lg border px-3 py-2 text-xs">
      已更新 workflow
      {changed.length > 0 ? ` · ${changed.join(", ")}` : ""}
    </div>
  );
};

export function WorkflowEditor() {
  const [state, { setState, id, isPending, error, flush }] =
    // name 决定自动生成的工具名:workflow → update_workflow。
    unstable_useInteractable("workflow", {
      // update_workflow 通过该 ID 定位这个编辑器实例。
      id: WORKFLOW_INSTANCE_ID,
      // description 会成为模型理解该 Interactable 的提示。
      description:
        "右侧 GitHub Actions YAML 编辑器。使用 update_workflow 创建或修改文件名和完整 YAML。",
      // Schema 决定可共享状态以及 update_workflow 可更新的字段。
      stateSchema: workflowSchema,
      // 持久化层没有返回数据时,使用初始 Workflow。
      initialState: INITIAL_WORKFLOW,
      // 自定义 Agent 更新在消息列表中的显示方式。
      updateRender: WorkflowUpdateMarker,
    });

  return (
    <aside>
      <input
        value={state.filename}
        onChange={(event) =>
          // 人为修改文件名
          setState((previous) => ({
            ...previous,
            filename: event.target.value,
          }))
        }
      />
      <textarea
        value={state.content}
        onChange={(event) =>
          // 人为修改 YAML 文件内容
          setState((previous) => ({
            ...previous,
            content: event.target.value,
          }))
        }
      />

      {/* 人为主动保存 YAML 文件内容 */}
      <button onClick={() => void flush()} disabled={isPending}>
        {isPending ? "保存中…" : "保存"}
      </button>
      {error ? <p>保存失败:{String(error)}</p> : null}
    </aside>
  );
}
2
3
4
5
6
7
8
9
10
11
12
13
14
15
16
17
18
19
20
21
22
23
24
25
26
27
28
29
30
31
32
33
34
35
36
37
38
39
40
41
42
43
44
45
46
47
48
49
50
51
52
53
54
55
56
57
58
59
60
61
62
63
64
65
66
67
68
注册完成后,模型会看到一个根据 workflowSchema 自动生成的 update_workflow。由于 Interactable 支持 Partial Update,Agent 只需发送发生变化的字段:
{
  "id": "main",
  "content": "name: CI\n\non:\n  push:\n    branches: [main]\n..."
}
2
3
4
没有传入的 filename 会保持不变。更新参数还会边生成边合并到状态,因此模型输出一份较长 YAML 时,编辑器可以逐段显示,而不用等整个 Tool Call 完成。
id: "main" 让编辑器在卸载、重新挂载和恢复持久化数据后仍指向同一个实例。如果同一页面挂载多个同名 Interactable,则必须给每个实例提供不同的 id,Agent 仍然共用一个 update_workflow,通过参数中的 id 选择目标。
updateRender 不会取代编辑器,它只决定 update_workflow 在聊天消息中如何显示。这里用一行「已更新 workflow · content」作为操作回执,避免把完整编辑器重复渲染到消息中。
# 让模型读取用户的修改
Agent 调用 update_workflow 时已经知道自己写入了什么;但用户直接编辑 <textarea> 后,模型并不会自动读取浏览器状态。
Interactables 会把变化后的状态作为 Snapshot 写入下一条用户消息的 metadata.custom.interactables。AI SDK 的 convertToModelMessages 默认忽略 metadata,因此 API Route 必须先调用 unstable_injectInteractableContext:
import {
  AISDKToolkit,
  unstable_injectInteractableContext,
  type FrontendTools,
} from "@assistant-ui/ai-sdk";
import {
  convertToModelMessages,
  stepCountIs,
  streamText,
  type UIMessage,
} from "ai";
import toolkit from "@/lib/toolkit";

const aiToolkit = new AISDKToolkit({
  toolkit: toolkit,
});

export async function POST(request: Request) {
  const {
    messages,
    tools,
  }: {
    messages: UIMessage[];
    tools?: FrontendTools;
  } = await request.json();

  const result = streamText({
    model,
    system: `右侧有一份共享 workflow。
需要创建或修改 YAML 时,必须调用 update_workflow。
用户手动修改后,以最新状态为准。`,
    messages: await convertToModelMessages(
      // 把 metadata 中的 Interactable Snapshot 注入模型上下文。
      unstable_injectInteractableContext(messages),
    ),
    tools: await aiToolkit.tools({
      frontend: tools,
    }),
    stopWhen: stepCountIs(10),
  });

  return result.toUIMessageStreamResponse();
}
2
3
4
5
6
7
8
9
10
11
12
13
14
15
16
17
18
19
20
21
22
23
24
25
26
27
28
29
30
31
32
33
34
35
36
37
38
39
40
41
42
43
完整 Snapshot 会被格式化成类似下面的上下文:
[Current state of "workflow" (id: "main"): {"filename":"deploy.yml","content":"name: CI\n..."}]
后续只有 content 发生变化时,可以发送 Partial Snapshot,告诉模型哪些字段更新、哪些字段保持不变。Snapshot 只会在模型尚未见过最新状态时附加,避免每轮重复发送整份 YAML。
这一点构成了人机协作的另一个方向:
- Agent → UI:调用
update_workflow,浏览器实时更新共享状态; - 用户 → Agent:调用
setState修改编辑器,下一条消息携带最新 Snapshot。
# 版本与恢复
每次 Agent 调用 update_workflow、每次用户调用 setState,都会形成一个版本。unstable_useInteractableVersions 可以读取当前会话中的全部版本:
import { unstable_useInteractableVersions } from "@assistant-ui/react";

const versions = unstable_useInteractableVersions<WorkflowState>(
  // 读取 workflow/main 在当前 Thread 中产生的全部版本。
  id,
  "workflow",
);

return (
  <div>
    {versions.map((version, index) => (
      <button
        key={index}
        // restore 会将历史状态重新写回当前 Interactable。
        onClick={version.restore}
      >
        v{index + 1} ·
        {version.origin === "user-edit" ? "你" : "AI"}
      </button>
    ))}
  </div>
);
2
3
4
5
6
7
8
9
10
11
12
13
14
15
16
17
18
19
20
21
22
restore() 会把对应版本重新设为当前状态,恢复动作本身也会成为新的状态。对于 App-scoped Interactable,这里的版本记录属于当前会话;跨会话的完整生命周期仍需由应用自己的持久化系统管理。
# 持久化为 YAML 文件
App-scoped Interactable 默认保存在内存中,页面刷新后会丢失。unstable_Interactables 接受一个 Persistence Adapter,通过 load 恢复全部实例,通过 save 保存完整 Snapshot。
这个例子把固定实例 main 映射到 /api/workflow:
// ID 必须与 unstable_useInteractable 中注册的实例一致。
const WORKFLOW_INSTANCE_ID = "main";

export const workflowFilePersistence = {
  load: async () => {
    // 页面初始化时,从服务端读取上一次保存的 YAML。
    const response = await fetch("/api/workflow");
    if (!response.ok) return undefined;

    const state = await response.json();
    // Adapter 返回的是以 Interactable ID 为 key 的完整 Snapshot。
    return {
      [WORKFLOW_INSTANCE_ID]: {
        name: "workflow",
        state: {
          filename: state.filename,
          content: state.content,
        },
      },
    };
  },

  save: async (snapshot) => {
    // save 每次收到当前 Persistence Scope 的完整 Snapshot。
    const entry = snapshot[WORKFLOW_INSTANCE_ID];
    if (!entry || entry.name !== "workflow") return;

    // 只把 workflow/main 对应的状态写入后端文件。
    const response = await fetch("/api/workflow", {
      method: "PUT",
      headers: { "Content-Type": "application/json" },
      body: JSON.stringify(entry.state),
    });
    if (!response.ok) throw new Error("保存 workflow 文件失败");
  },
};
2
3
4
5
6
7
8
9
10
11
12
13
14
15
16
17
18
19
20
21
22
23
24
25
26
27
28
29
30
31
32
33
34
35
36
状态变化后,Adapter 默认等待 500ms 再保存,isPending 和 error 可以显示同步状态;用户点击保存按钮时,flush() 会立即提交尚未写入的数据。
服务端用 workflowSchema 再次校验请求,并把文件限制在 data/workflows/ 下。文件名只允许字母、数字、._-,并且必须以 .yml 或 .yaml 结尾,避免 Agent 或用户构造路径穿越。
# 实现效果
# Demo
GitHub - assistant-ui-demo (opens new window)