# Next.js 使用 Prisma
上篇文章 Next.js 使用 Drizzle-ORM 中,我们学习使用了 Drizzle ORM (opens new window) 库,Prisma (opens new window) 和 Drizzle ORM (opens new window) 一样都是下一代 Node.js ORM,都提供类型安全的数据库访问、迁移和可视化数据编辑等功能。
Prisma 当前版本是 V7.8.0
# Prisma VS Drizzle-ORM
Prisma 和 Drizzle ORM 都是面向 TypeScript 的数据库工具,都支持类型安全查询和数据库迁移。简单来说,Drizzle 更像一个接近 SQL 的 Query Builder,适合喜欢直接控制 SQL 的开发者;Prisma 更像一套完整的 ORM 工具链,适合希望用统一 schema、自动类型生成和更高层 API 来管理数据库的项目。
| 对比项 | Prisma | Drizzle ORM |
|---|---|---|
| 定位 | 更完整的 ORM 和数据工具链 | 更接近 SQL 的 Query Builder |
| Schema 定义 | 使用 schema.prisma 集中描述模型 | 使用 TypeScript 函数描述表结构 |
| 查询风格 | prisma.user.findMany() 这类对象化 API | select().from().where() 这类 SQL 风格 API |
| 类型安全 | 根据 schema 生成完整类型 | 查询结果类型友好,但更依赖开发者写对 SQL 逻辑 |
| 关系查询 | 支持 include、select、nested writes、relation filters | 支持关系查询,但复杂关系更接近手写 SQL 思路 |
| 迁移 | Prisma Migrate 根据 schema 生成 migration | Drizzle Kit 根据 TS schema 生成 migration |
| 上手门槛 | 不需要很深 SQL 基础 | 更适合熟悉 SQL 的开发者 |
| 适合场景 | 团队项目、复杂模型、长期维护 | 小型项目、偏 SQL、希望保持轻量 |
如果项目里数据库关系比较复杂、多人协作较多,Prisma 会更省心;如果项目更强调轻量、SQL 可控性,Drizzle ORM 会更直接。
# 初始化项目
使用 Prisma 非常简单,下面是使用 Prisma 的具体步骤:
- 安装依赖
$ npm install prisma @types/pg --save-dev
$ npm install @prisma/client @prisma/adapter-pg pg dotenv
2
每个软件包的功能:
prisma- Prisma CLI,用于运行诸如prisma init、prisma migrate和prisma generate之类的命令@prisma/client- 是 Prisma ORM 生成类型的构建器。@prisma/adapter-pg- 用于将 Prisma ORM 连接到node-postgres的适配器pg-node-postgres连接 PostgreSQL 的 Node.js 库。@types/pg-node-postgres的 TypeScript 类型定义dotenv- 加载.env环境变量
- 初始化 Prisma ORM
使用 Prisma CLI 命令创建 Prisma Schema (opens new window) 文件,从而设置 Prisma ORM 项目
$ npx prisma init --datasource-provider postgresql --output ../generated/prisma
这条命令会执行以下几项操作:
- 创建一个
prisma/目录,其中包含一个schema.prisma文件,该文件包含您的数据库连接和 schema 模型。 - 在根目录下创建一个
.env文件,用于存放环境变量。 - 创建用于 Prisma 配置的
prisma.config.ts文件
配置文件 prisma.config.ts 如下,我们保持不变即可。
import "dotenv/config";
import { defineConfig, env } from "prisma/config";

export default defineConfig({
  schema: "prisma/schema.prisma",
  migrations: {
    path: "prisma/migrations",
  },
  datasource: {
    url: env("DATABASE_URL"),
  },
});
2
3
4
5
6
7
8
9
10
11
12
- 修改
.env环境变量,连接数据库
DATABASE_URL="postgresql://username:password@localhost:5432/db-name?schema=public"
- 在
prisma/schema.prisma文件里定义自己的 schema
// This is your Prisma schema file,
// learn more about it in the docs: https://pris.ly/d/prisma-schema

generator client {
  provider = "prisma-client"
  output   = "../generated/prisma"
}

datasource db {
  provider = "postgresql"
}

model User {
  id        Int      @id @default(autoincrement())
  email     String   @unique
  name      String?
  role      Role     @default(USER)
  posts     Post[]
  profile   Profile?
  createdAt DateTime @default(now())
  updatedAt DateTime @updatedAt
}

model Profile {
  id        Int      @id @default(autoincrement())
  bio       String
  user      User     @relation(fields: [userId], references: [id], onDelete: Cascade)
  userId    Int      @unique
  createdAt DateTime @default(now())
  updatedAt DateTime @updatedAt
}

model Post {
  id         Int        @id @default(autoincrement())
  title      String
  content    String?
  published  Boolean    @default(false)
  author     User       @relation(fields: [authorId], references: [id], onDelete: Cascade)
  authorId   Int
  categories Category[]
  createdAt  DateTime   @default(now())
  updatedAt  DateTime   @updatedAt

  @@index([authorId])
  @@index([published, createdAt])
}

model Category {
  id        Int      @id @default(autoincrement())
  name      String   @unique
  posts     Post[]
  createdAt DateTime @default(now())
  updatedAt DateTime @updatedAt
}

enum Role {
  USER
  ADMIN
}
2
3
4
5
6
7
8
9
10
11
12
13
14
15
16
17
18
19
20
21
22
23
24
25
26
27
28
29
30
31
32
33
34
35
36
37
38
39
40
41
42
43
44
45
46
47
48
49
50
51
52
53
54
55
56
57
58
59
- 创建第一个迁移以设置数据库表
$ npx prisma migrate dev --name init
这个命令首先会根据 DATABASE_URL 的配置创建数据库,再根据 prisma/schema.prisma 的配置创建数据库表结构,最后生成迁移记录。
├── migrations
|  ├── 20260425053014_init
|  |  └── migration.sql
|  └── migration_lock.toml
└── schema.prisma
2
3
4
5
- 生成 Prisma Client
$ npx prisma generate
这个命令根据 prisma/schema.prisma 文件的 output 配置选项
generator client {
  provider = "prisma-client"
  output   = "../generated/prisma"
}
2
3
4
在 generated/prisma 目录下生成如下文件
├── browser.ts
├── client.ts
├── commonInputTypes.ts
├── enums.ts
├── internal
|  ├── class.ts
|  ├── prismaNamespace.ts
|  └── prismaNamespaceBrowser.ts
├── models
|  ├── Category.ts
|  ├── Post.ts
|  ├── Profile.ts
|  └── User.ts
└── models.ts
2
3
4
5
6
7
8
9
10
11
12
13
14
需要注意的是 models 文件夹,生成了 schema 对应的对象文件。Prisma 通过这些文件将数据库操作转变为 JavaScript 对象操作
7、实例化 Prisma Client
将 Prisma ORM 驱动程序适配器的实例传递给 PrismaClient 构造函数
创建 lib/prisma.ts 文件,粘贴下面的代码
import "dotenv/config";
import { PrismaPg } from "@prisma/adapter-pg";
import { PrismaClient } from "../generated/prisma/client";

const connectionString = `${process.env.DATABASE_URL}`;

const adapter = new PrismaPg({ connectionString });
const prisma = new PrismaClient({ adapter });

export { prisma };
2
3
4
5
6
7
8
9
10
8、现在可以进行数据库操作了
import { prisma } from "./lib/prisma";

async function main() {
  const user = await prisma.user.create({
  data: {
    email: "ariadne@prisma.io",
    name: "Ariadne",
    posts: {
      create: [
        {
          title: "My first day at Prisma",
          categories: { create: { name: "Office" } },
        },
        {
          title: "How to connect to a SQLite database",
          categories: { create: [{ name: "Databases" }, { name: "Tutorials" }] },
        },
      ],
    },
  },
});

  const allUsers = await prisma.user.findMany({
    include: {
      posts: true,
    },
  });
}
2
3
4
5
6
7
8
9
10
11
12
13
14
15
16
17
18
19
20
21
22
23
24
25
26
27
28
如果想由别的库(如 Drizzle-ORM)切换到 Prisma,使用 prisma db pull 检查现有数据库
$ npx prisma db pull
此命令读取 DATABASE_URL 环境变量,连接到数据库,并检查数据库模式。然后,它将数据库模式从 SQL 转换为 Prisma 模式中的数据模型。
# 创建表
Prisma 使用 schema.prisma 描述数据库结构。在前面我创建了 User、Profile、Post、Category 四张表。
每个 model 通常对应数据库中的一张表,模型字段对应表中的列。
model User {
  id        Int      @id @default(autoincrement())
  email     String   @unique
  name      String?
  role      Role     @default(USER)
  posts     Post[]
  profile   Profile?
  createdAt DateTime @default(now())
  updatedAt DateTime @updatedAt
}

model Profile {
  id        Int      @id @default(autoincrement())
  bio       String
  user      User     @relation(fields: [userId], references: [id], onDelete: Cascade)
  userId    Int      @unique
  createdAt DateTime @default(now())
  updatedAt DateTime @updatedAt
}

model Post {
  id         Int        @id @default(autoincrement())
  title      String
  content    String?
  published  Boolean    @default(false)
  author     User       @relation(fields: [authorId], references: [id], onDelete: Cascade)
  authorId   Int
  categories Category[]
  createdAt  DateTime   @default(now())
  updatedAt  DateTime   @updatedAt

  @@index([authorId])
  @@index([published, createdAt])
}

model Category {
  id        Int      @id @default(autoincrement())
  name      String   @unique
  posts     Post[]
  createdAt DateTime @default(now())
  updatedAt DateTime @updatedAt
}

enum Role {
  USER
  ADMIN
}
2
3
4
5
6
7
8
9
10
11
12
13
14
15
16
17
18
19
20
21
22
23
24
25
26
27
28
29
30
31
32
33
34
35
36
37
38
39
40
41
42
43
44
45
46
47
# 列数据类型
Prisma 提供了一组与数据库无关的标量类型 (opens new window),再由数据库连接器映射为具体的列类型。
| Prisma 类型 | PostgreSQL 类型(默认映射) | TypeScript 类型 |
|---|---|---|
Int | integer | number |
BigInt | bigint | bigint |
Float | double precision | number |
Decimal | decimal(65, 30) | Prisma.Decimal |
String | text | string |
Boolean | boolean | boolean |
DateTime | timestamp(3) | Date |
Json | jsonb | Prisma.JsonValue |
Bytes | bytea | Uint8Array |
可以使用 Native database types (opens new window) 显式指定数据库类型。例如把金额限制为两位小数 @db.Decimal(10, 2):
model Product {
  id        Int      @id @default(autoincrement())
  name      String
  price     Decimal  @db.Decimal(10, 2)
  createdAt DateTime @default(now())
  updatedAt DateTime @updatedAt
}
2
3
4
5
6
7
字段类型后面的
? 表示该字段允许为 NULL,例如 name String? 是可选字符串
[] 表示列表或关系集合。例如 posts Post[] 表示一个用户可以关联多篇文章。
# 主键、唯一约束与索引
@id、@unique 用于单列约束,@@id、@@unique、@@index 用于模型级别的多列约束或索引:
model Post {
  id         Int      @id @default(autoincrement())
  title      String
  published  Boolean  @default(false)
  authorId   Int
  createdAt  DateTime @default(now())
  updatedAt  DateTime @updatedAt

  @@unique([authorId, title])
  @@index([published, createdAt])
}
2
3
4
5
6
7
8
9
10
11
@id:单列主键,常配合@default(autoincrement())@unique:单列唯一约束@@id:多列复合主键@@unique([authorId, title])表示同一作者不能创建两篇同名文章。@@index([published, createdAt])适合“按发布时间查询已发布文章”这类常用条件。索引能加快查询,但也会增加写入和存储成本,应根据实际查询模式添加。
# 默认值与自动更新时间
使用 @default() 为字段设置默认值:
model Example {
  id        Int      @id @default(autoincrement())
  code      String   @default(cuid())
  enabled   Boolean  @default(true)
  createdAt DateTime @default(now())
  updatedAt DateTime @updatedAt
}
2
3
4
5
6
7
autoincrement():由数据库生成递增整数。cuid()、uuid():生成字符串 ID。now():插入记录时使用当前时间。@updatedAt:每次通过 Prisma Client 更新记录时自动写入当前时间。
需要注意,@updatedAt 由 Prisma ORM 处理,并不是 PostgreSQL 的列约束;如果使用原生 SQL 更新记录,需要自己维护该字段。
# 枚举类型
枚举适合表示一组固定值。前面的 Role 会映射为 PostgreSQL 的枚举类型:
enum Role {
  USER
  ADMIN
}

model User {
  id        Int      @id @default(autoincrement())
  email     String   @unique
  role      Role     @default(USER)
  createdAt DateTime @default(now())
  updatedAt DateTime @updatedAt
}
2
3
4
5
6
7
8
9
10
11
12
# 关系
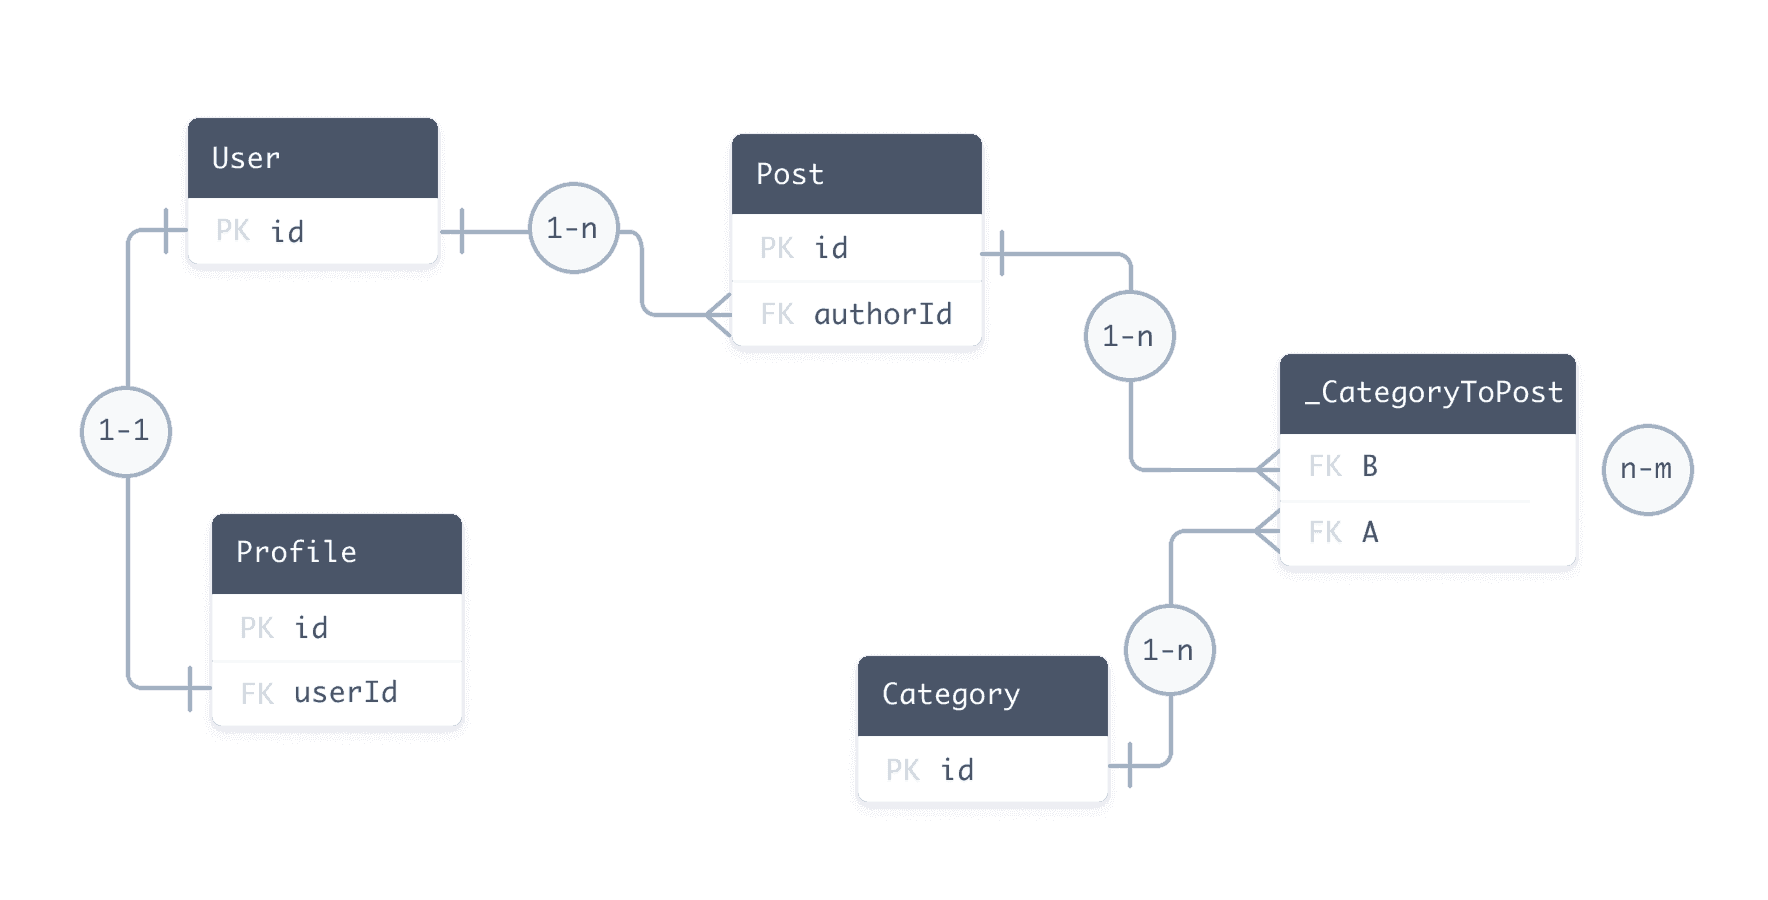
上面的完整 schema 包含三种常见关系。
# 一对一
User 和 Profile 是一对一关系:
model User {
  id        Int      @id @default(autoincrement())
  profile   Profile?
  createdAt DateTime @default(now())
  updatedAt DateTime @updatedAt
}

model Profile {
  id        Int      @id @default(autoincrement())
  bio       String
  user      User     @relation(fields: [userId], references: [id], onDelete: Cascade)
  userId    Int      @unique
  createdAt DateTime @default(now())
  updatedAt DateTime @updatedAt
}
2
3
4
5
6
7
8
9
10
11
12
13
14
15
Prisma 使用 @relation 定义关系
Profile.userId 是实际保存外键的关系标量字段,fields: [userId] 指定当前模型的外键,references: [id] 指定它引用 User.id。userId 必须使用 @unique,否则一个用户可以对应多个 Profile,就会变成一对多关系。
User.profile 使用 Profile?,表示用户可以暂时没有 Profile;Profile.user 没有 ?,表示每个 Profile 必须属于一个用户。删除用户时,onDelete: Cascade 会让数据库同时删除对应的 Profile。
# 一对多
User 和 Post 是一对多关系:
model User {
  id        Int      @id @default(autoincrement())
  posts     Post[]
  createdAt DateTime @default(now())
  updatedAt DateTime @updatedAt
}

model Post {
  id        Int      @id @default(autoincrement())
  title     String
  author    User     @relation(fields: [authorId], references: [id], onDelete: Cascade)
  authorId  Int
  createdAt DateTime @default(now())
  updatedAt DateTime @updatedAt

  @@index([authorId])
}
2
3
4
5
6
7
8
9
10
11
12
13
14
15
16
17
与一对一的区别是 User.posts 是数组类型 Post[]。
User.posts 是不保存到数据库的 Prisma 关系字段,真正的外键保存在 Post.authorId 中。
因为通常会通过 authorId 查询文章,所以给它添加了索引。
# 多对多
Post 和 Category 是多对多关系。一篇文章可以属于多个分类,一个分类也可以包含多篇文章:
model Post {
  id         Int        @id @default(autoincrement())
  categories Category[]
  createdAt  DateTime   @default(now())
  updatedAt  DateTime   @updatedAt
}

model Category {
  id        Int      @id @default(autoincrement())
  name      String   @unique
  posts     Post[]
  createdAt DateTime @default(now())
  updatedAt DateTime @updatedAt
}
2
3
4
5
6
7
8
9
10
11
12
13
14
这是 Prisma 的隐式多对多关系。两端都使用列表字段,Prisma Migrate 会自动创建和管理中间表,适合中间表不需要额外字段的场景。
如果需要记录分类的添加时间、排序或添加人,应改用显式中间模型:
model Post {
  id         Int                @id @default(autoincrement())
  categories CategoriesOnPosts[]
  createdAt  DateTime           @default(now())
  updatedAt  DateTime           @updatedAt
}

model Category {
  id        Int                @id @default(autoincrement())
  name      String             @unique
  posts     CategoriesOnPosts[]
  createdAt DateTime           @default(now())
  updatedAt DateTime           @updatedAt
}

model CategoriesOnPosts {
  post       Post     @relation(fields: [postId], references: [id], onDelete: Cascade)
  postId     Int
  category   Category @relation(fields: [categoryId], references: [id], onDelete: Cascade)
  categoryId Int
  assignedAt DateTime @default(now())
  updatedAt  DateTime @updatedAt

  @@id([postId, categoryId])
  @@index([categoryId])
}
2
3
4
5
6
7
8
9
10
11
12
13
14
15
16
17
18
19
20
21
22
23
24
25
26
@@id([postId, categoryId]) 使用两个外键组成复合主键,保证同一文章和分类只关联一次。
# 插入数据
Prisma Client 使用 create() 插入单条记录。下面在创建用户的同时创建 Profile 和文章,并为文章连接分类:
const user = await prisma.user.create({
  data: {
    email: "alice@example.com",
    name: "Alice",
    profile: {
      create: {
        bio: "TypeScript developer",
      },
    },
    posts: {
      create: {
        title: "Hello Prisma",
        content: "My first Prisma post",
        categories: {
          connectOrCreate: {
            where: {
              name: "Prisma",
            },
            create: {
              name: "Prisma",
            },
          },
        },
      },
    },
  },
  include: {
    profile: true,
    posts: {
      include: {
        categories: true,
      },
    },
  },
});
2
3
4
5
6
7
8
9
10
11
12
13
14
15
16
17
18
19
20
21
22
23
24
25
26
27
28
29
30
31
32
33
34
35
这是一个 Nested write (opens new window)。创建 User、Profile、Post 和 Category 的操作在同一个事务中执行,只要其中一步失败,之前的写入都会回滚。
关系数据常用以下几种写法:
create:创建一条新的关联记录。createMany:批量创建一对多关系中的记录,但不能继续嵌套创建更深层关系。connect:通过唯一字段连接已经存在的记录。connectOrCreate:记录存在时连接,不存在时创建。
如果“Prisma”分类已经存在,也可以直接使用 connect:
const post = await prisma.post.create({
  data: {
    title: "Prisma Relations",
    author: {
      connect: {
        email: "alice@example.com",
      },
    },
    categories: {
      connect: [
        { name: "Prisma" },
        { name: "TypeScript" },
      ],
    },
  },
});
2
3
4
5
6
7
8
9
10
11
12
13
14
15
16
connect 的条件必须能唯一定位记录,因此前面的 User.email 和 Category.name 都定义了 @unique。如果目标记录不存在,整个操作会失败。
# 批量插入
PostgreSQL 可以使用 createMany() 一次插入多条记录:
const result = await prisma.category.createMany({
  data: [
    { name: "Prisma" },
    { name: "Next.js" },
    { name: "PostgreSQL" },
  ],
  skipDuplicates: true,
});

console.log(result.count);
2
3
4
5
6
7
8
9
10
skipDuplicates: true 会跳过违反唯一约束的记录。createMany() 返回写入数量,如果还需要返回创建后的记录,可以使用 createManyAndReturn():
const categories = await prisma.category.createManyAndReturn({
  data: [
    { name: "React" },
    { name: "Vue" },
  ],
  skipDuplicates: true,
  select: {
    id: true,
    name: true,
  },
});
2
3
4
5
6
7
8
9
10
11
createManyAndReturn() 支持 PostgreSQL、CockroachDB 和 SQLite,但返回顺序不一定和输入顺序相同。顶层 createMany()、createManyAndReturn() 不能使用嵌套的 create、connect 或 connectOrCreate 创建关系数据;复杂的关联写入应使用 create() 的 nested write,或者拆分后放入 $transaction()。
# 更新数据
Prisma Client 使用 update() 更新一条记录,where 同样必须使用唯一字段:
const post = await prisma.post.update({
  where: {
    id: 1,
  },
  data: {
    title: "Prisma Relations Guide",
    published: true,
    categories: {
      connect: {
        name: "PostgreSQL",
      },
    },
  },
  include: {
    categories: true,
  },
});
2
3
4
5
6
7
8
9
10
11
12
13
14
15
16
17
更新文章时,updatedAt 会因为 Schema 中的 @updatedAt 自动更新。关系字段除了 connect,还支持:
disconnect:解除关联,但不删除关联记录。set:用新的关系列表替换现有关系。delete:删除关联记录。update、upsert:更新关联记录,或者不存在时创建。
例如更新用户 Profile:
const user = await prisma.user.update({
  where: {
    email: "alice@example.com",
  },
  data: {
    profile: {
      upsert: {
        create: {
          bio: "Next.js developer",
        },
        update: {
          bio: "Next.js and Prisma developer",
        },
      },
    },
  },
  include: {
    profile: true,
  },
});
2
3
4
5
6
7
8
9
10
11
12
13
14
15
16
17
18
19
20
# 批量更新
updateMany() 根据条件更新多条记录,并返回受影响的行数:
const result = await prisma.post.updateMany({
  where: {
    authorId: 1,
    published: false,
  },
  data: {
    published: true,
  },
});

console.log(`更新了 ${result.count} 篇文章`);
2
3
4
5
6
7
8
9
10
11
如果希望同时返回更新后的记录,PostgreSQL 可以使用 updateManyAndReturn():
const posts = await prisma.post.updateManyAndReturn({
  where: {
    authorId: 1,
    published: false,
  },
  data: {
    published: true,
  },
  select: {
    id: true,
    title: true,
    published: true,
  },
});
2
3
4
5
6
7
8
9
10
11
12
13
14
和 createManyAndReturn() 一样,updateManyAndReturn() 不支持 relationLoadStrategy: "join"。
# Upsert
upsert() 表示“存在则更新,不存在则创建”,适合按唯一字段同步数据:
const user = await prisma.user.upsert({
  where: {
    email: "bob@example.com",
  },
  update: {
    name: "Bobby",
  },
  create: {
    email: "bob@example.com",
    name: "Bob",
    role: "USER",
  },
});
2
3
4
5
6
7
8
9
10
11
12
13
# 删除数据
使用 delete() 删除一条记录:
const post = await prisma.post.delete({
  where: {
    id: 1,
  },
});
2
3
4
5
使用 deleteMany() 按条件批量删除:
const result = await prisma.post.deleteMany({
  where: {
    published: false,
    createdAt: {
      lt: new Date("2026-01-01"),
    },
  },
});

console.log(`删除了 ${result.count} 篇草稿`);
2
3
4
5
6
7
8
9
10
# 级联删除
Schema 中 Profile.user 和 Post.author 都设置了 onDelete: Cascade:
user User @relation(fields: [userId], references: [id], onDelete: Cascade)
因此删除 User 时,PostgreSQL 会自动删除该用户的 Profile 和 Post。隐式多对多关系中与这些 Post 关联的中间表记录也会被清理,但 Category 本身不会被删除,因为它还可能属于其他文章。
级联删除不可恢复,使用前应确认它符合业务规则。如果没有配置级联操作,删除仍被其他记录引用的 User 会触发外键约束错误。这时可以使用交互式事务,按照依赖顺序显式删除:
await prisma.$transaction(async (tx) => {
  const user = await tx.user.findUniqueOrThrow({
    where: {
      email: "alice@example.com",
    },
    select: {
      id: true,
    },
  });

  await tx.post.deleteMany({
    where: {
      authorId: user.id,
    },
  });

  await tx.profile.deleteMany({
    where: {
      userId: user.id,
    },
  });

  await tx.user.delete({
    where: {
      id: user.id,
    },
  });
});
2
3
4
5
6
7
8
9
10
11
12
13
14
15
16
17
18
19
20
21
22
23
24
25
26
27
28
事务中的任意操作失败时,所有删除都会回滚。
# 查询数据
Prisma Client 为每个模型生成了类型安全的查询方法:
findUnique():使用主键或唯一字段查询一条记录。findUniqueOrThrow():找不到记录时抛出PrismaClientKnownRequestError。findFirst():返回满足条件和排序规则的第一条记录。findMany():返回满足条件的记录数组。
# 查询单条记录
通过唯一邮箱查询用户:
const user = await prisma.user.findUnique({
  where: {
    email: "alice@example.com",
  },
});
2
3
4
5
findUnique() 找不到记录时返回 null。如果业务上要求记录必须存在,可以使用 findUniqueOrThrow():
const user = await prisma.user.findUniqueOrThrow({
  where: {
    id: 1,
  },
});
2
3
4
5
findFirst() 适合查询“满足条件的第一条记录”。例如查询 Alice 最近发布的文章:
const latestPost = await prisma.post.findFirst({
  where: {
    author: {
      email: "alice@example.com",
    },
    published: true,
  },
  orderBy: {
    createdAt: "desc",
  },
});
2
3
4
5
6
7
8
9
10
11
# 选择返回字段
默认情况下,Prisma 返回模型的所有标量字段,但不会自动加载关系。可以使用 select 只返回需要的字段:
const users = await prisma.user.findMany({
  select: {
    id: true,
    email: true,
    role: true,
  },
});
2
3
4
5
6
7
返回类型会根据 select 自动缩小为:
const users: {
  id: number;
  email: string;
  role: Role;
}[];
2
3
4
5
还可以用 omit 排除敏感或不需要的字段:
const users = await prisma.user.findMany({
  omit: {
    updatedAt: true,
  },
});
2
3
4
5
# 过滤
findMany() 使用 where 过滤数据。Prisma 提供 equals、in、lt、lte、gt、gte、contains、startsWith、endsWith 等过滤条件,并使用 AND、OR、NOT 组合条件。
下面查询标题包含 “prisma”、已经发布,并且属于 “Prisma” 或 “PostgreSQL” 分类的文章:
const posts = await prisma.post.findMany({
  where: {
    title: {
      contains: "prisma",
      mode: "insensitive",
    },
    published: true,
    categories: {
      some: {
        name: {
          in: ["Prisma", "PostgreSQL"],
        },
      },
    },
    OR: [
      {
        content: {
          not: null,
        },
      },
      {
        author: {
          role: "ADMIN",
        },
      },
    ],
  },
});
2
3
4
5
6
7
8
9
10
11
12
13
14
15
16
17
18
19
20
21
22
23
24
25
26
27
28
some、every、none 用于过滤一对多或多对多关系:
some:至少一条关联记录满足条件。every:所有关联记录都满足条件。none:没有关联记录满足条件。
对于一对一关系,可以使用 is 和 isNot:
const users = await prisma.user.findMany({
  where: {
    profile: {
      is: {
        bio: {
          contains: "TypeScript",
        },
      },
    },
  },
});
2
3
4
5
6
7
8
9
10
11
# 排序
使用 orderBy 排序。传入数组可以指定多级排序:
const posts = await prisma.post.findMany({
  where: {
    published: true,
  },
  orderBy: [
    {
      createdAt: "desc",
    },
    {
      id: "desc",
    },
  ],
});
2
3
4
5
6
7
8
9
10
11
12
13
第二个 id 排序能在 createdAt 相同时保持稳定顺序。
# 查询关系数据
使用 include 加载关系数据。下面查询用户、Profile、文章以及文章分类:
const users = await prisma.user.findMany({
  include: {
    profile: true,
    posts: {
      where: {
        published: true,
      },
      orderBy: {
        createdAt: "desc",
      },
      include: {
        categories: true,
      },
    },
    _count: {
      select: {
        posts: true,
      },
    },
  },
});
2
3
4
5
6
7
8
9
10
11
12
13
14
15
16
17
18
19
20
21
返回结果的结构大致如下:
[
  {
    "id": 1,
    "email": "alice@example.com",
    "name": "Alice",
    "role": "USER",
    "createdAt": "2026-04-27T02:00:00.000Z",
    "updatedAt": "2026-04-27T02:00:00.000Z",
    "profile": {
      "id": 1,
      "bio": "TypeScript developer",
      "userId": 1,
      "createdAt": "2026-04-27T02:00:00.000Z",
      "updatedAt": "2026-04-27T02:00:00.000Z"
    },
    "posts": [
      {
        "id": 1,
        "title": "Hello Prisma",
        "content": "My first Prisma post",
        "published": true,
        "authorId": 1,
        "createdAt": "2026-04-27T02:10:00.000Z",
        "updatedAt": "2026-04-27T02:10:00.000Z",
        "categories": [
          {
            "id": 1,
            "name": "Prisma",
            "createdAt": "2026-04-27T02:05:00.000Z",
            "updatedAt": "2026-04-27T02:05:00.000Z"
          }
        ]
      }
    ],
    "_count": {
      "posts": 1
    }
  }
]
2
3
4
5
6
7
8
9
10
11
12
13
14
15
16
17
18
19
20
21
22
23
24
25
26
27
28
29
30
31
32
33
34
35
36
37
38
39
不能在同一级参数中同时使用 select 和 include。如果既想限制用户字段,又想加载文章,应在 select 中选择关系:
const users = await prisma.user.findMany({
  select: {
    id: true,
    name: true,
    posts: {
      select: {
        id: true,
        title: true,
      },
    },
  },
});
2
3
4
5
6
7
8
9
10
11
12
# 分页
Prisma 支持偏移分页和游标分页。
# 偏移分页
偏移分页使用 skip 和 take,适合页数不深、需要直接跳到指定页的场景:
async function getPosts(page = 1, pageSize = 10) {
  return prisma.post.findMany({
    where: {
      published: true,
    },
    orderBy: {
      createdAt: "desc",
    },
    skip: (page - 1) * pageSize,
    take: pageSize,
  });
}
2
3
4
5
6
7
8
9
10
11
12
它的优点是实现简单,可以直接跳转到任意页;缺点是偏移量很大时,数据库仍需要扫描并跳过前面的记录。翻页期间如果有记录插入或删除,还可能出现重复或遗漏。
# 游标分页
游标分页从上一页最后一条记录继续查询,更适合 Feed、时间线和大数据集:
async function getNextPosts(cursor?: number, pageSize = 10) {
  return prisma.post.findMany({
    where: {
      published: true,
    },
    orderBy: {
      id: "asc",
    },
    take: pageSize,
    ...(cursor
      ? {
          skip: 1,
          cursor: {
            id: cursor,
          },
        }
      : {}),
  });
}
2
3
4
5
6
7
8
9
10
11
12
13
14
15
16
17
18
19
cursor 必须使用唯一且有序的字段。skip: 1 用于跳过游标本身,否则上一页最后一条记录会再次出现。
# 统计与分组
使用 count() 统计记录数量:
const publishedCount = await prisma.post.count({
  where: {
    published: true,
  },
});
2
3
4
5
使用 aggregate() 一次获得多个统计值:
const result = await prisma.post.aggregate({
  where: {
    published: true,
  },
  _count: {
    _all: true,
  },
  _max: {
    createdAt: true,
  },
  _min: {
    createdAt: true,
  },
});
2
3
4
5
6
7
8
9
10
11
12
13
14
使用 groupBy() 按字段分组。例如分别统计草稿和已发布文章数量:
const result = await prisma.post.groupBy({
  by: ["published"],
  _count: {
    _all: true,
  },
  orderBy: {
    published: "asc",
  },
});
2
3
4
5
6
7
8
9
# 事务
如果多个彼此独立的操作必须全部成功,可以使用 $transaction([])。分页接口经常需要同时查询当前页和总数:
const page = 2;
const pageSize = 10;
const where = {
  published: true,
};

const [posts, total] = await prisma.$transaction([
  prisma.post.findMany({
    where,
    orderBy: {
      createdAt: "desc",
    },
    skip: (page - 1) * pageSize,
    take: pageSize,
  }),
  prisma.post.count({
    where,
  }),
]);

const result = {
  data: posts,
  page,
  pageSize,
  total,
  totalPages: Math.ceil(total / pageSize),
};
2
3
4
5
6
7
8
9
10
11
12
13
14
15
16
17
18
19
20
21
22
23
24
25
26
27
需要在操作之间传递数据或编写条件逻辑时,使用前面删除章节展示的交互式事务 prisma.$transaction(async (tx) => {})。事务应尽量保持简短,避免在事务回调中执行网络请求或耗时操作。
# 数据库迁移
随着业务迭代,数据库表结构会不断变化,例如新增表、增加字段、创建索引或修改约束。数据库迁移把这些变化保存为按顺序执行的 SQL 文件,使不同开发环境、测试环境和生产环境可以复现相同的数据库结构。
Prisma Migrate 的常用命令可以分成两组:
- 开发环境:
prisma migrate dev,根据 Schema 变化创建并应用迁移。 - 测试/生产环境:
prisma migrate deploy,只应用已经提交的迁移文件。
# migrate dev
修改 schema.prisma 后,使用 migrate dev 创建迁移:
$ npx prisma migrate dev --name add_post_slug
migrate dev 会完成以下工作:
- 在 shadow database 中重新执行已有迁移,检测 schema drift。
- 对比当前 Prisma Schema 和数据库结构。
- 在
prisma/migrations下生成新的 SQL 迁移文件。 - 把尚未应用的迁移执行到开发数据库。
- 在数据库的
_prisma_migrations表中记录迁移状态。
migrate dev 只应该在开发环境中运行。在 Prisma 7 中,它不会再自动执行 prisma generate 或 seed,需要时应显式运行:
$ npx prisma generate
# 先检查再应用迁移
自动生成的 SQL 应在应用前进行检查,特别是删除列、修改字段类型、添加非空字段等可能丢失数据的操作。使用 --create-only 只生成迁移文件,不立即应用:
$ npx prisma migrate dev --name add_post_slug --create-only
假设要给已有数据的 Post 添加一个必填 slug,直接添加 slug String @unique 会因为旧记录没有值而失败。更安全的方式是分阶段迁移。
1. 先添加可选字段
model Post {
  id         Int        @id @default(autoincrement())
  title      String
  slug       String?    @unique
  content    String?
  published  Boolean    @default(false)
  author     User       @relation(fields: [authorId], references: [id], onDelete: Cascade)
  authorId   Int
  categories Category[]
  createdAt  DateTime   @default(now())
  updatedAt  DateTime   @updatedAt

  @@index([authorId])
  @@index([published, createdAt])
}
2
3
4
5
6
7
8
9
10
11
12
13
14
15
生成并检查 SQL,然后应用:
$ npx prisma migrate dev --name add_optional_post_slug --create-only
$ npx prisma migrate dev
2
2. 回填已有数据
可以在迁移文件中加入自定义 SQL,或者用单独的数据迁移脚本回填。PostgreSQL 的简单示例如下:
UPDATE "Post"
SET "slug" = 'post-' || "id"
WHERE "slug" IS NULL;
2
3
3. 改为必填字段
确认所有旧数据都有 slug 后,把字段改成 slug String @unique,再创建第二个迁移:
$ npx prisma migrate dev --name require_post_slug --create-only
检查生成的 SQL 是否只包含预期变化,然后运行 npx prisma migrate dev 应用迁移。不要修改已经在共享环境中应用过的迁移文件;如果需要修正,应新增迁移。
# migrate deploy
将 prisma/migrations 和应用代码一起提交,在 staging 或生产环境中执行:
$ npx prisma migrate deploy
migrate deploy 只会应用尚未执行的迁移,不会根据 Schema 生成迁移、检测 drift 或重置数据库,也不需要 shadow database。它适合放在 CI/CD 部署流程中。
生产迁移建议遵循以下流程:
- 在开发环境生成迁移,并人工检查 SQL。
- 使用接近生产数据规模的 staging 环境验证迁移和应用兼容性。
- 对删除列、修改类型等高风险操作准备备份和回滚方案。
- 部署时执行
prisma migrate deploy。 - 部署后检查迁移状态和关键查询。
# migrate status
migrate status 会对比本地 prisma/migrations 目录和数据库中的 _prisma_migrations 表:
$ npx prisma migrate status
它可以发现尚未应用的迁移、数据库中存在但本地缺失的迁移,以及失败的迁移,适合部署前后检查状态。
# migrate diff
migrate diff 用于比较两个 Schema 来源。下面比较 prisma.config.ts 中配置的数据库和当前 Prisma Schema,并输出 SQL:
$ npx prisma migrate diff \
    --from-config-datasource \
    --to-schema prisma/schema.prisma \
    --script
2
3
4
这个命令适合排查 schema drift、预览差异或辅助处理 hotfix。它只负责比较并输出差异,不会自动应用 SQL。Prisma 7 使用 --from-config-datasource 和 --to-config-datasource 读取配置中的 datasource。
# db push
db push 直接把 Prisma Schema 同步到数据库,不生成迁移文件:
$ npx prisma db push
它适合快速原型、本地实验和不需要保留变更历史的项目。因为没有可审查、可追踪的迁移历史,团队项目和生产环境通常应该使用 migrate dev + migrate deploy。
如果 Prisma 检测到潜在数据丢失,db push 会发出警告。不要在不了解后果时使用 --accept-data-loss 或 --force-reset。Prisma 7 的 db push 也不会自动执行 prisma generate。
# Prisma Studio
Prisma Studio 是一个浏览器中的数据库编辑器,可以查看、过滤、新增、修改和删除 Prisma 模型中的数据:
$ npx prisma studio
它会读取 prisma.config.ts、schema.prisma 和 datasource 配置,然后启动本地 Web 服务并打开浏览器。
如果配置文件不在默认位置,可以通过 --config 指定:
$ npx prisma studio --config ./prisma.config.ts
Prisma Studio 很适合在本地开发时检查关联数据、验证迁移结果和手动准备测试数据。它可以直接修改数据库,因此连接生产数据库时必须格外谨慎,也不应该把未受身份验证和网络访问控制保护的 Studio 暴露到公网。
# References
- Prisma (opens new window)
- Prisma Schema (opens new window)
- Prisma Client CRUD (opens new window)
- Prisma Relation Queries (opens new window)
- Prisma Filtering and Sorting (opens new window)
- Prisma Pagination (opens new window)
- Prisma Aggregation and Grouping (opens new window)
- Prisma Transactions (opens new window)
- Prisma Migrate (opens new window)
- Prisma Studio (opens new window)
- Prisma Client API reference (opens new window)
- Drizzle ORM (opens new window)
- NPM Trends - Prisma vs Drizzle ORM (opens new window)
- PostgreSQL 17.5 Documentation (opens new window)
postgres.js(opens new window)node-postgres(opens new window)